Aaron`s 的职业路径

gitGraph TB:
  commit id:"Graduate From High School" tag:"Linfen, China"
  commit id:"Got Driver Licence" tag:"2013.08"
  branch TYUT
  commit id:"Enrollment TYUT"  tag:"Taiyuan, China"
  commit id:"Develop Game App" tag:"“Hello Hell”" type: HIGHLIGHT
  commit id:"Plan:3+1" tag:"2016.09"
  branch Briup.Ltd
  commit id:"First Internship" tag:"Suzhou, China"
  commit id:"CRUD boy" 
  commit id:"Dimission" tag:"2017.01" type:REVERSE
  checkout TYUT
  merge Briup.Ltd id:"Final Presentation" tag:"2017.04"
  checkout Briup.Ltd
  branch Enjoyor.PLC
  commit id:"Second Internship" tag:"Hangzhou,China"
  checkout TYUT
  merge Enjoyor.PLC id:"Got SE Bachelor Degree " tag:"2017.07"
  checkout Enjoyor.PLC
  commit id:"First Full Time Job" tag:"2017.07"
  commit id:"Dimssion" tag:"2018.04"
  checkout main
  merge Enjoyor.PLC id:"Plan To Study Aboard"
  commit id:"Get Some Rest" tag:"2018.06"
  branch TOEFL-GRE
  commit id:"Learning At Huahua.Ltd" tag:"Beijing,China"
  commit id:"Got USC Admission" tag:"2018.11" type: HIGHLIGHT
  checkout main
  merge TOEFL-GRE id:"Prepare To Leave" tag:"2018.12"
  branch USC
  commit id:"Pass Pre-School" tag:"Los Angeles,USA"
  checkout main
  merge USC id:"Back Home,Summer Break" tag:"2019.06"
  commit id:"Back School" tag:"2019.07"
  checkout USC
  merge main id:"Got Straight As"
  commit id:"Leaning ML, DL, GPT"
  checkout main
  merge USC id:"Back,Due to COVID-19" tag:"2021.02"
  checkout USC
  commit id:"Got DS Master Degree" tag:"2021.05"
  checkout main
  commit id:"Got An offer" tag:"2021.06"
  branch Zhejianglab
  commit id:"Second Full Time" tag:"Hangzhou,China"
  commit id:"Got Promotion" tag:"2024.01"
  commit id:"For Now"
2024年3月7日

Aaron`s 的职业路径 的子部分

🧯备份及恢复 的子部分

ElasticSearch

2024年3月7日

Git

2024年3月7日

Minio

2024年3月7日

N8N

2024年3月7日

☁️CSP Related 的子部分

Aliyun 的子部分

OSSutil

阿里版本的 Minio(https://min.io/)

下载 ossutil

首先,你需要下载 ossutil 二进制文件

OS:
curl https://gosspublic.alicdn.com/ossutil/install.sh  | sudo bash
curl -o ossutil-v1.7.19-windows-386.zip https://gosspublic.alicdn.com/ossutil/1.7.19/ossutil-v1.7.19-windows-386.zip

配置 ossutil

./ossutil config
Params Description Instruction
endpoint the Endpoint of the region where the Bucket is located 通过OSS页面找到endpoin 地址
accessKeyID OSS AccessKey 通过用户中心找到accessKey
accessKeySecret OSS AccessKeySecret 通过用户中心找到accessKeySecret
stsToken token for sts service 可以为空
信息

您还可以直接修改 /home/<$user>/.ossutilconfig 文件来配置ossutil。

展示文件

ossutil ls oss://<$PATH>
For exmaple
ossutil ls oss://csst-data/CSST-20240312/dfs/

下载文件/文件夹

你能用 cp 上传或者下载文件

ossutil cp -r oss://<$PATH> <$PTHER_PATH>
For exmaple
ossutil cp -r oss://csst-data/CSST-20240312/dfs/ /data/nfs/data/pvc... #从OSS下载文件到本地/data/nfs/data/pvc...

上传文件/文件夹

ossutil cp -r <$SOURCE_PATH> oss://<$PATH>
For exmaple
ossutil cp -r /data/nfs/data/pvc/a.txt  oss://csst-data/CSST-20240312/dfs/b.txt #从本地上传文件到OSS
2024年3月24日

ECS

Apsara Stack (Aliyun Directed Cloud)

Append content in /etc/resolv.conf

nameserver 172.27.205.79

And then restart kube-system.coredns-xxxx

2024年3月14日

Zhejianglab 的子部分

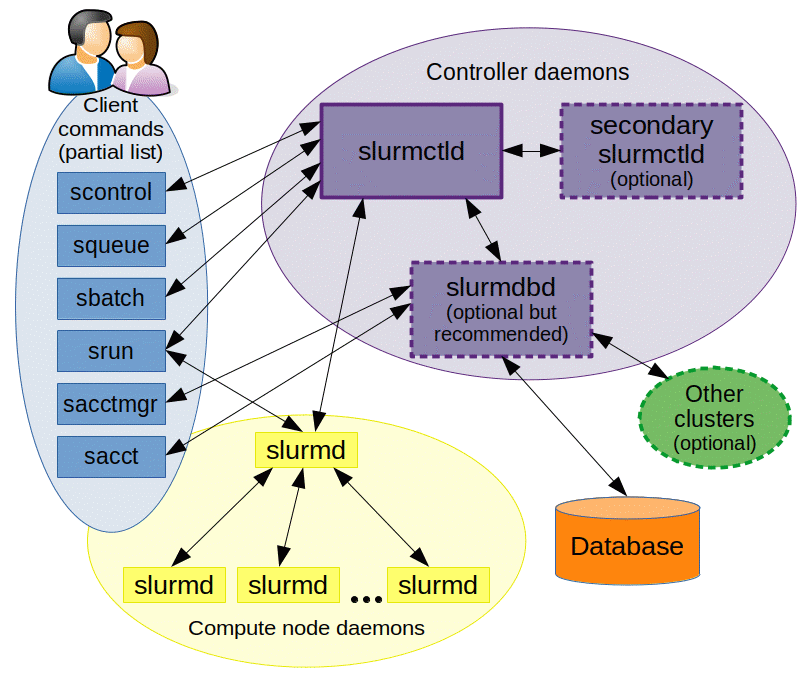
👨‍💻Schedmd Slurm

The Slurm Workload Manager, formerly known as Simple Linux Utility for Resource Management (SLURM), or simply Slurm, is a free and open-source job scheduler for Linux and Unix-like kernels, used by many of the world’s supercomputers and computer clusters.

It provides three key functions:

  • allocating exclusive and/or non-exclusive access to resources (computer nodes) to users for some duration of time so they can perform work,
  • providing a framework for starting, executing, and monitoring work, typically a parallel job such as Message Passing Interface (MPI) on a set of allocated nodes, and
  • arbitrating contention for resources by managing a queue of pending jobs.

func1 func1

Content

2024年8月7日

👨‍💻Schedmd Slurm 的子部分

Build & Install

2024年8月7日

CheatSheet

2024年8月7日

CheatSheet 的子部分

File Operations

文件分发

  • sbcast 用于将文件从提交节点分发到计算节点。它特别适用于需要将大量或较大的数据文件分发到多个计算节点的情况,能够减少分发时间并提高效率。
    • 特性
      1. 快速分发文件:将文件快速复制到作业分配的所有计算节点,避免手动分发文件的麻烦。比传统的 scp 或 rsync 更快,尤其是在分发到多个节点时。
      2. 简化作业脚本:自动处理文件分发,使作业脚本更简洁。
      3. 提高效率:通过并行传输提高文件分发速度,尤其是对大文件或多个文件的分发。
    • 用例
      1. 单独使用
      sbcast <source_file> <destination_path>
      1. 嵌入作业脚本
      #!/bin/bash
      #SBATCH --job-name=example_job
      #SBATCH --output=example_job.out
      #SBATCH --error=example_job.err
      #SBATCH --partition=compute
      #SBATCH --nodes=4
      
      # 使用 sbcast 将文件分发到每个节点的 /tmp 目录
      sbcast data.txt /tmp/data.txt
      
      # 执行你的程序,使用分发的文件
      srun my_program /tmp/data.txt

文件收集

  1. 重定向 在提交作业时,可以使用 #SBATCH –output 和 #SBATCH –error 指令将标准输出和标准错误重定向到指定文件

     #SBATCH --output=output.txt
     #SBATCH --error=error.txt

    或者

    sbatch -N2 -w "compute[01-02]" -o result/file/path xxx.slurm
  2. 手动发送目标地址 在提交作业时,在作业中使用 scp 或 rsync 将文件从计算节点复制到提交节点

  3. 使用NFS 如果计算集群中配置了共享文件系统(如 NFS、Lustre 或 GPFS),可以直接将结果文件写入共享目录。这样,所有节点生成的结果文件会自动存储在同一个位置

  4. 使用sbcast

2024年8月7日

Configuration Files

2024年8月7日

MPI Libs

2024年8月7日

🧪Demo 的子部分

Game

2024年8月7日

Game 的子部分

LOL游戏助手

使用深度学习方法,帮你赢得游戏

State Machine Event Bus Python 3.6 TensorFlow2 Captain 信息New Awesome

应用截图

这款应用程序共有四项功能

  1. 监控识别LOL游戏应用程序,并判断当前游戏处在什么样的运行状态
    func1 func1

  2. 第二个是推荐一些英雄来玩。根据你的敌方队伍已经禁用的英雄,这个工具会为你提供三个推荐选项来帮你提前针对你的敌人,获得先发优势。
    func2 func2

  3. 第三个功能将扫描小地图,当有人向你走来时,会弹出一个通知窗口来提醒你。
    func3 func3

  4. 最后一个功能将根据敌人的装备列表为您提供一些装备推荐。
    fun4 fun4

应用架构

mvc mvc

视频链接

在 Bilibili 上观看

在 Youtube 上观看

Repo

可以通过 github 或者 gitlab 获得原始代码。

2021年3月8日

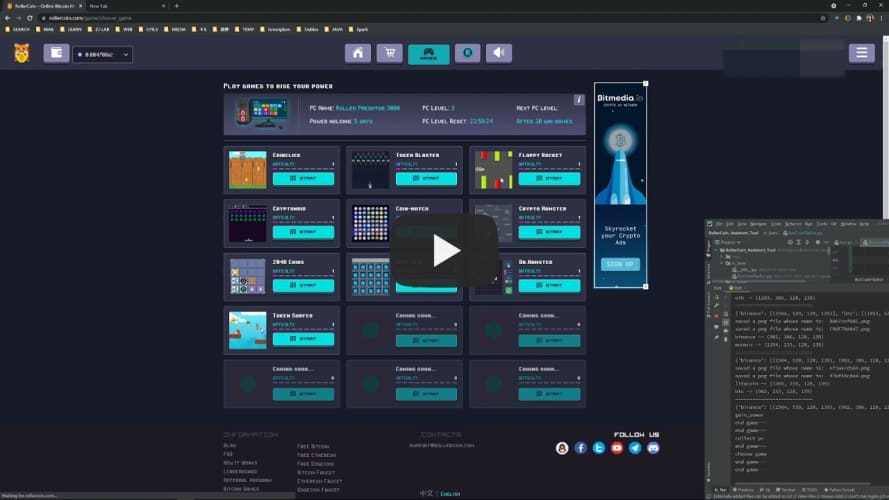
Roller Coin Assistant

Using deep learning techniques to help you to mining the cryptos, such as BTC, ETH and DOGE.

ScreenShots

There are two main funcs in this tool.

  1. Help you to crack the game, go Watch Video

RollerCoin Game Cracker RollerCoin Game Cracker

  • only support ‘Coin-Flip’ Game for now. (I know, rollercoin.com has lower down the benefit from this game, thats why I make the repo public. update)
  1. Help you to pass the geetest.

How to use

  1. open a web browser.
  2. go to this link https://rollercoin.com, and create an account.(https://rollercoin.com)
  3. keep the lang equals to ‘English’ (you can click the bottom button to change it).
  4. click the ‘Game’ button.
  5. start the application, and enjoy it.

Tips

  1. only supprot 1920*1080, 2560*1440 and higher resolution screen.
  2. and if you use 1920*1080 screen, strongly recommend you to fullscreen you web browser.

Checkout in Bilibili

Checkout in Youtube

2023年3月8日

HPC

2024年8月7日

Plugins

2024年8月7日

Plugins 的子部分

Flink S3 F3 Multiple

Normally, Flink only can access one S3 endpoint during the runtime. But we need to process some files from multiple minio simultaneously.

So I modified the original flink-s3-fs-hadoop and enable flink to do so.

StreamExecutionEnvironment env = StreamExecutionEnvironment.getExecutionEnvironment();
env.enableCheckpointing(5000L, CheckpointingMode.EXACTLY_ONCE);
env.setParallelism(1);
env.setStateBackend(new HashMapStateBackend());
env.getCheckpointConfig().setCheckpointStorage("file:///./checkpoints");

final FileSource<String> source =
    FileSource.forRecordStreamFormat(
            new TextLineInputFormat(),
            new Path(
                "s3u://admin:ZrwpsezF1Lt85dxl@10.11.33.132:9000/user-data/home/conti/2024-02-08--10"))
        .build();

final FileSource<String> source2 =
    FileSource.forRecordStreamFormat(
            new TextLineInputFormat(),
            new Path(
                "s3u://minioadmin:minioadmin@10.101.16.72:9000/user-data/home/conti"))
        .build();

env.fromSource(source, WatermarkStrategy.noWatermarks(), "file-source")
    .union(env.fromSource(source2, WatermarkStrategy.noWatermarks(), "file-source2"))
    .print("union-result");
    
env.execute();
original usage example

using default flink-s3-fs-hadoop, the configuration value will set into Hadoop configuration map. Only one value functioning at the same, there is no way for user to operate different in single one job context.

Configuration pluginConfiguration = new Configuration();
pluginConfiguration.setString("s3a.access-key", "admin");
pluginConfiguration.setString("s3a.secret-key", "ZrwpsezF1Lt85dxl");
pluginConfiguration.setString("s3a.connection.maximum", "1000");
pluginConfiguration.setString("s3a.endpoint", "http://10.11.33.132:9000");
pluginConfiguration.setBoolean("s3a.path.style.access", Boolean.TRUE);
FileSystem.initialize(
    pluginConfiguration, PluginUtils.createPluginManagerFromRootFolder(pluginConfiguration));

StreamExecutionEnvironment env = StreamExecutionEnvironment.getExecutionEnvironment();
env.enableCheckpointing(5000L, CheckpointingMode.EXACTLY_ONCE);
env.setParallelism(1);
env.setStateBackend(new HashMapStateBackend());
env.getCheckpointConfig().setCheckpointStorage("file:///./checkpoints");

final FileSource<String> source =
    FileSource.forRecordStreamFormat(
            new TextLineInputFormat(), new Path("s3a://user-data/home/conti/2024-02-08--10"))
        .build();
env.fromSource(source, WatermarkStrategy.noWatermarks(), "file-source").print();

env.execute();

Usage

There

Install From

For now, you can directly download flink-s3-fs-hadoop-$VERSION.jar and load in your project.
$VERSION is the flink version you are using.

​
  implementation(files("flink-s3-fs-hadoop-$flinkVersion.jar"))
  <dependency>
      <groupId>org.apache</groupId>
      <artifactId>flink</artifactId>
      <version>$flinkVersion</version>
      <systemPath>${project.basedir}flink-s3-fs-hadoop-$flinkVersion.jar</systemPath>
  </dependency>
the jar we provided was based on original flink-s3-fs-hadoop plugin, so you should use original protocal prefix s3a://

Or maybe you can wait from the PR, after I mereged into flink-master, you don't need to do anything, just update your flink version.
and directly use s3u://

2024年3月8日

Stream

2024年8月7日

Stream 的子部分

Cosmic Antenna

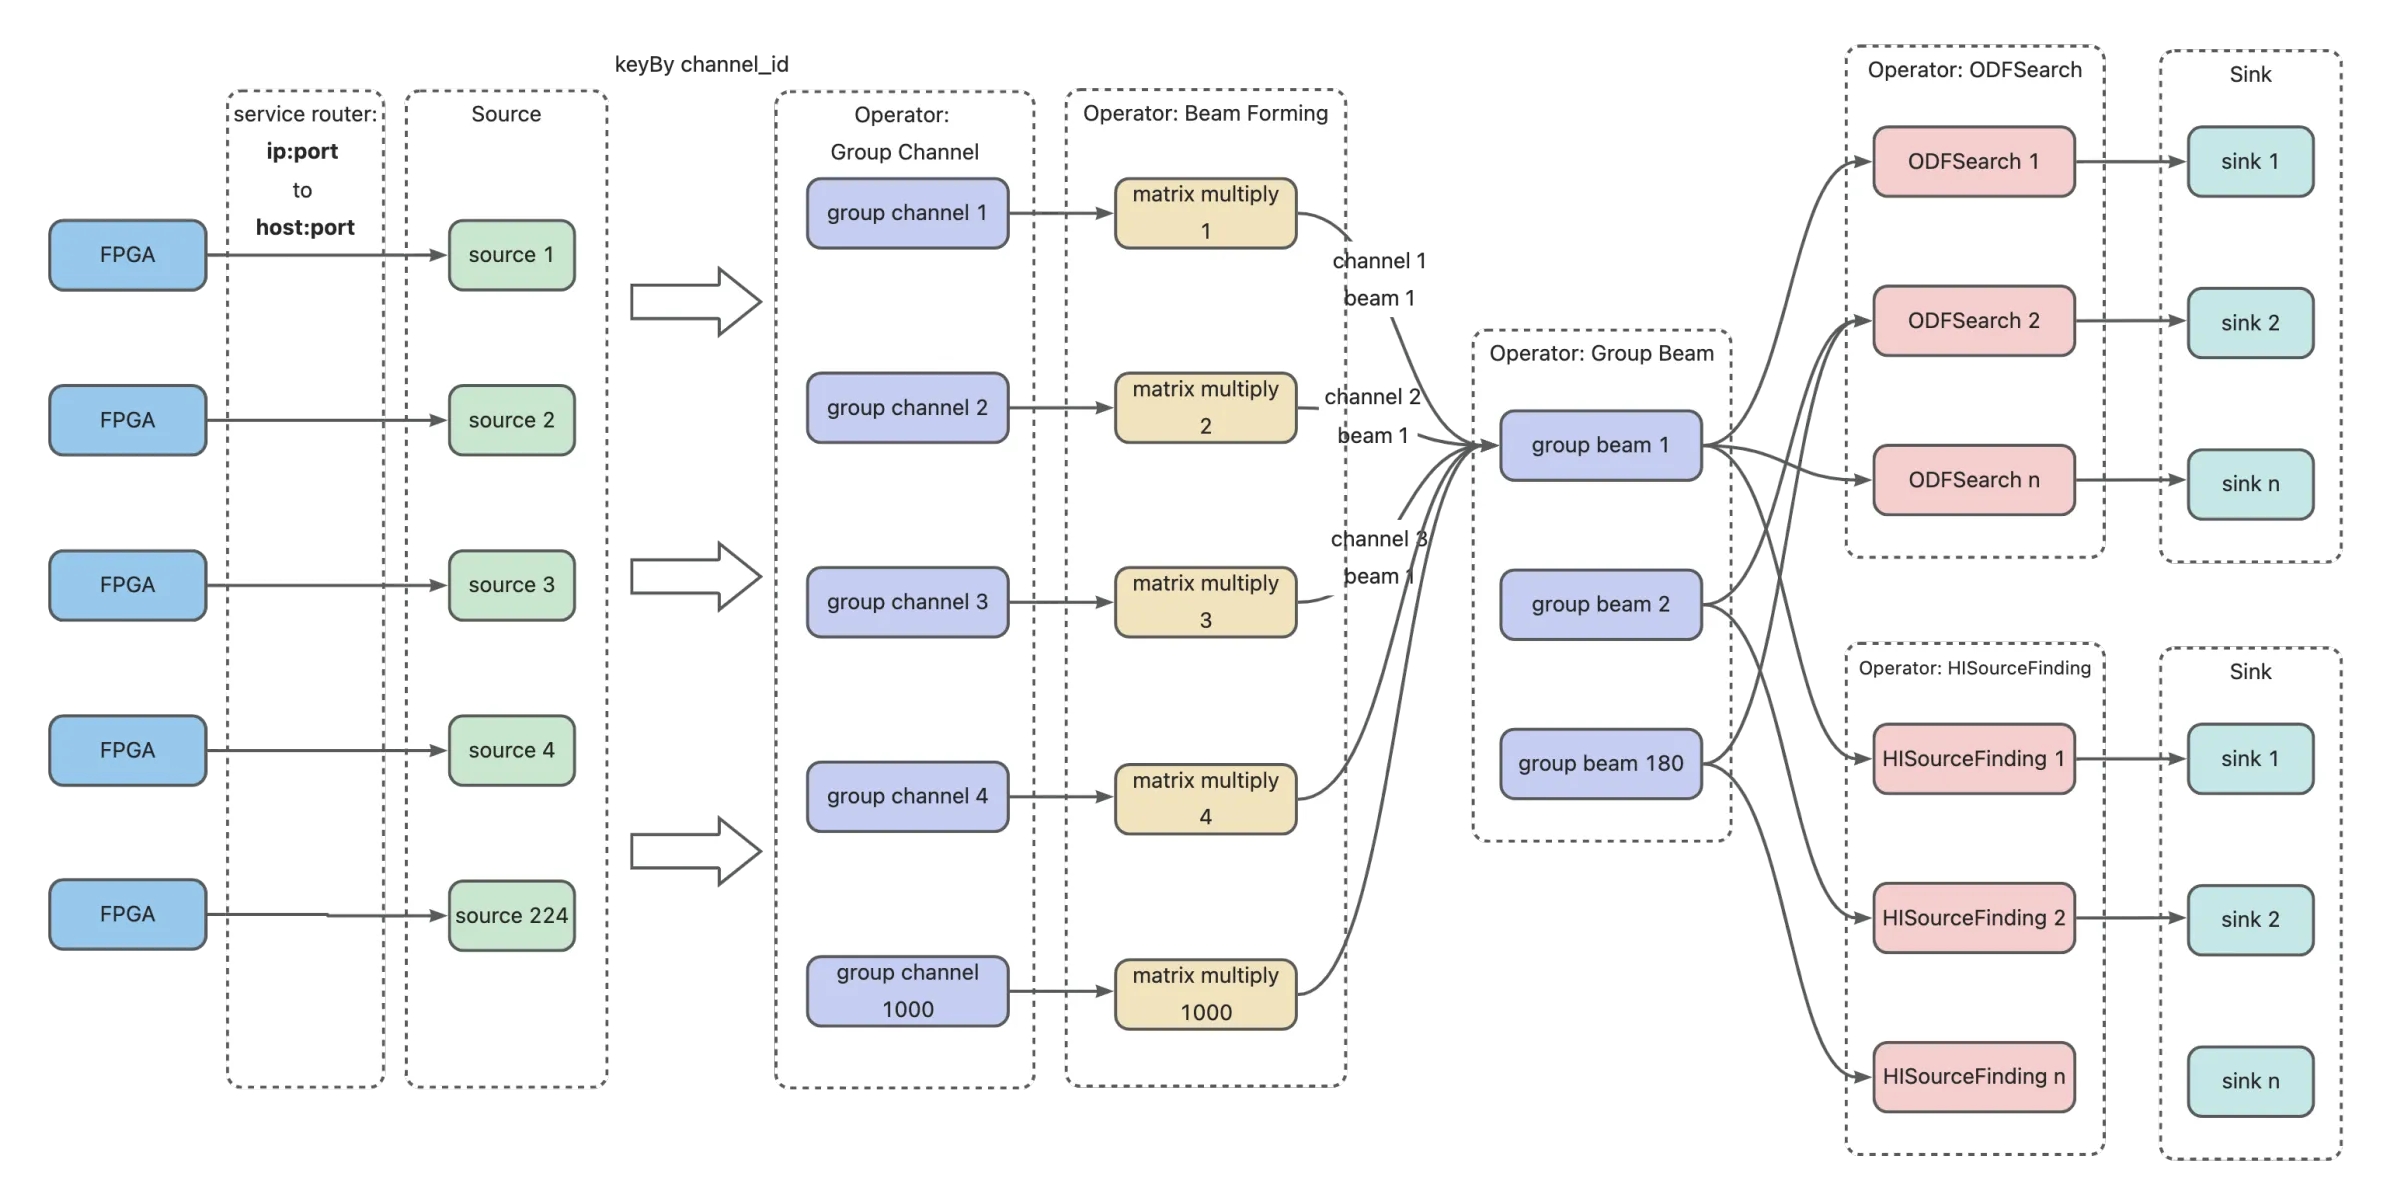
Design Architecture

  • objects

continuous processing antenna signal and sending 3 dimension data matrixes to different astronomical algorithm. asdsaa asdsaa

  • how data flows

asdsaa asdsaa

Building From Zero

Following these steps, you may build comic-antenna from nothing.

1. install podman

you can check article Install Podman

2. install kind and kubectl

mkdir -p $HOME/bin \
&& export PATH="$HOME/bin:$PATH" \
&& curl -o kind -L https://resource-ops.lab.zjvis.net:32443/binary/kind/v0.20.0/kind-linux-amd64 \
&& chmod u+x kind && mv kind $HOME/bin \
&& curl -o kubectl -L https://resource-ops.lab.zjvis.net:32443/binary/kubectl/v1.21.2/bin/linux/amd64/kubectl \
&& chmod u+x kubectl && mv kubectl $HOME/bin
# create a cluster using podman
curl -o kind.cluster.yaml -L https://gitlab.com/-/snippets/3686427/raw/main/kind-cluster.yaml \
&& export KIND_EXPERIMENTAL_PROVIDER=podman \
&& kind create cluster --name cs-cluster --image m.daocloud.io/docker.io/kindest/node:v1.27.3 --config=./kind.cluster.yaml
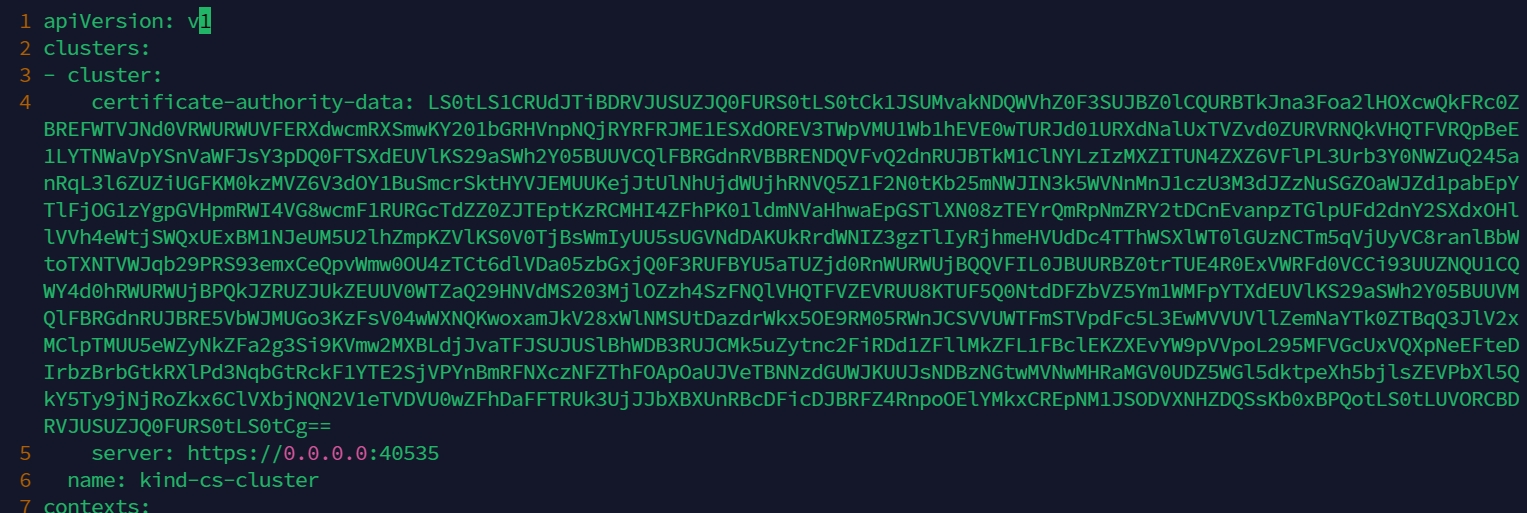
Modify ~/.kube/config

vim ~/.kube/config

in line 5, change server: http://::xxxx -> server: http://0.0.0.0:xxxxx

asdsaa asdsaa

3. [Optional] pre-downloaded slow images

DOCKER_IMAGE_PATH=/root/docker-images && mkdir -p $DOCKER_IMAGE_PATH
BASE_URL="https://resource-ops-dev.lab.zjvis.net:32443/docker-images"
for IMAGE in "quay.io_argoproj_argocd_v2.9.3.dim" \
    "ghcr.io_dexidp_dex_v2.37.0.dim" \
    "docker.io_library_redis_7.0.11-alpine.dim" \
    "docker.io_library_flink_1.17.dim"
do
    IMAGE_FILE=$DOCKER_IMAGE_PATH/$IMAGE
    if [ ! -f $IMAGE_FILE ]; then
        TMP_FILE=$IMAGE_FILE.tmp \
        && curl -o "$TMP_FILE" -L "$BASE_URL/$IMAGE" \
        && mv $TMP_FILE $IMAGE_FILE
    fi
    kind -n cs-cluster load image-archive $IMAGE_FILE
done

4. install argocd

you can check article Install ArgoCD

5. install essential app on argocd

# install cert manger    
curl -LO https://gitlab.com/-/snippets/3686424/raw/main/cert-manager.yaml \
&& kubectl -n argocd apply -f cert-manager.yaml \
&& argocd app sync argocd/cert-manager

# install ingress
curl -LO https://gitlab.com/-/snippets/3686426/raw/main/ingress-nginx.yaml \
&& kubectl -n argocd apply -f ingress-nginx.yaml \
&& argocd app sync argocd/ingress-nginx

# install flink-kubernetes-operator
curl -LO https://gitlab.com/-/snippets/3686429/raw/main/flink-operator.yaml \
&& kubectl -n argocd apply -f flink-operator.yaml \
&& argocd app sync argocd/flink-operator

6. install git

sudo dnf install -y git \
&& rm -rf $HOME/cosmic-antenna-demo \
&& mkdir $HOME/cosmic-antenna-demo \
&& git clone --branch pv_pvc_template https://github.com/AaronYang2333/cosmic-antenna-demo.git $HOME/cosmic-antenna-demo

7. prepare application image

# cd into  $HOME/cosmic-antenna-demo
sudo dnf install -y java-11-openjdk.x86_64 \
&& $HOME/cosmic-antenna-demo/gradlew :s3sync:buildImage \
&& $HOME/cosmic-antenna-demo/gradlew :fpga-mock:buildImage
# save and load into cluster
VERSION="1.0.3"
podman save --quiet -o $DOCKER_IMAGE_PATH/fpga-mock_$VERSION.dim localhost/fpga-mock:$VERSION \
&& kind -n cs-cluster load image-archive $DOCKER_IMAGE_PATH/fpga-mock_$VERSION.dim
podman save --quiet -o $DOCKER_IMAGE_PATH/s3sync_$VERSION.dim localhost/s3sync:$VERSION \
&& kind -n cs-cluster load image-archive $DOCKER_IMAGE_PATH/s3sync_$VERSION.dim
kubectl -n flink edit role/flink -o yaml
Modify role config

kubectl -n flink edit role/flink -o yaml

add services and endpoints to the rules.resources

8. prepare k8s resources [pv, pvc, sts]

cp -rf $HOME/cosmic-antenna-demo/flink/*.yaml /tmp \
&& podman exec -d cs-cluster-control-plane mkdir -p /mnt/flink-job
# create persist volume
kubectl -n flink create -f /tmp/pv.template.yaml
# create pv claim
kubectl -n flink create -f /tmp/pvc.template.yaml
# start up flink application
kubectl -n flink create -f /tmp/job.template.yaml
# start up ingress
kubectl -n flink create -f /tmp/ingress.forward.yaml
# start up fpga UDP client, sending data 
cp $HOME/cosmic-antenna-demo/fpga-mock/client.template.yaml /tmp \
&& kubectl -n flink create -f /tmp/client.template.yaml

9. check dashboard in browser

http://job-template-example.flink.lab.zjvis.net


Reference

  1. https://github.com/ben-wangz/blog/tree/main/docs/content/6.kubernetes/7.installation/ha-cluster
  2. xxx
2024年3月7日

Design

2024年8月7日

Design 的子部分

Yaml Crawler

Steps

  1. define which url you wanna crawl, lets say https://www.xxx.com/aaa.apex
  2. create a page pojo to describe what kind of web page you need to process

Then you can create a yaml file named root-pages.yaml and its content is

- '@class': "org.example.business.hs.code.MainPage"
  url: "https://www.xxx.com/aaa.apex"
  1. and then define a process flow yaml file, implying how to process web pages the crawler will meet.
processorChain:
  - '@class': "net.zjvis.lab.nebula.crawler.core.processor.decorator.ExceptionRecord"
    processor:
      '@class': "net.zjvis.lab.nebula.crawler.core.processor.decorator.RetryControl"
      processor:
        '@class': "net.zjvis.lab.nebula.crawler.core.processor.decorator.SpeedControl"
        processor:
          '@class': "org.example.business.hs.code.MainPageProcessor"
          application: "hs-code"
        time: 100
        unit: "MILLISECONDS"
      retryTimes: 1
  - '@class': "net.zjvis.lab.nebula.crawler.core.processor.decorator.ExceptionRecord"
    processor:
      '@class': "net.zjvis.lab.nebula.crawler.core.processor.decorator.RetryControl"
      processor:
        '@class': "net.zjvis.lab.nebula.crawler.core.processor.decorator.SpeedControl"
        processor:
          '@class': "net.zjvis.lab.nebula.crawler.core.processor.download.DownloadProcessor"
          pagePersist:
            '@class': "org.example.business.hs.code.persist.DownloadPageDatabasePersist"
            downloadPageRepositoryBeanName: "downloadPageRepository"
          downloadPageTransformer:
            '@class': "net.nebula.crawler.download.DefaultDownloadPageTransformer"
          skipExists:
            '@class': "net.nebula.crawler.download.SkipExistsById"
        time: 1
        unit: "SECONDS"
      retryTimes: 1
nThreads: 1
pollWaitingTime: 30
pollWaitingTimeUnit: "SECONDS"
waitFinishedTimeout: 180
waitFinishedTimeUnit: "SECONDS" 

ExceptionRecord, RetryControl, SpeedControl are provided by the yaml crawler itself, don’t worry. you only need to extend how to process your page MainPage, for example, you defined a MainPageProcessor. each processor will produce a set of other page or DownloadPage. DownloadPage like a ship containing information you need, and this framework will help you process DownloadPage and download or persist.

  1. Vola, run your crawler then.
2024年3月8日

Utils

Porjects

2024年3月7日

Utils 的子部分

Cowsay

since the previous cowsay image was built ten years ago, and in newser k8s, you will meet an exception like

Failed to pull image “docker/whalesay:latest”: [DEPRECATION NOTICE] Docker Image Format v1 and Docker Image manifest version 2, schema 1 support is disabled by default and will be removed in an upcoming release. Suggest the author of docker.io/docker/whalesay:latest to upgrade the image to the OCI Format or Docker Image manifest v2, schema 2. More information at https://docs.docker.com/go/deprecated-image-specs/

So, I built a new one. please try docker.io/aaron666/cowsay:v2

Build

docker build -t whalesay:v2 .

Usage

docker run -it localhost/whalesay:v2 whalesay  "hello world"

[root@ay-zj-ecs cowsay]# docker run -it localhost/whalesay:v2 whalesay  "hello world"
 _____________
< hello world >
 -------------
  \
   \
    \     
                      ##        .            
                ## ## ##       ==            
             ## ## ## ##      ===            
         /""""""""""""""""___/ ===        
    ~~~ {~~ ~~~~ ~~~ ~~~~ ~~ ~ /  ===- ~~~   
         \______ o          __/            
          \    \        __/             
            \____\______/   
docker run -it localhost/whalesay:v2 cowsay  "hello world"

[root@ay-zj-ecs cowsay]# docker run -it localhost/whalesay:v2 cowsay  "hello world"
 _____________
< hello world >
 -------------
        \   ^__^
         \  (oo)\_______
            (__)\       )\/\
                ||----w |
                ||     ||

Upload

docker tag fc544e209b40 docker-registry.lab.zverse.space/ay-dev/whalesay:v2
docker push docker-registry.lab.zverse.space/ay-dev/whalesay:v2
2025年3月7日

🐸Git 的子部分

Action 的子部分

Template

2024年3月7日

Notes

2024年3月7日

☸️Kubernetes 的子部分

Prepare k8s Cluster

There are many ways to build a kubernetes cluster.

Install Kuberctl

MIRROR="files.m.daocloud.io/"
VERSION=$(curl -L -s https://${MIRROR}dl.k8s.io/release/stable.txt)
[ $(uname -m) = x86_64 ] && curl -sSLo kubectl "https://${MIRROR}dl.k8s.io/release/${VERSION}/bin/linux/amd64/kubectl"
[ $(uname -m) = aarch64 ] && curl -sSLo kubectl "https://${MIRROR}dl.k8s.io/release/${VERSION}/bin/linux/arm64/kubectl"
chmod u+x kubectl
mkdir -p ${HOME}/bin
mv -f kubectl ${HOME}/bin

Build Cluster

​
MIRROR="files.m.daocloud.io/"
VERSION=v0.20.0
[ $(uname -m) = x86_64 ] && curl -sSLo kind "https://${MIRROR}github.com/kubernetes-sigs/kind/releases/download/${VERSION}/kind-linux-amd64"
[ $(uname -m) = aarch64 ] && curl -sSLo kind "https://${MIRROR}github.com/kubernetes-sigs/kind/releases/download/${VERSION}/kind-linux-arm64"
chmod u+x kind
mkdir -p ${HOME}/bin
mv -f kind ${HOME}/bin

Creating a Kubernetes cluster is as simple as kind create cluster

kind create cluster --name test

and the you can visit https://kind.sigs.k8s.io/docs/user/quick-start/ for mode detail.

MIRROR="files.m.daocloud.io/"
[ $(uname -m) = x86_64 ] && curl -sSLo minikube "https://${MIRROR}storage.googleapis.com/minikube/releases/latest/minikube-linux-amd64"
[ $(uname -m) = aarch64 ] && curl -sSLo minikube "https://${MIRROR}storage.googleapis.com/minikube/releases/latest/minikube-linux-arm64"
chmod u+x minikube
mkdir -p ${HOME}/bin
mv -f minikube ${HOME}/bin

[Optional] disable aegis service and reboot system for aliyun

sudo systemctl disable aegis && sudo reboot

after you download binary, you can start your cluster

minikube start --kubernetes-version=v1.27.10 --image-mirror-country=cn --image-repository=registry.cn-hangzhou.aliyuncs.com/google_containers --cpus=6 --memory=24g --disk-size=100g

add alias for convinence

alias kubectl="minikube kubectl --"

and then you can visit https://minikube.sigs.k8s.io/docs/start/ for more detail.

Prerequisites

  • Hardware Requirements:

    1. At least 2 GB of RAM per machine (minimum 1 GB)
    2. 2 CPUs on the master node
    3. Full network connectivity among all machines (public or private network)
  • Operating System:

    1. Ubuntu 20.04/18.04, CentOS 7/8, or any other supported Linux distribution.
  • Network Requirements:

    1. Unique hostname, MAC address, and product_uuid for each node.
    2. Certain ports need to be open (e.g., 6443, 2379-2380, 10250, 10251, 10252, 10255, etc.)
  • Disable Swap:

    sudo swapoff -a

Steps to Setup Kubernetes Cluster

  1. Prepare Your Servers Update the Package Index and Install Necessary Packages On all your nodes (both master and worker):
sudo apt-get update
sudo apt-get install -y apt-transport-https ca-certificates curl

Add the Kubernetes APT Repository

curl -s https://packages.cloud.google.com/apt/doc/apt-key.gpg | sudo apt-key add -
cat <<EOF | sudo tee /etc/apt/sources.list.d/kubernetes.list
deb http://apt.kubernetes.io/ kubernetes-xenial main
EOF

Install kubeadm, kubelet, and kubectl

sudo apt-get update
sudo apt-get install -y kubelet kubeadm kubectl
sudo apt-mark hold kubelet kubeadm kubectl
  1. Initialize the Master Node On the master node, initialize the Kubernetes control plane:
sudo kubeadm init --pod-network-cidr=192.168.0.0/16

The –pod-network-cidr flag is used to set the Pod network range. You might need to adjust this based on your network provider

Set up Local kubeconfig

mkdir -p $HOME/.kube
sudo cp -i /etc/kubernetes/admin.conf $HOME/.kube/config
sudo chown $(id -u):$(id -g) $HOME/.kube/config
  1. Install a Pod Network Add-on You can install a network add-on like Flannel, Calico, or Weave. For example, to install Calico:
​

```shell kubectl apply -f https://github.com/coreos/flannel/raw/master/Documentation/kube-flannel.yml ```

```shell kubectl apply -f https://docs.projectcalico.org/v3.14/manifests/calico.yaml ```

  1. Join Worker Nodes to the Cluster On each worker node, run the kubeadm join command provided at the end of the kubeadm init output on the master node. It will look something like this:
sudo kubeadm join <master-ip>:6443 --token <token> --discovery-token-ca-cert-hash sha256:<hash>

If you lost the join command, you can create a new token on the master node:

sudo kubeadm token create --print-join-command
  1. Verify the Cluster Once all nodes have joined, you can verify the cluster status from the master node:
kubectl get nodes

This command should list all your nodes with the status “Ready”.
2024年3月7日

Command

2024年3月7日

Container 的子部分

CheatShett

type:
  1. remove specific image
podman rmi <$image_id>
  1. remove all <none> images
podman rmi `podamn images | grep  '<none>' | awk '{print $3}'`
  1. remove all stopped containers
podman container prune
  1. remove all docker images not used
podman image prune
  1. find ip address of a container
podman inspect --format='{{.NetworkSettings.IPAddress}}' minio-server
  1. exec into container
podman run -it <$container_id> /bin/bash
  1. run with environment
podman run -d --replace 
    -p 18123:8123 -p 19000:9000 \
    --name clickhouse-server \
    -e ALLOW_EMPTY_PASSWORD=yes \
    --ulimit nofile=262144:262144 \
    quay.m.daocloud.io/kryptonite/clickhouse-docker-rootless:20.9.3.45 

--ulimit nofile=262144:262144: 262144 is the maximum users process or for showing maximum user process limit for the logged-in user

ulimit is admin access required Linux shell command which is used to see, set, or limit the resource usage of the current user. It is used to return the number of open file descriptors for each process. It is also used to set restrictions on the resources used by a process.

  1. login registry
podman login --tls-verify=false --username=ascm-org-1710208820455 cr.registry.res.cloud.zhejianglab.com -p 'xxxx'
  1. tag image
podman tag 76fdac66291c cr.registry.res.cloud.zhejianglab.com/ay-dev/datahub-s3-fits:1.0.0
  1. push image
podman push cr.registry.res.cloud.zhejianglab.com/ay-dev/datahub-s3-fits:1.0.0
  1. remove specific image
docker rmi <$image_id>
  1. remove all <none> images
docker rmi `docker images | grep  '<none>' | awk '{print $3}'`
  1. remove all stopped containers
docker container prune
  1. remove all docker images not used
docker image prune
  1. find ip address of a container
docker inspect --format='{{.NetworkSettings.IPAddress}}' minio-server
  1. exec into container
docker exec -it <$container_id> /bin/bash
  1. run with environment
docker run -d --replace -p 18123:8123 -p 19000:9000 --name clickhouse-server -e ALLOW_EMPTY_PASSWORD=yes --ulimit nofile=262144:262144 quay.m.daocloud.io/kryptonite/clickhouse-docker-rootless:20.9.3.45 

--ulimit nofile=262144:262144: sssss

  1. copy file

    Copy a local file into container

    docker cp ./some_file CONTAINER:/work

    or copy files from container to local path

    docker cp CONTAINER:/var/logs/ /tmp/app_logs
  2. load a volume

docker run --rm \
    --entrypoint bash \
    -v $PWD/data:/app:ro \
    -it docker.io/minio/mc:latest \
    -c "mc --insecure alias set minio https://oss-cn-hangzhou-zjy-d01-a.ops.cloud.zhejianglab.com/ g83B2sji1CbAfjQO 2h8NisFRELiwOn41iXc6sgufED1n1A \
        && mc --insecure ls minio/csst-prod/ \
        && mc --insecure mb --ignore-existing minio/csst-prod/crp-test \
        && mc --insecure cp /app/modify.pdf minio/csst-prod/crp-test/ \
        && mc --insecure ls --recursive minio/csst-prod/"
2024年3月7日

Template 的子部分

DevContainer Template

2024年3月7日

DEV

2024年3月7日

Operator 的子部分

KubeBuilder

2024年3月7日

Proxy 的子部分

Daocloud

1. install container tools

systemctl stop firewalld && systemctl disable firewalld
sudo dnf install -y podman
podman run -d -P m.daocloud.io/docker.io/library/nginx
2024年3月7日

Serverless 的子部分

Knative 的子部分

Eventing 的子部分

Broker

2024年3月7日

Plugin 的子部分

Eventing Kafka Broker

2024年3月7日

Kserve 的子部分

Serving 的子部分

Inference

2024年3月7日

Generative

2024年3月7日

Canary Policy

2024年3月7日

Auto Scaling

2024年3月7日

🏗️Linux 的子部分

Command

2024年3月7日

Components

2024年3月7日

Interface

2024年3月7日

Mirror

2024年3月7日

Scripts

2024年3月7日

🪀Install Shit 的子部分

Application

2025年3月7日

Auth

2024年3月7日

Binary

2024年3月7日

CICD

Articles

FQA

Q1: difference between docker\podmn\buildah

You can add standard markdown syntax:

  • multiple paragraphs
  • bullet point lists
  • emphasized, bold and even bold emphasized text
  • links
  • etc.
...and even source code

the possibilities are endless (almost - including other shortcodes may or may not work)

2025年3月7日

Container

Articles

FQA

Q1: difference between docker\podmn\buildah

You can add standard markdown syntax:

  • multiple paragraphs
  • bullet point lists
  • emphasized, bold and even bold emphasized text
  • links
  • etc.
...and even source code

the possibilities are endless (almost - including other shortcodes may or may not work)

2025年3月7日

Database

2024年3月7日

Git

2024年3月7日

HPC

2024年3月7日

MCP Related

2025年3月7日

Monitor

2025年3月7日

Networking

2024年3月7日

RPC

2025年3月7日

Storage

2025年5月7日

Streaming

2024年3月7日

🗃️Usage Notes 的子部分

Maven

1. build from submodule

You don’t need to build from the head of project.

./mvnw clean package -DskipTests  -rf :<$submodule-name>

you can find the <$submodule-name> from submodule ’s pom.xml

<project xmlns="http://maven.apache.org/POM/4.0.0" xmlns:xsi="http://www.w3.org/2001/XMLSchema-instance"
		xsi:schemaLocation="http://maven.apache.org/POM/4.0.0 http://maven.apache.org/maven-v4_0_0.xsd">

	<modelVersion>4.0.0</modelVersion>

	<parent>
		<groupId>org.apache.flink</groupId>
		<artifactId>flink-formats</artifactId>
		<version>1.20-SNAPSHOT</version>
	</parent>

	<artifactId>flink-avro</artifactId>
	<name>Flink : Formats : Avro</name>

Then you can modify the command as

./mvnw clean package -DskipTests  -rf :flink-avro
The result will look like this
[WARNING] For this reason, future Maven versions might no longer support building such malformed projects.
[WARNING] 
[INFO] ------------------------------------------------------------------------
[INFO] Detecting the operating system and CPU architecture
[INFO] ------------------------------------------------------------------------
[INFO] os.detected.name: linux
[INFO] os.detected.arch: x86_64
[INFO] os.detected.bitness: 64
[INFO] os.detected.version: 6.7
[INFO] os.detected.version.major: 6
[INFO] os.detected.version.minor: 7
[INFO] os.detected.release: fedora
[INFO] os.detected.release.version: 38
[INFO] os.detected.release.like.fedora: true
[INFO] os.detected.classifier: linux-x86_64
[INFO] ------------------------------------------------------------------------
[INFO] Reactor Build Order:
[INFO] 
[INFO] Flink : Formats : Avro                                             [jar]
[INFO] Flink : Formats : SQL Avro                                         [jar]
[INFO] Flink : Formats : Parquet                                          [jar]
[INFO] Flink : Formats : SQL Parquet                                      [jar]
[INFO] Flink : Formats : Orc                                              [jar]
[INFO] Flink : Formats : SQL Orc                                          [jar]
[INFO] Flink : Python                                                     [jar]
...

Normally, build Flink will start from module flink-parent

2. skip some other test

For example, you can skip RAT test by doing this:

./mvnw clean package -DskipTests '-Drat.skip=true'
2024年3月11日

Gradle

1. spotless

keep your code spotless, check more detail in https://github.com/diffplug/spotless

see how to configuration

there are several files need to configure.

  1. settings.gradle.kts
plugins {
    id("org.gradle.toolchains.foojay-resolver-convention") version "0.7.0"
}
  1. build.gradle.kts
plugins {
    id("com.diffplug.spotless") version "6.23.3"
}
configure<com.diffplug.gradle.spotless.SpotlessExtension> {
    kotlinGradle {
        target("**/*.kts")
        ktlint()
    }
    java {
        target("**/*.java")
        googleJavaFormat()
            .reflowLongStrings()
            .skipJavadocFormatting()
            .reorderImports(false)
    }
    yaml {
        target("**/*.yaml")
        jackson()
            .feature("ORDER_MAP_ENTRIES_BY_KEYS", true)
    }
    json {
        target("**/*.json")
        targetExclude(".vscode/settings.json")
        jackson()
            .feature("ORDER_MAP_ENTRIES_BY_KEYS", true)
    }
}

And the, you can execute follwoing command to format your code.

​
./gradlew spotlessApply
./mvnw spotless:apply

2. shadowJar

shadowjar could combine a project’s dependency classes and resources into a single jar. check https://imperceptiblethoughts.com/shadow/

see how to configuration

you need moidfy your build.gradle.kts

import com.github.jengelman.gradle.plugins.shadow.tasks.ShadowJar

plugins {
    java // Optional 
    id("com.github.johnrengelman.shadow") version "8.1.1"
}

tasks.named<ShadowJar>("shadowJar") {
    archiveBaseName.set("connector-shadow")
    archiveVersion.set("1.0")
    archiveClassifier.set("")
    manifest {
        attributes(mapOf("Main-Class" to "com.example.xxxxx.Main"))
    }
}
./gradlew shadowJar

3. check dependency

list your project’s dependencies in tree view

see how to configuration

you need moidfy your build.gradle.kts

configurations {
    compileClasspath
}
​
./gradlew dependencies --configuration compileClasspath
./gradlew :<$module_name>:dependencies --configuration compileClasspath
Check Potential Result

result will look like this

compileClasspath - Compile classpath for source set 'main'.
+--- org.projectlombok:lombok:1.18.22
+--- org.apache.flink:flink-hadoop-fs:1.17.1
|    \--- org.apache.flink:flink-core:1.17.1
|         +--- org.apache.flink:flink-annotations:1.17.1
|         |    \--- com.google.code.findbugs:jsr305:1.3.9 -> 3.0.2
|         +--- org.apache.flink:flink-metrics-core:1.17.1
|         |    \--- org.apache.flink:flink-annotations:1.17.1 (*)
|         +--- org.apache.flink:flink-shaded-asm-9:9.3-16.1
|         +--- org.apache.flink:flink-shaded-jackson:2.13.4-16.1
|         +--- org.apache.commons:commons-lang3:3.12.0
|         +--- org.apache.commons:commons-text:1.10.0
|         |    \--- org.apache.commons:commons-lang3:3.12.0
|         +--- commons-collections:commons-collections:3.2.2
|         +--- org.apache.commons:commons-compress:1.21 -> 1.24.0
|         +--- org.apache.flink:flink-shaded-guava:30.1.1-jre-16.1
|         \--- com.google.code.findbugs:jsr305:1.3.9 -> 3.0.2
...
2024年3月7日

Application

2025年3月7日

CICD

Articles

FQA

Q1: difference between docker\podmn\buildah

You can add standard markdown syntax:

  • multiple paragraphs
  • bullet point lists
  • emphasized, bold and even bold emphasized text
  • links
  • etc.
...and even source code

the possibilities are endless (almost - including other shortcodes may or may not work)

2025年3月7日

Container

Articles

FQA

Q1: difference between docker\podmn\buildah

You can add standard markdown syntax:

  • multiple paragraphs
  • bullet point lists
  • emphasized, bold and even bold emphasized text
  • links
  • etc.
...and even source code

the possibilities are endless (almost - including other shortcodes may or may not work)

2025年3月7日

Database

2024年3月7日

HPC

2024年3月7日

K8s

2024年3月7日

Monitor

2025年3月7日

Networking

2024年3月7日

RPC

2025年3月7日

Storage

2025年5月7日

Middlewares

2024年4月7日

Middlewares 的子部分

🐿️Apache Flink 的子部分

On K8s Operator

2024年4月7日

CDC 的子部分

Mysql CDC

More Ofthen, we can get a simplest example form CDC Connectors. But people still need to google some inescapable problems before using it.

preliminary

Flink: 1.17 JDK: 11

Flink CDC version mapping
Flink CDC Version Flink Version
1.0.0 1.11.*
1.1.0 1.11.*
1.2.0 1.12.*
1.3.0 1.12.*
1.4.0 1.13.*
2.0.* 1.13.*
2.1.* 1.13.*
2.2.* 1.13.*, 1.14.*
2.3.* 1.13.*, 1.14.*, 1.15.*
2.4.* 1.13.*, 1.14.*, 1.15.*
3.0.* 1.14.*, 1.15.*, 1.16.*

usage for DataStream API

Only import com.ververica.flink-connector-mysql-cdc is not enough.

​
implementation("com.ververica:flink-connector-mysql-cdc:2.4.0")

//you also need these following dependencies
implementation("org.apache.flink:flink-shaded-guava:30.1.1-jre-16.1")
implementation("org.apache.flink:flink-connector-base:1.17")
implementation("org.apache.flink:flink-table-planner_2.12:1.17")
<dependency>
  <groupId>com.ververica</groupId>
  <!-- add the dependency matching your database -->
  <artifactId>flink-connector-mysql-cdc</artifactId>
  <!-- The dependency is available only for stable releases, SNAPSHOT dependencies need to be built based on master or release- branches by yourself. -->
  <version>2.4.0</version>
</dependency>

<!-- https://mvnrepository.com/artifact/org.apache.flink/flink-shaded-guava -->
<dependency>
  <groupId>org.apache.flink</groupId>
  <artifactId>flink-shaded-guava</artifactId>
  <version>30.1.1-jre-16.1</version>
</dependency>

<!-- https://mvnrepository.com/artifact/org.apache.flink/flink-connector-base -->
<dependency>
  <groupId>org.apache.flink</groupId>
  <artifactId>flink-connector-base</artifactId>
  <version>1.17.1</version>
</dependency>

<!-- https://mvnrepository.com/artifact/org.apache.flink/flink-table-planner -->
<dependency>
  <groupId>org.apache.flink</groupId>
  <artifactId>flink-table-planner_2.12</artifactId>
  <version>1.17.1</version>
</dependency>

usage for table/SQL API

2024年3月7日

Connector

2024年3月7日

About Me

2024年3月7日

Argoes

2024年3月7日

Argoes 的子部分

Workflow Template

2024年3月7日

CSSTs

2024年3月7日

CSSTs 的子部分

Publish Image

2024年3月7日

Import Data

2024年3月7日

Deploy App

2024年3月7日

Mbi L1 Job

2024年3月7日

Languages

2024年3月7日

Languages 的子部分

♨️JAVA 的子部分

JVM Related

2024年3月7日

🐍Python

2024年3月7日

🐹Go

2024年3月7日

JVM Related

2024年3月7日

Web Related