Subsections of 🏗️Linux Related
Cheatsheet
useradd
sudo useradd <$name> -m -r -s /bin/bash -p <$password>telnet
a command line interface for communication with a remote device or serve
telnet <$ip> <$port>lsof (list as open files)
everything is a file
lsof <$option:value>awk (Aho, Weinberger, and Kernighan [Names])
awk is a scripting language used for manipulating data and generating reports.
# awk [params] 'script'
awk <$params> <$string_content>
for example
filter bigger than 3
echo -e "1\n2\n3\n4\n5\n" | awk '$1>3'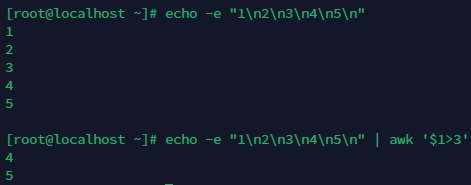
ss (socket statistics)
view detailed information about your system’s network connections, including TCP/IP, UDP, and Unix domain sockets
ss [options]clean files 3 days ago
find /aaa/bbb/ccc/*.gz -mtime +3 -exec rm {} \;ssh without affect $HOME/.ssh/known_hosts
ssh -o "UserKnownHostsFile /dev/null" root@aaa.domain.com
ssh -o "UserKnownHostsFile /dev/null" -o "StrictHostKeyChecking=no" root@aaa.domain.com
sync clock
[yum|dnf] install -y chrony \
    && systemctl enable chronyd \
    && (systemctl is-active chronyd || systemctl start chronyd) \
    && chronyc sources \
    && chronyc tracking \
    && timedatectl set-timezone 'Asia/Shanghai'
set hostname
hostnamectl set-hostname developadd remote key to other server
ssh -o "UserKnownHostsFile /dev/null" \
    root@aaa.bbb.ccc \
    "mkdir -p /root/.ssh && chmod 700 /root/.ssh && echo '$SOME_PUBLIC_KEY' \
>> /root/.ssh/authorized_keys && chmod 600 /root/.ssh/authorized_keys"set -x
This will print each command to the standard error before executing it, which is useful for debugging scripts.
set -xset -e
Exit immediately if a command exits with a non-zero status.
set -xsed (Stream Editor)
sed <$option> <$file_path>fdisk
list all disk
fdisk -lcreate CFS file system
Use mkfs.xfs command to create xfs file system and internal log on the same disk, example is shown below:
mkfs.xfs <$path>modprobe
program to add and remove modules from the Linux Kernel
modprobe nfs && modprobe nfsddisown
disown command in Linux is used to remove jobs from the job table.
disown [options] jobID1 jobID2 ... jobIDNgenerate SSH key
ssh-keygen -t rsa -b 4096 -C "aaron19940628@gmail.com"create soft link
sudo ln -sf <$install_path>/bin/* /usr/local/binappend dir into $PATH (temporary)
export PATH="/root/bin:$PATH"copy public key to ECS
ssh-copy-id -i ~/.ssh/id_rsa.pub root@10.200.60.53echo “nameserver 8.8.8.8” | sudo tee /etc/resolv.conf echo “nameserver 8.8.4.4” | sudo tee -a /etc/resolv.conf
Command
Subsections of Command
Echo
在Windows批处理中(使用ECHO命令)
ECHO 这是要写入的内容 > filename.txt
ECHO 这是要追加的内容 >> filename.txt
在Linux/macOS Shell中
echo "这是要写入的内容" > filename.txt
echo "这是要追加的内容" >> filename.txt
在Python中
# 写入文件(覆盖)
with open('filename.txt', 'w', encoding='utf-8') as f:
    f.write("这是要写入的内容\n")

# 追加内容
with open('filename.txt', 'a', encoding='utf-8') as f:
    f.write("这是要追加的内容\n")
在PowerShell中
"这是要写入的内容" | Out-File -FilePath filename.txt
"这是要追加的内容" | Out-File -FilePath filename.txt -Append
在JavaScript (Node.js) 中
const fs = require('fs');

// 写入文件(覆盖)
fs.writeFileSync('filename.txt', '这是要写入的内容\n');

// 追加内容
fs.appendFileSync('filename.txt', '这是要追加的内容\n');Grep
grep 是 Linux 中强大的文本搜索工具,其名称来源于 “Global Regular Expression Print”。以下是 grep 命令的常见用法:
基本语法
grep [选项] 模式 [文件...]常用选项
1. 基础搜索
# 在文件中搜索包含"error"的行
grep "error" filename.log

# 搜索时忽略大小写
grep -i "error" filename.log

# 显示不匹配的行
grep -v "success" filename.log

# 显示匹配的行号
grep -n "pattern" filename.txt
2. 递归搜索
# 在当前目录及子目录中递归搜索
grep -r "function_name" .

# 递归搜索并显示文件名
grep -r -l "text" /path/to/directory
3. 输出控制
# 只显示匹配的文件名(不显示具体行)
grep -l "pattern" *.txt

# 显示匹配行前后的内容
grep -A 3 "error" logfile.txt    # 显示匹配行后3行
grep -B 2 "error" logfile.txt    # 显示匹配行前2行
grep -C 2 "error" logfile.txt    # 显示匹配行前后各2行

# 只显示匹配的部分(而非整行)
grep -o "pattern" file.txt
4. 正则表达式
# 使用扩展正则表达式
grep -E "pattern1|pattern2" file.txt

# 匹配以"start"开头的行
grep "^start" file.txt

# 匹配以"end"结尾的行
grep "end$" file.txt

# 匹配空行
grep "^$" file.txt

# 使用字符类
grep "[0-9]" file.txt           # 包含数字的行
grep "[a-zA-Z]" file.txt        # 包含字母的行
5. 文件处理
# 从多个文件中搜索
grep "text" file1.txt file2.txt

# 使用通配符
grep "pattern" *.log

# 从标准输入读取
cat file.txt | grep "pattern"
echo "some text" | grep "text"
6. 统计信息
# 统计匹配的行数
grep -c "pattern" file.txt

# 统计匹配的次数(可能一行有多个匹配)
grep -o "pattern" file.txt | wc -l
实用示例
1. 日志分析
# 查找今天的错误日志
grep "ERROR" /var/log/syslog | grep "$(date '+%Y-%m-%d')"

# 查找包含IP地址的行
grep -E "[0-9]+\.[0-9]+\.[0-9]+\.[0-9]+" access.log
2. 代码搜索
# 在项目中查找函数定义
grep -r "function_name(" src/

# 查找包含TODO或FIXME的注释
grep -r -E "TODO|FIXME" ./

# 查找空行并统计数量
grep -c "^$" source_code.py
3. 系统监控
# 查看特定进程
ps aux | grep "nginx"

# 检查端口占用
netstat -tulpn | grep ":80"
4. 文件内容检查
# 检查配置文件中的有效设置(忽略注释和空行)
grep -v "^#" /etc/ssh/sshd_config | grep -v "^$"

# 查找包含邮箱地址的行
grep -E "\b[A-Za-z0-9._%+-]+@[A-Za-z0-9.-]+\.[A-Z|a-z]{2,}\b" file.txt
高级技巧
1. 使用上下文
# 显示错误及其上下文
grep -C 3 -i "error" application.log
2. 反向引用
# 使用扩展正则表达式的分组
grep -E "(abc).*\1" file.txt  # 查找重复的"abc"
3. 二进制文件搜索
# 在二进制文件中搜索文本字符串
grep -a "text" binaryfile
4. 颜色高亮
# 启用颜色高亮(通常默认开启)
grep --color=auto "pattern" file.txt
常用组合
与其它命令配合
# 查找并排序
grep "pattern" file.txt | sort

# 查找并计数
grep -o "pattern" file.txt | sort | uniq -c

# 查找并保存结果
grep "error" logfile.txt > errors.txt
这些是 grep 命令最常用的用法,掌握它们可以大大提高在 Linux 环境下处理文本的效率。
Sed
sed(Stream Editor)是 Linux 中强大的流编辑器,用于对文本进行过滤和转换。以下是 sed 命令的常见用法:
基本语法
sed [选项] '命令' 文件
sed [选项] -e '命令1' -e '命令2' 文件
sed [选项] -f 脚本文件 文件
常用选项
1. 基础选项
# 编辑文件并备份原文件
sed -i.bak 's/old/new/g' file.txt

# 直接修改文件(无备份)
sed -i 's/old/new/g' file.txt

# 只打印匹配的行
sed -n '命令' file.txt

# 使用扩展正则表达式
sed -E '命令' file.txt
文本替换
1. 基本替换
# 替换每行第一个匹配
sed 's/old/new/' file.txt

# 替换所有匹配(全局替换)
sed 's/old/new/g' file.txt

# 替换第N次出现的匹配
sed 's/old/new/2' file.txt    # 替换第二次出现

# 只替换匹配的行
sed '/pattern/s/old/new/g' file.txt
2. 替换分隔符
# 当模式包含斜杠时,可以使用其他分隔符
sed 's|/usr/local|/opt|g' file.txt
sed 's#old#new#g' file.txt
3. 引用和转义
# 使用&引用匹配的整个文本
sed 's/[0-9]*/[&]/g' file.txt

# 使用分组引用
sed 's/\([a-z]*\) \([a-z]*\)/\2 \1/' file.txt
sed -E 's/([a-z]*) ([a-z]*)/\2 \1/' file.txt  # 扩展正则表达式
行操作
1. 行寻址
# 指定行号
sed '5s/old/new/' file.txt        # 只对第5行替换
sed '1,5s/old/new/g' file.txt     # 1-5行替换
sed '5,$s/old/new/g' file.txt     # 第5行到最后一行

# 使用正则表达式匹配行
sed '/^#/s/old/new/' file.txt     # 只对以#开头的行
sed '/start/,/end/s/old/new/g' file.txt  # 从start到end的行
2. 删除行
# 删除空行
sed '/^$/d' file.txt

# 删除注释行
sed '/^#/d' file.txt

# 删除特定行号
sed '5d' file.txt                 # 删除第5行
sed '1,5d' file.txt               # 删除1-5行
sed '/pattern/d' file.txt         # 删除匹配模式的行
3. 插入和添加
# 在指定行前插入
sed '5i\插入的内容' file.txt

# 在指定行后添加
sed '5a\添加的内容' file.txt

# 在文件开头插入
sed '1i\开头内容' file.txt

# 在文件末尾添加
sed '$a\结尾内容' file.txt
4. 修改行
# 替换整行
sed '5c\新的行内容' file.txt

# 替换匹配模式的行
sed '/pattern/c\新的行内容' file.txt
高级操作
1. 打印控制
# 只打印匹配的行(类似grep)
sed -n '/pattern/p' file.txt

# 打印行号
sed -n '/pattern/=' file.txt

# 同时打印行号和内容
sed -n '/pattern/{=;p}' file.txt
2. 多重命令
# 使用分号分隔多个命令
sed 's/old/new/g; s/foo/bar/g' file.txt

# 使用-e选项
sed -e 's/old/new/' -e 's/foo/bar/' file.txt

# 对同一行执行多个操作
sed '/pattern/{s/old/new/; s/foo/bar/}' file.txt
3. 文件操作
# 读取文件并插入
sed '/pattern/r otherfile.txt' file.txt

# 将匹配行写入文件
sed '/pattern/w output.txt' file.txt
4. 保持空间操作
# 模式空间与保持空间交换
sed '1!G;h;$!d' file.txt          # 反转文件行顺序

# 复制到保持空间
sed '/pattern/h' file.txt

# 从保持空间取回
sed '/pattern/g' file.txt
实用示例
1. 配置文件修改
# 修改SSH端口
sed -i 's/^#Port 22/Port 2222/' /etc/ssh/sshd_config

# 启用root登录
sed -i 's/^#PermitRootLogin yes/PermitRootLogin yes/' /etc/ssh/sshd_config

# 注释掉某行
sed -i '/pattern/s/^/#/' file.txt

# 取消注释
sed -i '/pattern/s/^#//' file.txt
2. 日志处理
# 提取时间戳
sed -n 's/.*\([0-9]\{2\}:[0-9]\{2\}:[0-9]\{2\}\).*/\1/p' logfile

# 删除空白字符
sed 's/^[ \t]*//;s/[ \t]*$//' file.txt
3. 文本格式化
# 每行末尾添加逗号
sed 's/$/,/' file.txt

# 合并连续空行
sed '/^$/{N;/^\n$/D}' file.txt

# 在每行前添加行号
sed = file.txt | sed 'N;s/\n/\t/'
4. 数据转换
# CSV转TSV
sed 's/,/\t/g' data.csv

# 转换日期格式
sed -E 's/([0-9]{4})-([0-9]{2})-([0-9]{2})/\3\/\2\/\1/g' dates.txt

# URL编码解码(简单版本)
echo "hello world" | sed 's/ /%20/g'
5. 脚本文件使用
# 创建sed脚本
cat > script.sed << EOF
s/old/new/g
/^#/d
/^$/d
EOF

# 使用脚本文件
sed -f script.sed file.txt
常用组合技巧
1. 与管道配合
# 查找并替换
grep "pattern" file.txt | sed 's/old/new/g'

# 处理命令输出
ls -l | sed -n '2,$p' | awk '{print $9}'
2. 复杂文本处理
# 提取XML/HTML标签内容
sed -n 's/.*<title>\(.*\)<\/title>.*/\1/p' file.html

# 处理配置文件段落的示例
sed -n '/^\[database\]/,/^\[/p' config.ini | sed '/^\[/d'
这些 sed 命令用法涵盖了大多数日常文本处理需求,掌握它们可以高效地进行批量文本编辑和转换操作。
UFW
- add allow rule
ufw allow 80/tcp- delete allow rule
ufw delete allow 3000/tcpComponents
Subsections of Components
Cgroup有什么作用
cgroup 的功能非常丰富,除了 CPU 限制外,还提供了多种系统资源的管控能力:
1. 内存管理(memory)
1.1 内存限制
# 设置内存使用上限
echo "100M" > /sys/fs/cgroup/memory/group1/memory.limit_in_bytes

# 设置内存+Swap 上限
echo "200M" > /sys/fs/cgroup/memory/group1/memory.memsw.limit_in_bytes
1.2 内存统计和监控
# 查看内存使用情况
cat /sys/fs/cgroup/memory/group1/memory.usage_in_bytes
cat /sys/fs/cgroup/memory/group1/memory.stat
1.3 内存压力控制
# 设置内存回收压力
echo 100 > /sys/fs/cgroup/memory/group1/memory.swappiness
2. 块设备 I/O 控制(blkio)
2.1 I/O 带宽限制
# 限制读带宽 1MB/s
echo "8:0 1048576" > /sys/fs/cgroup/blkio/group1/blkio.throttle.read_bps_device

# 限制写带宽 2MB/s
echo "8:0 2097152" > /sys/fs/cgroup/blkio/group1/blkio.throttle.write_bps_device
2.2 I/OPS 限制
# 限制每秒读操作数
echo "8:0 100" > /sys/fs/cgroup/blkio/group1/blkio.throttle.read_iops_device

# 限制每秒写操作数
echo "8:0 50" > /sys/fs/cgroup/blkio/group1/blkio.throttle.write_iops_device
2.3 I/O 权重分配
# 设置 I/O 优先级权重(100-1000)
echo 500 > /sys/fs/cgroup/blkio/group1/blkio.weight
3. 进程控制(pids)
3.1 进程数限制
# 限制最大进程数
echo 100 > /sys/fs/cgroup/pids/group1/pids.max

# 查看当前进程数
cat /sys/fs/cgroup/pids/group1/pids.current
4. 设备访问控制(devices)
4.1 设备权限管理
# 允许访问设备
echo "c 1:3 rwm" > /sys/fs/cgroup/devices/group1/devices.allow

# 拒绝访问设备
echo "c 1:5 rwm" > /sys/fs/cgroup/devices/group1/devices.deny
5. 网络控制(net_cls, net_prio)
5.1 网络流量分类
# 设置网络流量类ID
echo 0x100001 > /sys/fs/cgroup/net_cls/group1/net_cls.classid
5.2 网络优先级
# 设置网络接口优先级
echo "eth0 5" > /sys/fs/cgroup/net_prio/group1/net_prio.ifpriomap
6. 挂载点控制(devices)
6.1 文件系统访问限制
# 限制挂载命名空间操作
echo 1 > /sys/fs/cgroup/group1/devices.deny
7. 统一层级 cgroup v2 功能
cgroup v2 提供了更统一的管理接口:
7.1 资源保护
# 内存低水位线保护
echo "min 50M" > /sys/fs/cgroup/group1/memory.low

# CPU 权重保护
echo 100 > /sys/fs/cgroup/group1/cpu.weight
7.2 I/O 控制
# I/O 权重
echo "default 100" > /sys/fs/cgroup/group1/io.weight

# I/O 最大带宽
echo "8:0 rbps=1048576 wbps=2097152" > /sys/fs/cgroup/group1/io.max
8. 实际应用场景
8.1 容器资源限制
# Docker 容器资源限制
docker run -it \
  --cpus="0.5" \
  --memory="100m" \
  --blkio-weight=500 \
  --pids-limit=100 \
  ubuntu:latest
8.2 systemd 服务限制
[Service]
MemoryMax=100M
IOWeight=500
TasksMax=100
DeviceAllow=/dev/null rw
DeviceAllow=/dev/zero rw
DeviceAllow=/dev/full rw
8.3 Kubernetes 资源管理
apiVersion: v1
kind: Pod
spec:
  containers:
  - name: app
    resources:
      limits:
        cpu: "500m"
        memory: "128Mi"
        ephemeral-storage: "1Gi"
      requests:
        cpu: "250m"
        memory: "64Mi"
9. 监控和统计
9.1 资源使用统计
# 查看 cgroup 资源使用
cat /sys/fs/cgroup/memory/group1/memory.stat
cat /sys/fs/cgroup/cpu/group1/cpu.stat
cat /sys/fs/cgroup/io/group1/io.stat
9.2 压力状态信息
# 查看内存压力
cat /sys/fs/cgroup/memory/group1/memory.pressure
10. 高级功能
10.1 资源委托(cgroup v2)
# 允许子 cgroup 管理特定资源
echo "+memory +io" > /sys/fs/cgroup/group1/cgroup.subtree_control
10.2 冻结进程
# 暂停 cgroup 中所有进程
echo 1 > /sys/fs/cgroup/group1/cgroup.freeze

# 恢复执行
echo 0 > /sys/fs/cgroup/group1/cgroup.freeze
cgroup 的这些功能使得它成为容器化技术(如 Docker、Kubernetes)的基础,提供了完整的资源隔离、限制和统计能力,是现代 Linux 系统资源管理的核心技术。
IPVS
IPVS 是什么?
IPVS(IP Virtual Server) 是 Linux 内核内置的第4层(传输层)负载均衡器,是 LVS(Linux Virtual Server)项目的核心组件。
基本概念
- 工作层级:传输层(TCP/UDP)
- 实现方式:内核空间实现,高性能
- 功能:将 TCP/UDP 请求负载均衡到多个真实服务器
IPVS 的核心架构
客户端请求
    ↓
虚拟服务 (Virtual Service) - VIP:Port
    ↓
负载均衡调度算法
    ↓
真实服务器池 (Real Servers)
IPVS 的主要作用
1. 高性能负载均衡
# IPVS 处理能力可达数十万并发连接
# 相比 iptables 有更好的性能表现
2. 多种负载均衡算法
# 查看支持的调度算法
grep -i ip_vs /lib/modules/$(uname -r)/modules.builtin

# 常用算法:
rr      # 轮询 (Round Robin)
wrr     # 加权轮询 (Weighted RR)
lc      # 最少连接 (Least Connection)
wlc     # 加权最少连接 (Weighted LC)
sh      # 源地址哈希 (Source Hashing)
dh      # 目标地址哈希 (Destination Hashing)
3. 多种工作模式
NAT 模式(网络地址转换)
# 请求和响应都经过负载均衡器
# 配置示例
ipvsadm -A -t 192.168.1.100:80 -s rr
ipvsadm -a -t 192.168.1.100:80 -r 10.244.1.10:80 -m
ipvsadm -a -t 192.168.1.100:80 -r 10.244.1.11:80 -m
DR 模式(直接路由)
# 响应直接返回客户端,不经过负载均衡器
# 高性能模式
ipvsadm -A -t 192.168.1.100:80 -s rr
ipvsadm -a -t 192.168.1.100:80 -r 10.244.1.10:80 -g
ipvsadm -a -t 192.168.1.100:80 -r 10.244.1.11:80 -g
TUN 模式(IP 隧道)
# 通过 IP 隧道转发请求
ipvsadm -A -t 192.168.1.100:80 -s rr
ipvsadm -a -t 192.168.1.100:80 -r 10.244.1.10:80 -i
ipvsadm -a -t 192.168.1.100:80 -r 10.244.1.11:80 -i
IPVS 在 Kubernetes 中的应用
kube-proxy IPVS 模式的优势
# 性能对比
iptables: O(n) 链式查找,规则多时性能下降
ipvs:   O(1) 哈希表查找,高性能
Kubernetes 中的 IPVS 配置
# 查看 kube-proxy 是否使用 IPVS 模式
kubectl -n kube-system get pods -l k8s-app=kube-proxy -o yaml | grep mode

# 查看 IPVS 规则
ipvsadm -Ln
IPVS 的核心功能
1. 连接调度
# 不同调度算法的应用场景
rr      # 通用场景,服务器性能相近
wrr     # 服务器性能差异较大
lc      # 长连接服务,如数据库
sh      # 会话保持需求
2. 健康检查
# IPVS 本身不提供健康检查
# 需要配合 keepalived 或其他健康检查工具
3. 会话保持
# 使用源地址哈希实现会话保持
ipvsadm -A -t 192.168.1.100:80 -s sh
IPVS 管理命令详解
基本操作
# 添加虚拟服务
ipvsadm -A -t|u|f <service-address> [-s scheduler]

# 添加真实服务器
ipvsadm -a -t|u|f <service-address> -r <server-address> [-g|i|m] [-w weight]

# 示例
ipvsadm -A -t 192.168.1.100:80 -s wlc
ipvsadm -a -t 192.168.1.100:80 -r 192.168.1.10:8080 -m -w 1
ipvsadm -a -t 192.168.1.100:80 -r 192.168.1.11:8080 -m -w 2
监控和统计
# 查看连接统计
ipvsadm -Ln --stats
ipvsadm -Ln --rate

# 查看当前连接
ipvsadm -Lnc

# 查看超时设置
ipvsadm -L --timeout
IPVS 与相关技术对比
IPVS vs iptables
| 特性 | IPVS | iptables |
|---|---|---|
| 性能 | O(1) 哈希查找 | O(n) 链式查找 |
| 规模 | 支持大量服务 | 规则多时性能下降 |
| 功能 | 专业负载均衡 | 通用防火墙 |
| 算法 | 多种调度算法 | 简单轮询 |
IPVS vs Nginx
| 特性 | IPVS | Nginx |
|---|---|---|
| 层级 | 第4层 (传输层) | 第7层 (应用层) |
| 性能 | 内核级,更高 | 用户空间,功能丰富 |
| 功能 | 基础负载均衡 | 内容路由、SSL终止等 |
实际应用场景
1. Kubernetes Service 代理
# kube-proxy 为每个 Service 创建 IPVS 规则
ipvsadm -Ln
# 输出示例:
TCP  10.96.0.1:443 rr
  -> 192.168.1.10:6443    Masq    1      0          0
TCP  10.96.0.10:53 rr
  -> 10.244.0.5:53        Masq    1      0          0
2. 高可用负载均衡
# 配合 keepalived 实现高可用
# 主备负载均衡器 + IPVS
3. 数据库读写分离
# 使用 IPVS 分发数据库连接
ipvsadm -A -t 192.168.1.100:3306 -s lc
ipvsadm -a -t 192.168.1.100:3306 -r 192.168.1.20:3306 -m
ipvsadm -a -t 192.168.1.100:3306 -r 192.168.1.21:3306 -m
总结
IPVS 的主要用途:
- 高性能负载均衡 - 内核级实现,处理能力强大
- 多种调度算法 - 适应不同业务场景
- 多种工作模式 - NAT/DR/TUN 满足不同网络需求
- 大规模集群支持 - 适合云原生和微服务架构
- Kubernetes 集成 - 作为 kube-proxy 的后端,提供高效的 Service 代理
在 Kubernetes 环境中,IPVS 模式相比 iptables 模式在大规模服务下具有明显的性能优势,是生产环境推荐的负载均衡方案。
Interface
Subsections of Interface
POSIX标准
Mirror
Subsections of Mirror
Source Repo
Fedora
- Fedora 40 located in
/etc/yum.repos.d/
CentOS
-
CentOS 7 located in
/etc/yum.repos.d/ -
CentOS 8 stream located in
/etc/yum.repos.d/
Ubuntu
-
Ubuntu 18.04 located in
/etc/apt/sources.list -
Ubuntu 20.04 located in
/etc/apt/sources.list -
Ubuntu 22.04 located in
/etc/apt/sources.list
Debian
-
Debian Buster located in
/etc/apt/sources.list -
Debian Bullseye located in
/etc/apt/sources.list
Anolis
-
Anolis 3 located in
/etc/yum.repos.d/ -
Anolis 2 located in
/etc/yum.repos.d/Alinyun Mirror
Refresh Repo
OS:
dnf clean all && dnf makecacheyum clean all && yum makecacheapt-get clean allScripts
Subsections of Scripts
Create Systemd Service
- 创建 systemd 服务文件
vim /etc/systemd/system/your-service-name.service- 添加以下内容到文件中
运行一个脚本
[Unit]
Description=Your Service Description
After=network.target # after: 指定在哪些服务之后启动

[Service]
Type=simple  # simple: 运行一个简单的程序 | forking: 服务会fork出新的进程 | oneshot: 运行一次 | notify: 运行并等待通知 | exec: 运行一个命令
User=root
ExecStart=/bin/bash -c "your-bash-command-here"
Restart=always
RestartSec=5

[Install]
WantedBy=multi-user.target # multi-user.target: 运行在多用户模式下的目标
运行一个程序
[Unit]
Description=Backup Service
After=network.target

[Service]
Type=simple
User=root
ExecStart=/bin/bash -c "tar -czf /backup/backup-$(date +%Y%m%d).tar.gz /home/user/data"
Restart=on-failure

[Install]
WantedBy=multi-user.target- 启动服务
# 重新加载 systemd 配置
sudo systemctl daemon-reload

# 启动服务
sudo systemctl start your-service-name

# 设置开机启动
sudo systemctl enable your-service-name

# 检查服务状态
sudo systemctl status your-service-name

# 停止服务
sudo systemctl stop your-service-name

# 禁用开机启动
sudo systemctl disable your-service-name

# 查看服务日志
sudo journalctl -u your-service-name -fDisable Service
Disable firewall、selinux、dnsmasq、swap service
systemctl disable --now firewalld
systemctl disable --now dnsmasq
systemctl disable --now NetworkManager

setenforce 0
sed -i 's#SELINUX=permissive#SELINUX=disabled#g' /etc/sysconfig/selinux
sed -i 's#SELINUX=permissive#SELINUX=disabled#g' /etc/selinux/config
reboot
getenforce


swapoff -a && sysctl -w vm.swappiness=0
sed -ri '/^[^#]*swap/s@^@#@' /etc/fstabFree Disk Space
Cleanup
- find first 10 biggest files
dnf install ncdu

# 找出当前目录下最大的10个文件/目录
du -ah . | sort -rh | head -n 10

# 找出家目录下大于100M的文件
find ~ -type f -size +100M -exec ls -lh {} \; | awk '{ print $9 ": " $5 }'- clean cache
rm -rf ~/.cache/*
sudo rm -rf /tmp/*
sudo rm -rf /var/tmp/*- clean images
# 删除所有停止的容器
podman container prune -y

# 删除所有未被任何容器引用的镜像(悬空镜像)
podman image prune

# 更激进的清理:删除所有未被运行的容器使用的镜像
podman image prune -a

# 清理构建缓存
podman builder prune

# 最彻底的清理:删除所有停止的容器、所有未被容器使用的网络、所有悬空镜像和构建缓存
podman system prune
podman system prune -a # 更加彻底,会删除所有未被使用的镜像,而不仅仅是悬空的Login Without Pwd
copy id_rsa to other nodes
yum install sshpass -y
mkdir -p /extend/shell

cat >>/extend/shell/distribute_pub.sh<< EOF
#!/bin/bash
ROOT_PASS=root123
ssh-keygen -t rsa -f ~/.ssh/id_rsa -P ''
for ip in 101 102 103
do
sshpass -p\$ROOT_PASS ssh-copy-id -o StrictHostKeyChecking=no 192.168.29.\$ip
done
EOF

cd /extend/shell
chmod +x distribute_pub.sh

./distribute_pub.shSet Http Proxy
[Optional] Install Proxy Server
go and check http://port.72602.online/ops/hugo/index.htmlSet Http Proxy
export https_proxy=http://47.110.67.161:30890
export http_proxy=http://47.110.67.161:30890
Use Proxy in Pod