Subsections of ☸️Kubernetes
Prepare k8s Cluster
Install Kuberctl
MIRROR="files.m.daocloud.io/"
VERSION=$(curl -L -s https://${MIRROR}dl.k8s.io/release/stable.txt)
[ $(uname -m) = x86_64 ] && curl -sSLo kubectl "https://${MIRROR}dl.k8s.io/release/${VERSION}/bin/linux/amd64/kubectl"
[ $(uname -m) = aarch64 ] && curl -sSLo kubectl "https://${MIRROR}dl.k8s.io/release/${VERSION}/bin/linux/arm64/kubectl"
chmod u+x kubectl
mkdir -p ${HOME}/bin
mv -f kubectl ${HOME}/bin
Then, you can choose
Building a K8s Cluster, you can choose one of the following methods.
Subsections of Prepare k8s Cluster
Kind
Warning
Although this is a easiest way to build a cluster, but I won’t recommend you to choose this. SInce there are many unsolved issue in here, check https://kind.sigs.k8s.io/docs/user/known-issues/
Preliminary
-
Kind binary has installed, if not check 🔗link
-
Hardware Requirements:
- At least 2 GB of RAM per machine (minimum 1 GB)
- 2 CPUs on the master node
- Full network connectivity among all machines (public or private network)
-
Operating System:
- Ubuntu 22.04/14.04, CentOS 7/8, or any other supported Linux distribution.
-
Network Requirements:
- Unique hostname, MAC address, and product_uuid for each node.
- Certain ports need to be open (e.g., 6443, 2379-2380, 10250, 10251, 10252, 10255, etc.)
Create your cluster
Creating a Kubernetes cluster is as simple as kind create cluster
kind create cluster --name testDelete your cluster
kind delete clusterReference
and the you can visit https://kind.sigs.k8s.io/docs/user/quick-start/ for mode detail.
K3s
Preliminary
-
- Server need to have at least 2 cores, 2 GB RAM
- Agent need 1 core , 512 MB RAM
-
Operating System:
- K3s is expected to work on most modern Linux systems.
-
Network Requirements:
- The K3s server needs port 6443 to be accessible by all nodes.
- If you wish to utilize the metrics server, all nodes must be accessible to each other on port 10250.
Init K3s Server [At Server End]
curl -sfL https://rancher-mirror.rancher.cn/k3s/k3s-install.sh | INSTALL_K3S_MIRROR=cn sh -s - server --cluster-init --flannel-backend=vxlan --node-taint "node-role.kubernetes.io/control-plane=true:NoSchedule" --disable traefikappend --disable traefik
append --disable servicelb 禁用 ServiceLB(如果你计划使用其他负载均衡器如 MetalLB)
append --disable local-storage 禁用本地存储(如果你使用其他存储方案)
Get K3s Token [At Server End]
cat /var/lib/rancher/k3s/server/node-tokenJoin K3s Worker [At Agent End]
curl -sfL https://rancher-mirror.rancher.cn/k3s/k3s-install.sh | INSTALL_K3S_MIRROR=cn K3S_URL=https://<master-ip>:6443 K3S_TOKEN=<join-token> sh -Copy Kubeconfig [At Server + Agent End]
mkdir -p $HOME/.kube
cp /etc/rancher/k3s/k3s.yaml $HOME/.kube/config
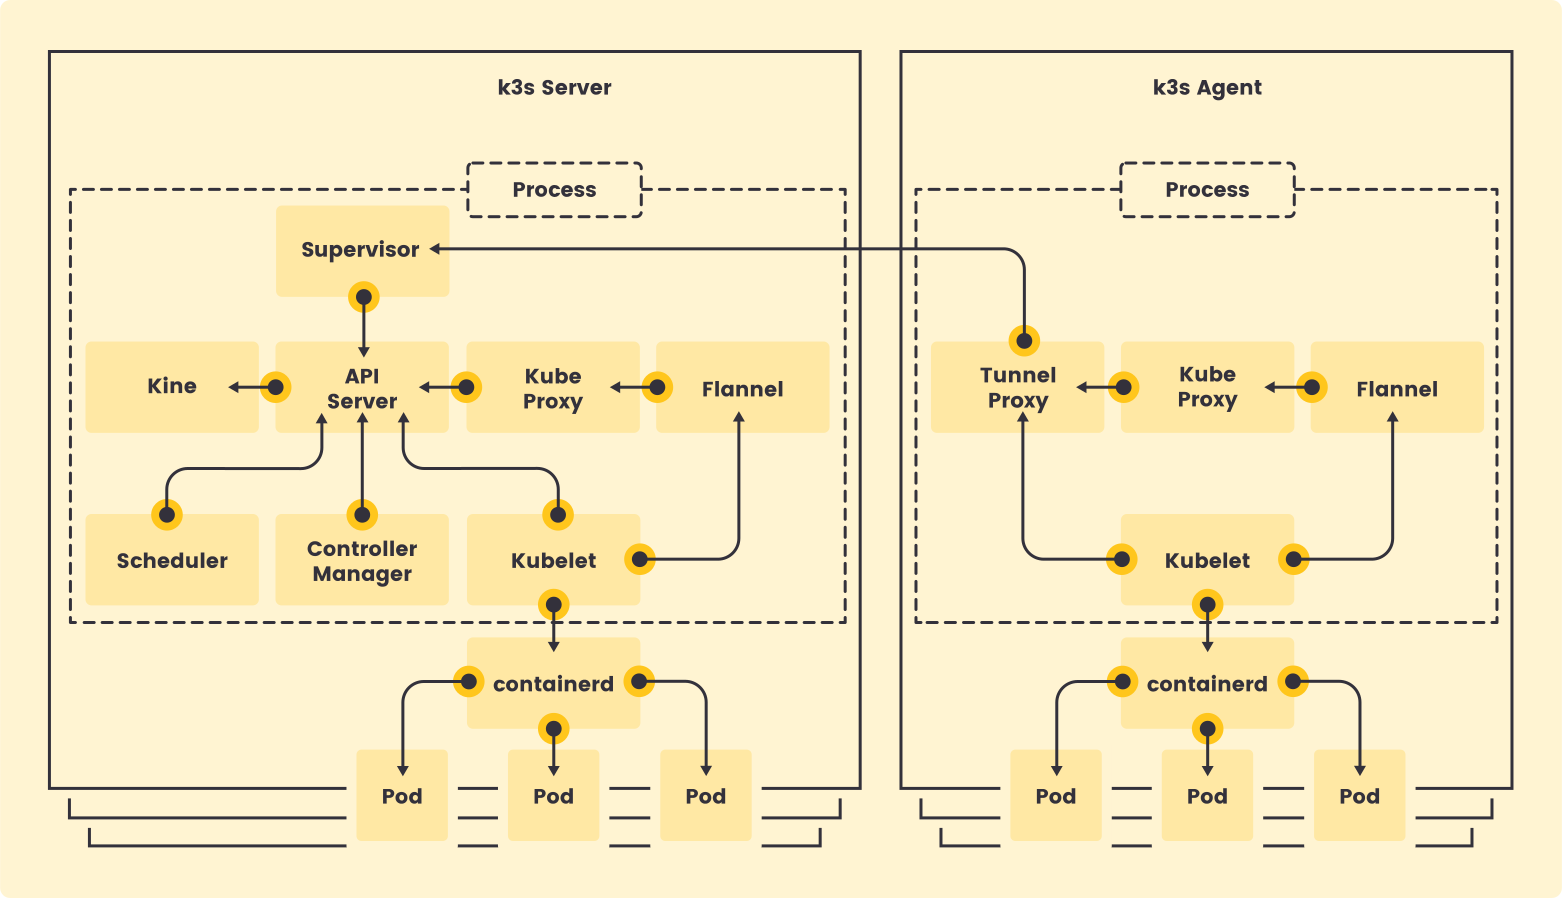
How it works
Uninstall K3s cluster [At Server + Agent End]
# exec on server
/usr/local/bin/k3s-uninstall.sh

# exec on agent
/usr/local/bin/k3s-agent-uninstall.shMinikube
Preliminary
-
Minikube binary has installed, if not check 🔗link
-
Hardware Requirements:
- At least 2 GB of RAM per machine (minimum 1 GB)
- 2 CPUs on the master node
- Full network connectivity among all machines (public or private network)
-
Operating System:
- Ubuntu 20.04/18.04, CentOS 7/8, or any other supported Linux distribution.
-
Network Requirements:
- Unique hostname, MAC address, and product_uuid for each node.
- Certain ports need to be open (e.g., 6443, 2379-2380, 10250, 10251, 10252, 10255, etc.)
[Optional] Disable aegis service and reboot system for Aliyun
sudo systemctl disable aegis && sudo rebootCustomize your cluster
minikube start --driver=podman --image-mirror-country=cn --kubernetes-version=v1.33.1 --image-repository=registry.cn-hangzhou.aliyuncs.com/google_containers --cpus=6 --memory=20g --disk-size=50g --forceRestart minikube
minikube stop && minikube startAdd alias
alias kubectl="minikube kubectl --"Stop And Clean
minikube stop && minikube delete --all --purgeForward
# execute on your local machine
        Remote                                                  Local⬇️
   __________________                          ________________________________
  ╱                  ╲╲      wire/wifi        ╱ [ Minikube ] 17.100.x.y        ╲╲
 ╱                   ╱╱   <------------->    ╱                                 ╱╱
╱ telnet 192.168.a.b ╱                      ╱  > execute ssh... at 192.168.a.b ╱
╲___________________╱  IP: 10.45.m.n        ╲_________________________________╱ IP: 192.168.a.b
ssh -i ~/.minikube/machines/minikube/id_rsa docker@$(minikube ip) -L '*:30443:0.0.0.0:30443' -N -fand then you can visit https://minikube.sigs.k8s.io/docs/start/ for more detail.
FAQ
Command
Subsections of Command
Kubectl CheatSheet
Switch Context
- use different config
kubectl --kubeconfig /root/.kube/config_ack get podResource
-
create resource
Resource Fromkubectl create -n <$namespace> -f <$file_url>helm install <$resource_id> <$resource_id> \ --namespace <$namespace> \ --create-namespace \ --version <$version> \ --repo <$repo_url> \ --values resource.values.yaml \ --atomic -
debug resource
kubectl -n <$namespace> describe <$resource_id>- logging resource
kubectl -n <$namespace> logs -f <$resource_id>- port forwarding resource
kubectl -n <$namespace> port-forward <$resource_id> --address 0.0.0.0 8080:80 # local:pod- delete all resource under specific namespace
kubectl delete all --all -n <$namespace>- delete error pods
kubectl -n <$namespace> delete pods --field-selector status.phase=Failed- force delete
kubectl -n <$namespace> delete pod <$resource_id> --force --grace-period=0- opening a Bash Shell inside a Pod
kubectl -n <$namespace> exec -it <$resource_id> -- bash - copy secret to another namespace
kubectl -n <$namespaceA> get secret <$secret_name> -o json \
    | jq 'del(.metadata["namespace","creationTimestamp","resourceVersion","selfLink","uid"])' \
| kubectl -n <$namespaceB> apply -f -- copy secret to another name
kubectl -n <$namespace> get secret <$old_secret_name> -o json | \
jq 'del(.metadata["namespace","creationTimestamp","resourceVersion","selfLink","uid","ownerReferences","annotations","labels"]) | .metadata.name = "<$new_secret_name>"' | \
kubectl apply -n <$namespace> -f -- delete all completed job
kubectl delete jobs -n <$namespace> --field-selector status.successful=1 Nodes
- list taint
kubectl describe nodes | grep -i taint
## kubectl describe node <节点名称> | grep Taints- add taint
kubectl taint nodes <$node_ip> <key:value>- remove taint 使用 kubectl taint 命令并在 taint 键名后加上 - 符号
kubectl taint nodes <节点名称> <taint-key>-- show info extract by json path
kubectl get nodes -o jsonpath='{.items[*].spec.podCIDR}'Deploy
- rollout show rollout history
kubectl -n <$namespace> rollout history deploy/<$deploy_resource_id>undo rollout
kubectl -n <$namespace> rollout undo deploy <$deploy_resource_id> --to-revision=1Patch
clean those who won’t managed by k8s
kubectl -n metadata patch flinkingest ingest-table-or-fits-from-oss -p '{"metadata":{"finalizers":[]}}' --type=mergeHelm Chart CheatSheet
Finding Charts
helm search hub wordpressAdding Repositories
helm repo add ay-helm-mirror https://aaronyang0628.github.io/helm-chart-mirror/charts
helm repo update
Showing Chart Values
helm show values bitnami/wordpressPackaging Charts
helm package --dependency-update --destination /tmp/ /root/metadata-operator/environments/helm/metadata-environment/chartsUninstall Chart
helm uninstall -n warehouse warehousewhen failed, you can try
helm uninstall -n warehouse warehouse --no-hooks --cascade=foregroundResource CheatSheet
Create Secret From Literal
kubectl -n application create secret generic xxxx-secrets \
  --from-literal=xxx_uri='https://in03-891eca6c21bd4e5.serverless.aws-eu-central-1.cloud.zilliz.com' \
  --from-literal=xxxx_token='<$the uncoded value, do not base64 and paste here>' \
  --from-literal=tongyi_api_key='sk-xxxxxxxxxxx'
Forward external service
kubectl -n basic-components apply -f - <<EOF
apiVersion: v1
kind: Service
metadata:
  name: proxy-server-service
spec:
  type: ClusterIP
  ports:
  - port: 80
    targetPort: 32080
    protocol: TCP
    name: http
---
kubectl -n basic-components apply -f - <<EOF
apiVersion: v1
kind: Endpoints
metadata:
  name: proxy-server-service
subsets:
  - addresses:
    - ip: "47.xxx.xxx.xxx"
    ports:
    - port: 32080
      protocol: TCP
      name: http
---
apiVersion: networking.k8s.io/v1
kind: Ingress
metadata:
  name: proxy-server-ingress
  annotations:
    nginx.ingress.kubernetes.io/proxy-connect-timeout: "300"
    nginx.ingress.kubernetes.io/proxy-read-timeout: "300"
    nginx.ingress.kubernetes.io/proxy-send-timeout: "300"
spec:
  ingressClassName: nginx
  rules:
  - host: server.proxy.72602.online
    http:
      paths:
      - path: /
        pathType: Prefix
        backend:
          service:
            name: proxy-server-service
            port:
              number: 80
EOFConatiner
- Docker
Install Docker, you can refer to Docker Installation.
- Podman
Install Podman, you can refer to Podman Installation.
Subsections of Conatiner
CheatShett
type:
- remove specific image
podman rmi <$image_id>- remove all
<none>images
podman rmi `podamn images | grep '<none>' | awk '{print $3}'`- remove all stopped containers
podman container prune- remove all docker images not used
podman image prunesudo podman volume prune
- find ip address of a container
podman inspect --format='{{.NetworkSettings.IPAddress}}' minio-server- exec into container
podman run -it <$container_id> /bin/bash- run with environment
podman run -d --replace
    -p 18123:8123 -p 19000:9000 \
    --name clickhouse-server \
    -e ALLOW_EMPTY_PASSWORD=yes \
    --ulimit nofile=262144:262144 \
    quay.m.daocloud.io/kryptonite/clickhouse-docker-rootless:20.9.3.45
--ulimit nofile=262144:262144: 262144 is the maximum users process or for showing maximum user process limit for the logged-in user
ulimitis admin access required Linux shell command which is used to see, set, or limit the resource usage of the current user. It is used to return the number of open file descriptors for each process. It is also used to set restrictions on the resources used by a process.
- login registry
export ZJLAB_CR_PAT=ghp_xxxxxxxxxxxx
echo $ZJLAB_CR_PAT | podman login --tls-verify=false cr.registry.res.cloud.zhejianglab.com -u ascm-org-1710208820455 --password-stdin

export GITHUB_CR_PAT=ghp_xxxxxxxxxxxx
echo $GITHUB_CR_PAT | podman login ghcr.io -u aaronyang0628 --password-stdin

export DOCKER_CR_PAT=dckr_pat_bBN_Xkgz-xxxx
echo $DOCKER_CR_PAT | podman login docker.io -u aaron666 --password-stdin

export HARBOR_CR_PAT=Aaron
echo $DOCKER_CR_PAT | podman login --tls-verify=false harbor.zhejianglab.com -u byang628@zhejianglab.org --password-stdin- tag image
podman tag 76fdac66291c cr.registry.res.cloud.zhejianglab.com/ay-dev/datahub-s3-fits:1.0.0- push image
podman push cr.registry.res.cloud.zhejianglab.com/ay-dev/datahub-s3-fits:1.0.0- remove specific image
docker rmi <$image_id>- remove all
<none>images
docker rmi `docker images | grep '<none>' | awk '{print $3}'`- remove all stopped containers
docker container prune- remove all docker images not used
docker image prune- find ip address of a container
docker inspect --format='{{.NetworkSettings.IPAddress}}' minio-server- exec into container
docker exec -it <$container_id> /bin/bash- run with environment
docker run -d --replace -p 18123:8123 -p 19000:9000 --name clickhouse-server -e ALLOW_EMPTY_PASSWORD=yes --ulimit nofile=262144:262144 quay.m.daocloud.io/kryptonite/clickhouse-docker-rootless:20.9.3.45 --ulimit nofile=262144:262144: sssss
-
copy file
Copy a local file into container
docker cp ./some_file CONTAINER:/workor copy files from container to local path
docker cp CONTAINER:/var/logs/ /tmp/app_logs -
load a volume
docker run --rm \
    --entrypoint bash \
    -v $PWD/data:/app:ro \
    -it docker.io/minio/mc:latest \
    -c "mc --insecure alias set minio https://oss-cn-hangzhou-zjy-d01-a.ops.cloud.zhejianglab.com/ g83B2sji1CbAfjQO 2h8NisFRELiwOn41iXc6sgufED1n1A \
        && mc --insecure ls minio/csst-prod/ \
        && mc --insecure mb --ignore-existing minio/csst-prod/crp-test \
        && mc --insecure cp /app/modify.pdf minio/csst-prod/crp-test/ \
&& mc --insecure ls --recursive minio/csst-prod/"Template
Subsections of Template
DevContainer Template
Subsections of DevContainer Template
Java 21 + Go 1.24
prepare .devcontainer.json
{
  "name": "Go & Java DevContainer",
  "build": {
    "dockerfile": "Dockerfile"
  },
  "mounts": [
    "source=/root/.kube/config,target=/root/.kube/config,type=bind",
    "source=/root/.minikube/profiles/minikube/client.crt,target=/root/.minikube/profiles/minikube/client.crt,type=bind",
    "source=/root/.minikube/profiles/minikube/client.key,target=/root/.minikube/profiles/minikube/client.key,type=bind",
    "source=/root/.minikube/ca.crt,target=/root/.minikube/ca.crt,type=bind"
  ],
  "customizations": {
    "vscode": {
      "extensions": [
        "golang.go",
        "vscjava.vscode-java-pack",
        "redhat.java",
        "vscjava.vscode-maven",
        "Alibaba-Cloud.tongyi-lingma",
        "vscjava.vscode-java-debug",
        "vscjava.vscode-java-dependency",
        "vscjava.vscode-java-test"
      ]
    }
  },
  "remoteUser": "root",
  "postCreateCommand": "go version && java -version && mvn -v"
}
prepare Dockerfile
FROM m.daocloud.io/docker.io/ubuntu:24.04

ENV DEBIAN_FRONTEND=noninteractive

RUN apt-get update && \
    apt-get install -y --no-install-recommends \
    ca-certificates \
    curl \
    git \
    wget \
    gnupg \
    vim \
    lsb-release \
    apt-transport-https \
    && apt-get clean \
    && rm -rf /var/lib/apt/lists/*

# install OpenJDK 21
RUN mkdir -p /etc/apt/keyrings && \
    wget -qO - https://packages.adoptium.net/artifactory/api/gpg/key/public | gpg --dearmor -o /etc/apt/keyrings/adoptium.gpg && \
    echo "deb [signed-by=/etc/apt/keyrings/adoptium.gpg arch=amd64] https://packages.adoptium.net/artifactory/deb $(awk -F= '/^VERSION_CODENAME/{print$2}' /etc/os-release) main" | tee /etc/apt/sources.list.d/adoptium.list > /dev/null && \
    apt-get update && \
    apt-get install -y temurin-21-jdk && \
    apt-get clean && \
    rm -rf /var/lib/apt/lists/*

# set java env
ENV JAVA_HOME=/usr/lib/jvm/temurin-21-jdk-amd64

# install maven
ARG MAVEN_VERSION=3.9.10
RUN wget https://dlcdn.apache.org/maven/maven-3/${MAVEN_VERSION}/binaries/apache-maven-${MAVEN_VERSION}-bin.tar.gz -O /tmp/maven.tar.gz && \
    mkdir -p /opt/maven && \
    tar -C /opt/maven -xzf /tmp/maven.tar.gz --strip-components=1 && \
    rm /tmp/maven.tar.gz

ENV MAVEN_HOME=/opt/maven
ENV PATH="${MAVEN_HOME}/bin:${PATH}"

# install go 1.24.4
ARG GO_VERSION=1.24.4
RUN wget https://dl.google.com/go/go${GO_VERSION}.linux-amd64.tar.gz -O /tmp/go.tar.gz && \
    tar -C /usr/local -xzf /tmp/go.tar.gz && \
    rm /tmp/go.tar.gz

# set go env
ENV GOROOT=/usr/local/go
ENV GOPATH=/go
ENV PATH="${GOROOT}/bin:${GOPATH}/bin:${PATH}"

# install other binarys
ARG KUBECTL_VERSION=v1.33.0
RUN wget https://files.m.daocloud.io/dl.k8s.io/release/${KUBECTL_VERSION}/bin/linux/amd64/kubectl -O /tmp/kubectl && \
    chmod u+x /tmp/kubectl && \
    mv -f /tmp/kubectl /usr/local/bin/kubectl

ARG HELM_VERSION=v3.13.3
RUN wget https://files.m.daocloud.io/get.helm.sh/helm-${HELM_VERSION}-linux-amd64.tar.gz -O /tmp/helm-${HELM_VERSION}-linux-amd64.tar.gz && \
    mkdir -p /opt/helm && \
    tar -C /opt/helm -xzf /tmp/helm-${HELM_VERSION}-linux-amd64.tar.gz && \
    rm /tmp/helm-${HELM_VERSION}-linux-amd64.tar.gz

ENV HELM_HOME=/opt/helm/linux-amd64
ENV PATH="${HELM_HOME}:${PATH}"

USER root
WORKDIR /workspacePython 3.11 + CUDA 120
prepare .devcontainer.json
{
	"name": "DALI Learning Environment",
	"build": {
		"dockerfile": "Dockerfile",
		"context": "..",
		"args": {
			"VARIANT": "3.11",
			"HTTP_PROXY": "",
			"HTTPS_PROXY": "",
			"http_proxy": "",
			"https_proxy": ""
		}
	},
	"forwardPorts": [8000],
	"portsAttributes": {
		"8000": {
			"label": "HTTP Server",
			"protocol": "http",
			"onAutoForward": "notify"
		}
	},
	"customizations": {
		"vscode": {
			"extensions": [
				"ms-python.python",
				"ms-python.vscode-pylance",
				"ms-python.debugpy"
			],
			"settings": {
				"python.defaultInterpreterPath": "/usr/bin/python",
				"files.exclude": {
					"**/__pycache__": true,
					"**/*.pyc": true
				}
			}
		}
	},
	"postCreateCommand": "bash .devcontainer/post-create.sh",
	"remoteUser": "vscode",
	"runArgs": [
		"-p", "0.0.0.0:8000:8000",
		"--device=/dev/nvidiactl",
		"--device=/dev/nvidia0",
		"--device=/dev/nvidia-uvm",
		"--device=/dev/nvidia-uvm-tools",
		"--ipc=host",
		"--ulimit", "memlock=-1",
		"--ulimit", "stack=67108864",
		"--env", "LD_LIBRARY_PATH=/usr/local/cuda/lib64:/usr/lib/x86_64-linux-gnu:/host/usr/lib/x86_64-linux-gnu"
	],
	"mounts": [
		"type=bind,src=${localEnv:HOME}/.ssh,target=/home/vscode/.ssh,readonly",
		"type=bind,src=/usr/lib/x86_64-linux-gnu,target=/host/usr/lib/x86_64-linux-gnu,readonly",
		"type=bind,src=/usr/bin/nvidia-smi,target=/usr/bin/nvidia-smi,readonly",
		"type=bind,src=/usr/bin/nvidia-debugdump,target=/usr/bin/nvidia-debugdump,readonly"
	],
	"containerEnv": {
		"CUDA_VISIBLE_DEVICES": "0",
		"NVIDIA_VISIBLE_DEVICES": "all",
		"NVIDIA_DRIVER_CAPABILITIES": "compute,utility",
		"HTTP_PROXY": "",
		"HTTPS_PROXY": "",
		"http_proxy": "",
		"https_proxy": "",
		"NO_PROXY": "",
		"no_proxy": ""
	},
	"description": "NVIDIA DALI MCP开发环境 - GPU支持的轻量级镜像"
}
prepare Dockerfile
# Use runtime image instead of devel to reduce size (4GB vs 10GB)
FROM m.daocloud.io/docker.io/nvidia/cuda:12.1.0-cudnn8-runtime-ubuntu22.04

ENV DEBIAN_FRONTEND=noninteractive
ENV TZ=Asia/Shanghai

# Add deadsnakes PPA for Python 3.11 and install base dependencies
# Clear proxy settings to avoid connection issues during build
RUN unset HTTP_PROXY HTTPS_PROXY http_proxy https_proxy && \
    apt-get update && apt-get install -y --no-install-recommends \
    software-properties-common \
    curl \
    && add-apt-repository ppa:deadsnakes/ppa -y && \
    apt-get update && apt-get install -y --no-install-recommends \
    python3.11 \
    python3.11-dev \
    python3.11-distutils \
    python3-pip \
    git \
    wget \
    && rm -rf /var/lib/apt/lists/*

# Install Node.js (LTS) for Claude CLI
RUN unset HTTP_PROXY HTTPS_PROXY http_proxy https_proxy && \
    curl -fsSL https://deb.nodesource.com/setup_lts.x | bash - && \
    apt-get install -y --no-install-recommends nodejs && \
    rm -rf /var/lib/apt/lists/*

# Set NVIDIA library paths
ENV LD_LIBRARY_PATH=/usr/local/cuda/lib64:${LD_LIBRARY_PATH}
ENV CUDA_HOME=/usr/local/cuda
ENV PATH=${CUDA_HOME}/bin:${PATH}
ENV NVIDIA_VISIBLE_DEVICES=all
ENV NVIDIA_DRIVER_CAPABILITIES=compute,utility

# Set Python 3.11 as default version
RUN unset HTTP_PROXY HTTPS_PROXY http_proxy https_proxy && \
    update-alternatives --install /usr/bin/python python /usr/bin/python3.11 1 && \
    update-alternatives --install /usr/bin/python3 python3 /usr/bin/python3.11 1

# Upgrade pip
RUN unset HTTP_PROXY HTTPS_PROXY http_proxy https_proxy && \
    python -m pip install --no-cache-dir --upgrade pip setuptools wheel

# Install DALI and minimal packages for MCP development
RUN unset HTTP_PROXY HTTPS_PROXY http_proxy https_proxy && \
    pip install --no-cache-dir \
    --extra-index-url https://pypi.nvidia.com \
    nvidia-dali-cuda120 \
    numpy \
    ipython

# Create non-root user
RUN useradd -m -s /bin/bash vscode && \
    mkdir -p /workspace && \
    chown -R vscode:vscode /workspace

WORKDIR /workspace
USER vscode

CMD ["/bin/bash"]
post-create.sh
#!/bin/bash

# Clear proxy settings (should already be cleared by containerEnv, but double-check)
unset HTTP_PROXY HTTPS_PROXY http_proxy https_proxy

# Install MCP SDK and minimal dependencies
pip install --no-cache-dir \
    -i https://pypi.tuna.tsinghua.edu.cn/simple \
    mcp \
    anthropic

curl -fsSL https://claude.ai/install.sh | bash

echo 'export PATH="$HOME/.local/bin:$PATH"' >> ~/.bashrc && source ~/.bashrc

# Create working directories
mkdir -p /workspace/scripts

echo "✅ DALI environment setup completed!"DEV
Subsections of DEV
Devpod
Preliminary
1. Get provider config
# just copy ~/.kube/configfor example, the original config
apiVersion: v1
clusters:
- cluster:
    certificate-authority: <$file_path>
    extensions:
    - extension:
        provider: minikube.sigs.k8s.io
        version: v1.33.0
      name: cluster_info
    server: https://<$minikube_ip>:8443
  name: minikube
contexts:
- context:
    cluster: minikube
    extensions:
    - extension:
        provider: minikube.sigs.k8s.io
        version: v1.33.0
      name: context_info
    namespace: default
    user: minikube
  name: minikube
current-context: minikube
kind: Config
preferences: {}
users:
- name: minikube
  user:
    client-certificate: <$file_path>
    client-key: <$file_path>
you need to rename clusters.cluster.certificate-authority, clusters.cluster.server, users.user.client-certificate, users.user.client-key.
clusters.cluster.certificate-authority -> clusters.cluster.certificate-authority-data
clusters.cluster.server -> ip set to `localhost`
users.user.client-certificate -> users.user.client-certificate-data
users.user.client-key -> users.user.client-key-data
the data you paste after each key should be base64
cat <$file_path> | base64then, modified config file should be look like this:
apiVersion: v1
clusters:
- cluster:
    certificate-authority-data: xxxxxxxxxxxxxx
    extensions:
    - extension:
        provider: minikube.sigs.k8s.io
        version: v1.33.0
      name: cluster_info
    server: https://127.0.0.1:8443
  name: minikube
contexts:
- context:
    cluster: minikube
    extensions:
    - extension:
        provider: minikube.sigs.k8s.io
        version: v1.33.0
      name: context_info
    namespace: default
    user: minikube
  name: minikube
current-context: minikube
kind: Config
preferences: {}
users:
- name: minikube
  user:
    client-certificate-data: xxxxxxxxxxxx
    client-key-data: xxxxxxxxxxxxxxxx
then we should forward minikube port in your own pc
#where you host minikube
MACHINE_IP_ADDRESS=10.200.60.102
USER=ayay
MINIKUBE_IP_ADDRESS=$(ssh -o 'UserKnownHostsFile /dev/null' $USER@$MACHINE_IP_ADDRESS '$HOME/bin/minikube ip')
ssh -o 'UserKnownHostsFile /dev/null' $USER@$MACHINE_IP_ADDRESS -L "*:8443:$MINIKUBE_IP_ADDRESS:8443" -N -f
2. Create workspace
- get git repo link
- choose appropriate provider
- choose ide type and version
- and go!
Useful Command
Install Kubectl
for more information, you can check 🔗link to install kubectl
-
How to use it in devpod
Everything works fine.
when you in pod, and using kubectl you should change
clusters.cluster.serverin~/.kube/configto https://<$minikube_ip>:8443 -
exec into devpod
kubectl -n devpod exec -it <$resource_id> -c devpod -- bin/bash- add DNS item
10.aaa.bbb.ccc gitee.zhejianglab.com- shutdown ssh tunnel
# check if port 8443 is already open
netstat -aon|findstr "8443"

# find PID
ps | grep ssh

# kill the process
taskkill /PID <$PID> /T /F
# check if port 8443 is already open netstat -aon|findstr "8443" # find PID ps | grep ssh # kill the process kill -9 <$PID>
Dev Conatiner
write .devcontainer.json
JumpServer
          Local             Jumpserver        virtual node (develop/k3s)
        ________            _______                ________
       ╱        ╲          ╱       ╲╲             ╱        ╲
      ╱         ╱ ------  ╱        ╱╱  --------  ╱         ╱
     ╱         ╱         ╱         ╱            ╱         ╱
     ╲________╱          ╲________╱             ╲________╱
    IP: 10.A.B.C    IP: jumpserver.dev.72602.online   IP: 192.168.100.xxx
Modify SSH Config
30022has ssh service at jumpserver
cat .ssh/config
Host jumpserver
  HostName jumpserver.dev.72602.online
  Port 30022
  User ay
  IdentityFile ~/.ssh/id_rsa

Host virtual
  HostName 192.168.100.xxx
  Port 22
  User ay
  ProxyJump jumpserver
  IdentityFile ~/.ssh/id_rsa
And then you can directly connect to the virtual node
Forward port in virtual node
30022has ssh service at jumpserver
32524is a service which you wanna forward
ssh -o 'UserKnownHostsFile /dev/null' -o 'ServerAliveInterval=60' -L 32524:192.168.100.xxx:32524 -p 30022 ay@jumpserver.dev.72602.onlineOperator SDK
Subsections of Operator SDK
KubeBuilder
Basic
Kubebuilder 是一个使用 CRDs 构建 K8s API 的 SDK,主要是:
- 基于 controller-runtime 以及 client-go 构建
- 提供一套可扩展的 API 框架,方便用户从零开始开发 CRDs 和 Controllers 和 Admission Webhooks 来扩展 K8s。
- 还提供脚手架工具初始化 CRDs 工程,自动生成 boilerplate 模板代码和配置;
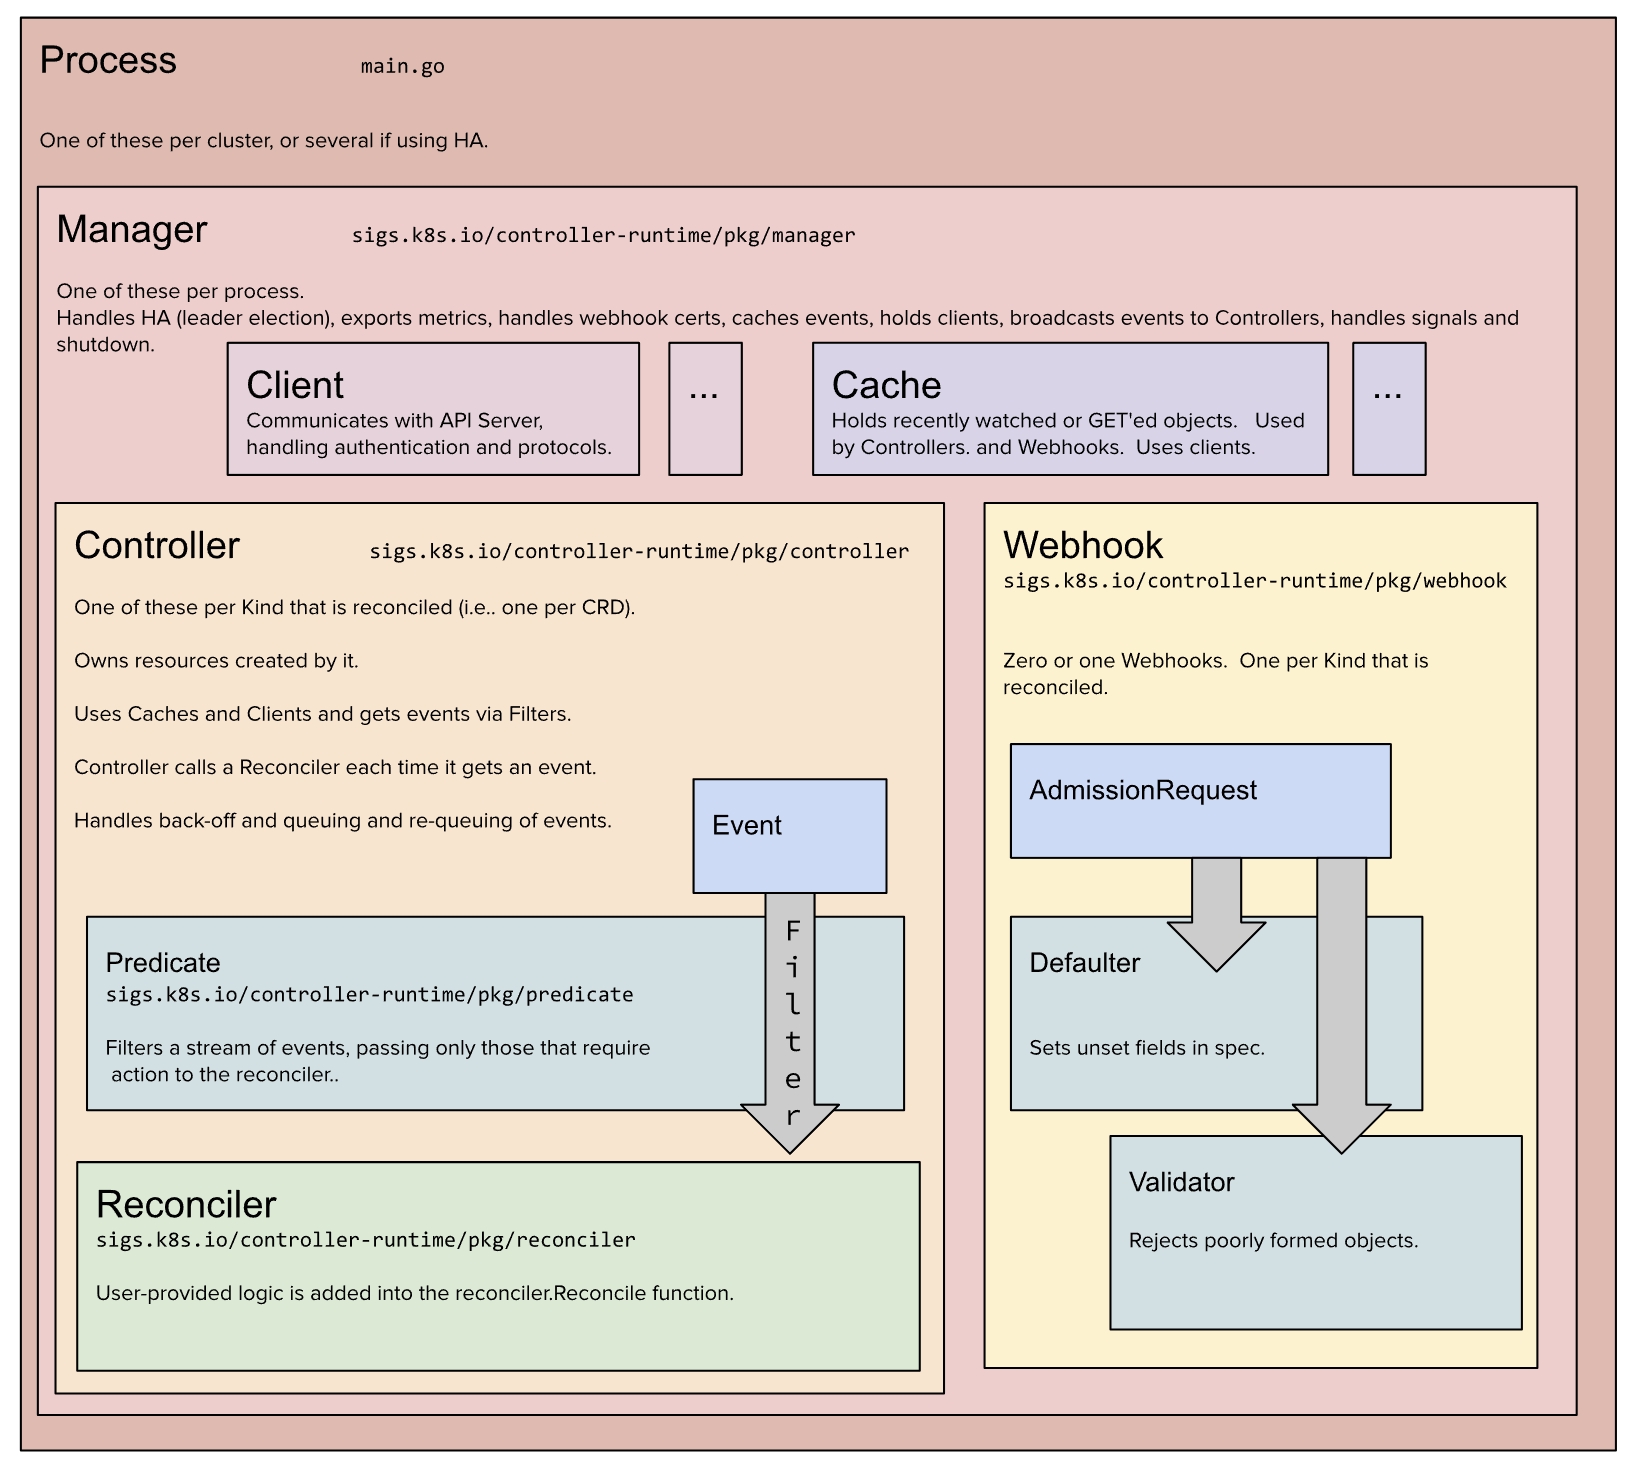
Architecture
Main.go
import (
	_ "k8s.io/client-go/plugin/pkg/client/auth"

	ctrl "sigs.k8s.io/controller-runtime"
)
// nolint:gocyclo
func main() {
    ...

    mgr, err := ctrl.NewManager(ctrl.GetConfigOrDie(), ctrl.Options{}

    ...
    if err = (&controller.GuestbookReconciler{
        Client: mgr.GetClient(),
        Scheme: mgr.GetScheme(),
    }).SetupWithManager(mgr); err != nil {
        setupLog.Error(err, "unable to create controller", "controller", "Guestbook")
        os.Exit(1)
    }

    ...
    if os.Getenv("ENABLE_WEBHOOKS") != "false" {
        if err = webhookwebappv1.SetupGuestbookWebhookWithManager(mgr); err != nil {
            setupLog.Error(err, "unable to create webhook", "webhook", "Guestbook")
            os.Exit(1)
        }
    }
Manager
Manager是核心组件,可以协调多个控制器、处理缓存、客户端、领导选举等,来自https://github.com/kubernetes-sigs/controller-runtime/blob/v0.20.0/pkg/manager/manager.go
- Client 承担了与 Kubernetes API Server 通信、操作资源对象、读写缓存等关键职责; 分为两类:
- Reader:优先读Cache, 避免频繁访问 API Server, Get后放缓存
- Writer: 支持写操作(Create、Update、Delete、Patch),直接与 API Server 交互。
- informers 是 client-go 提供的核心组件,用于监听(Watch)Kubernetes API Server 中特定资源类型(如 Pod、Deployment 或自定义 CRD)的变更事件(Create/Update/Delete)。
- Client 依赖 Informer 机制自动同步缓存。当 API Server 中资源变更时,Informer 会定时更新本地缓存,确保后续读操作获取最新数据。
- Cache
- Cache 通过 内置的client 的 ListWatcher机制 监听 API Server 的资源变更。
- 事件被写入本地缓存(如 Indexer),避免频繁访问 API Server。
- 缓存(Cache)的作用是减少对API Server的直接请求,同时保证控制器能够快速读取资源的最新状态。
- Event
Kubernetes API Server 通过 HTTP 长连接 推送资源变更事件,client-go 的 Informer 负责监听这些消息。
- Event:事件是Kubernetes API Server与Controller之间传递的信息,包含资源类型、资源名称、事件类型(ADDED、MODIFIED、DELETED)等信息,并转换成requets, check link
- API Server → Manager的Informer → Cache → Controller的Watch → Predicate过滤 → WorkQueue → Controller的Reconcile()方法
Controller
It’s a controller’s job to ensure that, for any given object the actual state of the world matches the desired state in the object. Each controller focuses on one root Kind, but may interact with other Kinds.
func (r *GuestbookReconciler) Reconcile(ctx context.Context, req ctrl.Request) (ctrl.Result, error) {
    ...
}
func (r *GuestbookReconciler) SetupWithManager(mgr ctrl.Manager) error {
	return ctrl.NewControllerManagedBy(mgr).
		For(&webappv1.Guestbook{}).
		Named("guestbook").
		Complete(r)
}
If you wanna build your own controller, please check https://github.com/kubernetes/community/blob/master/contributors/devel/sig-api-machinery/controllers.md
-
每个Controller在初始化时会向Manager注册它关心的资源类型(例如通过Owns(&v1.Pod{})声明关注Pod资源)。
-
Manager根据Controller的注册信息,为相关资源创建对应的Informer和Watch, check link
-
当资源变更事件发生时,Informer会将事件从缓存中取出,并通过Predicate(过滤器)判断是否需要触发协调逻辑。
-
若事件通过过滤,Controller会将事件加入队列(WorkQueue),最终调用用户实现的Reconcile()函数进行处理, check link
func (c *Controller[request]) Start(ctx context.Context) error {

	c.ctx = ctx

	queue := c.NewQueue(c.Name, c.RateLimiter)

    c.Queue = &priorityQueueWrapper[request]{TypedRateLimitingInterface: queue}

	err := func() error {

            // start to sync event sources
            if err := c.startEventSources(ctx); err != nil {
                return err
            }

            for i := 0; i < c.MaxConcurrentReconciles; i++ {
                go func() {
                    for c.processNextWorkItem(ctx) {

                    }
                }()
            }
	}()

	c.LogConstructor(nil).Info("All workers finished")
}
func (c *Controller[request]) processNextWorkItem(ctx context.Context) bool {
obj, priority, shutdown := c.Queue.GetWithPriority()
c.reconcileHandler(ctx, obj, priority)
}Webhook
Webhooks are a mechanism to intercept requests to the Kubernetes API server. They can be used to validate, mutate, or even proxy requests.
func (d *GuestbookCustomDefaulter) Default(ctx context.Context, obj runtime.Object) error {}

func (v *GuestbookCustomValidator) ValidateCreate(ctx context.Context, obj runtime.Object) (admission.Warnings, error) {}

func (v *GuestbookCustomValidator) ValidateUpdate(ctx context.Context, oldObj, newObj runtime.Object) (admission.Warnings, error) {}

func (v *GuestbookCustomValidator) ValidateDelete(ctx context.Context, obj runtime.Object) (admission.Warnings, error) {}

func SetupGuestbookWebhookWithManager(mgr ctrl.Manager) error {
	return ctrl.NewWebhookManagedBy(mgr).For(&webappv1.Guestbook{}).
		WithValidator(&GuestbookCustomValidator{}).
		WithDefaulter(&GuestbookCustomDefaulter{}).
		Complete()
}
Links
Subsections of KubeBuilder
Quick Start
Prerequisites
- go version v1.23.0+
- docker version 17.03+.
- kubectl version v1.11.3+.
- Access to a Kubernetes v1.11.3+ cluster.
Installation
# download kubebuilder and install locally.
curl -L -o kubebuilder "https://go.kubebuilder.io/dl/latest/$(go env GOOS)/$(go env GOARCH)"
chmod +x kubebuilder && sudo mv kubebuilder /usr/local/bin/
Create A Project
mkdir -p ~/projects/guestbook
cd ~/projects/guestbook
kubebuilder init --domain my.domain --repo my.domain/guestbookCreate An API
kubebuilder create api --group webapp --version v1 --kind GuestbookPrepare a K8s Cluster
cluster in
minikube start --kubernetes-version=v1.27.10 --image-mirror-country=cn --image-repository=registry.cn-hangzhou.aliyuncs.com/google_containers --cpus=4 --memory=4g --disk-size=50g --forceasdasda
Install CRDs
check installed crds in k8s
kubectl get crdsinstall guestbook crd in k8s
cd ~/projects/guestbook
make install
uninstall CRDs
make uninstall

make undeploy
Deploy to cluster
make docker-build IMG=aaron666/guestbook-operator:test
make docker-build docker-push IMG=<some-registry>/<project-name>:tag
make deploy IMG=<some-registry>/<project-name>:tagOperator-SDK
Links
Proxy
Subsections of Proxy
Daocloud Binary
使用方法
在原始 URL 上面加入 files.m.daocloud.io 的 前缀 就可以使用。比如:
# Helm 下载原始URL
wget https://get.helm.sh/helm-v3.9.1-linux-amd64.tar.gz

# 加速后的 URL
wget https://files.m.daocloud.io/get.helm.sh/helm-v3.9.1-linux-amd64.tar.gz
即可加速下载, 所以如果指定的文件没有被缓存, 会卡住等待缓存完成, 后续下载就无带宽限制。
最佳实践
使用场景1 - 安装 Helm
cd /tmp
export HELM_VERSION="v3.9.3"

wget "https://files.m.daocloud.io/get.helm.sh/helm-${HELM_VERSION}-linux-amd64.tar.gz"
tar -zxvf helm-${HELM_VERSION}-linux-amd64.tar.gz
mv linux-amd64/helm /usr/local/bin/helm
helm version
使用场景2 - 安装 KubeSpray
加入如下配置即可:
files_repo: "https://files.m.daocloud.io"

## Kubernetes components
kubeadm_download_url: "{{ files_repo }}/dl.k8s.io/release/{{ kubeadm_version }}/bin/linux/{{ image_arch }}/kubeadm"
kubectl_download_url: "{{ files_repo }}/dl.k8s.io/release/{{ kube_version }}/bin/linux/{{ image_arch }}/kubectl"
kubelet_download_url: "{{ files_repo }}/dl.k8s.io/release/{{ kube_version }}/bin/linux/{{ image_arch }}/kubelet"

## CNI Plugins
cni_download_url: "{{ files_repo }}/github.com/containernetworking/plugins/releases/download/{{ cni_version }}/cni-plugins-linux-{{ image_arch }}-{{ cni_version }}.tgz"

## cri-tools
crictl_download_url: "{{ files_repo }}/github.com/kubernetes-sigs/cri-tools/releases/download/{{ crictl_version }}/crictl-{{ crictl_version }}-{{ ansible_system | lower }}-{{ image_arch }}.tar.gz"

## [Optional] etcd: only if you **DON'T** use etcd_deployment=host
etcd_download_url: "{{ files_repo }}/github.com/etcd-io/etcd/releases/download/{{ etcd_version }}/etcd-{{ etcd_version }}-linux-{{ image_arch }}.tar.gz"

# [Optional] Calico: If using Calico network plugin
calicoctl_download_url: "{{ files_repo }}/github.com/projectcalico/calico/releases/download/{{ calico_ctl_version }}/calicoctl-linux-{{ image_arch }}"
calicoctl_alternate_download_url: "{{ files_repo }}/github.com/projectcalico/calicoctl/releases/download/{{ calico_ctl_version }}/calicoctl-linux-{{ image_arch }}"
# [Optional] Calico with kdd: If using Calico network plugin with kdd datastore
calico_crds_download_url: "{{ files_repo }}/github.com/projectcalico/calico/archive/{{ calico_version }}.tar.gz"

# [Optional] Flannel: If using Falnnel network plugin
flannel_cni_download_url: "{{ files_repo }}/kubernetes/flannel/{{ flannel_cni_version }}/flannel-{{ image_arch }}"

# [Optional] helm: only if you set helm_enabled: true
helm_download_url: "{{ files_repo }}/get.helm.sh/helm-{{ helm_version }}-linux-{{ image_arch }}.tar.gz"

# [Optional] crun: only if you set crun_enabled: true
crun_download_url: "{{ files_repo }}/github.com/containers/crun/releases/download/{{ crun_version }}/crun-{{ crun_version }}-linux-{{ image_arch }}"

# [Optional] kata: only if you set kata_containers_enabled: true
kata_containers_download_url: "{{ files_repo }}/github.com/kata-containers/kata-containers/releases/download/{{ kata_containers_version }}/kata-static-{{ kata_containers_version }}-{{ ansible_architecture }}.tar.xz"

# [Optional] cri-dockerd: only if you set container_manager: docker
cri_dockerd_download_url: "{{ files_repo }}/github.com/Mirantis/cri-dockerd/releases/download/v{{ cri_dockerd_version }}/cri-dockerd-{{ cri_dockerd_version }}.{{ image_arch }}.tgz"

# [Optional] runc,containerd: only if you set container_runtime: containerd
runc_download_url: "{{ files_repo }}/github.com/opencontainers/runc/releases/download/{{ runc_version }}/runc.{{ image_arch }}"
containerd_download_url: "{{ files_repo }}/github.com/containerd/containerd/releases/download/v{{ containerd_version }}/containerd-{{ containerd_version }}-linux-{{ image_arch }}.tar.gz"
nerdctl_download_url: "{{ files_repo }}/github.com/containerd/nerdctl/releases/download/v{{ nerdctl_version }}/nerdctl-{{ nerdctl_version }}-{{ ansible_system | lower }}-{{ image_arch }}.tar.gz"实测下载速度可以达到Downloaded: 19 files, 603M in 23s (25.9 MB/s), 下载全部文件可以在 23s 内完成!
完整方法可以参考 https://gist.github.com/yankay/a863cf2e300bff6f9040ab1c6c58fbae
使用场景3 - 安装 KIND
cd /tmp
export KIND_VERSION="v0.22.0"

curl -Lo ./kind https://files.m.daocloud.io/github.com/kubernetes-sigs/kind/releases/download/${KIND_VERSION}/kind-linux-amd64
chmod +x ./kind
mv ./kind /usr/bin/kind
kind version
使用场景4 - 安装 K9S
cd /tmp
export K9S_VERSION="v0.32.4"

wget https://files.m.daocloud.io/github.com/derailed/k9s/releases/download/${K9S_VERSION}/k9s_Linux_x86_64.tar.gz
tar -zxvf k9s_Linux_x86_64.tar.gz
chmod +x k9s
mv k9s /usr/bin/k9s
k9s version
使用场景5 - 安装 istio
cd /tmp
export ISTIO_VERSION="1.14.3"

wget "https://files.m.daocloud.io/github.com/istio/istio/releases/download/${ISTIO_VERSION}/istio-${ISTIO_VERSION}-linux-amd64.tar.gz"
tar -zxvf istio-${ISTIO_VERSION}-linux-amd64.tar.gz
# Do follow the istio docs to install istio
使用场景6 - 安装 nerdctl (代替 docker 工具)
这里是root安装,其他安装方式请参考源站: https://github.com/containerd/nerdctl
export NERDCTL_VERSION="1.7.6"
mkdir -p nerdctl ;cd nerdctl
wget https://files.m.daocloud.io/github.com/containerd/nerdctl/releases/download/v${NERDCTL_VERSION}/nerdctl-full-${NERDCTL_VERSION}-linux-amd64.tar.gz
tar -zvxf nerdctl-full-${NERDCTL_VERSION}-linux-amd64.tar.gz
mkdir -p /opt/cni/bin ;cp -f libexec/cni/* /opt/cni/bin/ ;cp bin/* /usr/local/bin/ ;cp lib/systemd/system/*.service /usr/lib/systemd/system/
systemctl enable containerd ;systemctl start containerd --now
systemctl enable buildkit;systemctl start buildkit --now
欢迎贡献更多的场景
禁止加速的后缀
以下后缀的文件会直接响应 403
- .bmp
- .jpg
- .jpeg
- .png
- .gif
- .webp
- .tiff
- .mp4
- .webm
- .ogg
- .avi
- .mov
- .flv
- .mkv
- .mp3
- .wav
- .rar
Daocloud Image
快速开始
docker run -d -P m.daocloud.io/docker.io/library/nginx使用方法
增加前缀 (推荐方式)。比如:
              docker.io/library/busybox
                 |
                 V
m.daocloud.io/docker.io/library/busybox
或者 支持的镜像仓库 的 前缀替换 就可以使用。比如:
           docker.io/library/busybox
             |
             V
docker.m.daocloud.io/library/busybox
无缓存
在拉取的时候如果Daocloud没有缓存, 将会在 同步队列 添加同步缓存的任务.
支持前缀替换的 Registry (不推荐)
推荐使用添加前缀的方式.
前缀替换的 Registry 的规则, 这是人工配置的, 有需求提 Issue.
| 源站 | 替换为 | 备注 |
|---|---|---|
| docker.elastic.co | elastic.m.daocloud.io | |
| docker.io | docker.m.daocloud.io | |
| gcr.io | gcr.m.daocloud.io | |
| ghcr.io | ghcr.m.daocloud.io | |
| k8s.gcr.io | k8s-gcr.m.daocloud.io | k8s.gcr.io 已被迁移到 registry.k8s.io |
| registry.k8s.io | k8s.m.daocloud.io | |
| mcr.microsoft.com | mcr.m.daocloud.io | |
| nvcr.io | nvcr.m.daocloud.io | |
| quay.io | quay.m.daocloud.io | |
| registry.ollama.ai | ollama.m.daocloud.io |
最佳实践
加速 Kubneretes
加速安装 kubeadm
kubeadm config images pull --image-repository k8s-gcr.m.daocloud.io加速安装 kind
kind create cluster --name kind --image m.daocloud.io/docker.io/kindest/node:v1.22.1加速 Containerd
- 参考 Containerd 官方文档: hosts.md
- 如果您使用 kubespray 安装 containerd, 可以配置
containerd_registries_mirrors
加速 Docker
添加到 /etc/docker/daemon.json
{
  "registry-mirrors": [
    "https://docker.m.daocloud.io"
  ]
}
加速 Ollama & DeepSeek
加速安装 Ollama
CPU:
docker run -d -v ollama:/root/.ollama -p 11434:11434 --name ollama docker.m.daocloud.io/ollama/ollamaGPU 版本:
- 首先安装 Nvidia Container Toolkit
- 运行以下命令启动 Ollama 容器:
docker run -d --gpus=all -v ollama:/root/.ollama -p 11434:11434 --name ollama docker.m.daocloud.io/ollama/ollama更多信息请参考:
加速使用 Deepseek-R1 模型
如上述步骤,在启动了ollama容器的前提下,还可以通过加速源,加速启动DeepSeek相关的模型服务
注:目前 Ollama 官方源的下载速度已经很快,您也可以直接使用官方源。
# 使用加速源
docker exec -it ollama ollama run ollama.m.daocloud.io/library/deepseek-r1:1.5b

# 或直接使用官方源下载模型
# docker exec -it ollama ollama run deepseek-r1:1.5bKubeVPN
1.install krew
-
- download and install
krew
- download and install
-
- Add the $HOME/.krew/bin directory to your PATH environment variable.
export PATH="${KREW_ROOT:-$HOME/.krew}/bin:$PATH"-
- Run kubectl krew to check the installation
kubectl krew list2. Download from kubevpn source from github
kubectl krew index add kubevpn https://gitclone.com/github.com/kubenetworks/kubevpn.git
kubectl krew install kubevpn/kubevpn
kubectl kubevpn
3. Deploy VPN in some cluster
Using different config to access different cluster and deploy vpn in that k8s.
kubectl kubevpn connectYour terminal should look like this:
➜  ~ kubectl kubevpn connect
Password:
Starting connect
Getting network CIDR from cluster info...
Getting network CIDR from CNI...
Getting network CIDR from services...
Labeling Namespace default
Creating ServiceAccount kubevpn-traffic-manager
Creating Roles kubevpn-traffic-manager
Creating RoleBinding kubevpn-traffic-manager
Creating Service kubevpn-traffic-manager
Creating MutatingWebhookConfiguration kubevpn-traffic-manager
Creating Deployment kubevpn-traffic-manager

Pod kubevpn-traffic-manager-66d969fd45-9zlbp is Pending
Container     Reason            Message
control-plane ContainerCreating
vpn           ContainerCreating
webhook       ContainerCreating

Pod kubevpn-traffic-manager-66d969fd45-9zlbp is Running
Container     Reason           Message
control-plane ContainerRunning
vpn           ContainerRunning
webhook       ContainerRunning

Forwarding port...
Connected tunnel
Adding route...
Configured DNS service
+----------------------------------------------------------+
| Now you can access resources in the kubernetes cluster ! |
+----------------------------------------------------------+
already connected to cluster network, use command kubectl kubevpn status to check status
➜  ~ kubectl kubevpn status
ID Mode Cluster   Kubeconfig                  Namespace            Status      Netif
0  full ops-dev   /root/.kube/zverse_config   data-and-computing   Connected   utun0
use pod productpage-788df7ff7f-jpkcs IP 172.29.2.134
➜  ~ kubectl get pods -o wide
NAME                                       AGE     IP                NODE              NOMINATED NODE  GATES
authors-dbb57d856-mbgqk                    7d23h   172.29.2.132      192.168.0.5       <none>
details-7d8b5f6bcf-hcl4t                   61d     172.29.0.77       192.168.104.255   <none>
kubevpn-traffic-manager-66d969fd45-9zlbp   74s     172.29.2.136      192.168.0.5       <none>
productpage-788df7ff7f-jpkcs               61d     172.29.2.134      192.168.0.5       <none>
ratings-77b6cd4499-zvl6c                   61d     172.29.0.86       192.168.104.255   <none>
reviews-85c88894d9-vgkxd                   24d     172.29.2.249      192.168.0.5       <none>
use ping to test connection, seems good
➜  ~ ping 172.29.2.134
PING 172.29.2.134 (172.29.2.134): 56 data bytes
64 bytes from 172.29.2.134: icmp_seq=0 ttl=63 time=55.727 ms
64 bytes from 172.29.2.134: icmp_seq=1 ttl=63 time=56.270 ms
64 bytes from 172.29.2.134: icmp_seq=2 ttl=63 time=55.228 ms
64 bytes from 172.29.2.134: icmp_seq=3 ttl=63 time=54.293 ms
^C
--- 172.29.2.134 ping statistics ---
4 packets transmitted, 4 packets received, 0.0% packet loss
round-trip min/avg/max/stddev = 54.293/55.380/56.270/0.728 ms
use service productpage IP 172.21.10.49
➜  ~ kubectl get services -o wide
NAME                      TYPE        CLUSTER-IP     PORT(S)              SELECTOR
authors                   ClusterIP   172.21.5.160   9080/TCP             app=authors
details                   ClusterIP   172.21.6.183   9080/TCP             app=details
kubernetes                ClusterIP   172.21.0.1     443/TCP              <none>
kubevpn-traffic-manager   ClusterIP   172.21.2.86    84xxxxxx0/TCP        app=kubevpn-traffic-manager
productpage               ClusterIP   172.21.10.49   9080/TCP             app=productpage
ratings                   ClusterIP   172.21.3.247   9080/TCP             app=ratings
reviews                   ClusterIP   172.21.8.24    9080/TCP             app=reviews
use command curl to test service connection
➜  ~ curl 172.21.10.49:9080
<!DOCTYPE html>
<html>
  <head>
    <title>Simple Bookstore App</title>
<meta charset="utf-8">
<meta http-equiv="X-UA-Compatible" content="IE=edge">
<meta name="viewport" content="width=device-width, initial-scale=1">
seems good too~
Serverless
Subsections of Serverless
Kserve
Subsections of Kserve
Install Kserve
Preliminary
Installation
Install By
Preliminary
1. Kubernetes has installed, if not check 🔗link 2. Helm binary has installed, if not check 🔗link1.install from script directly
Details
curl -s "https://raw.githubusercontent.com/kserve/kserve/release-0.15/hack/quick_install.sh" | bashExpectd Output
Installing Gateway API CRDs …
…
😀 Successfully installed Istio
😀 Successfully installed Cert Manager
😀 Successfully installed Knative
Preliminary
1. If you have only one node in your cluster, you need at least 6 CPUs, 6 GB of memory, and 30 GB of disk storage. 2. If you have multiple nodes in your cluster, for each node you need at least 2 CPUs, 4 GB of memory, and 20 GB of disk storage.1.install knative serving CRD resources
Details
kubectl apply -f https://github.com/knative/serving/releases/download/knative-v1.18.0/serving-crds.yaml2.install knative serving components
Details
kubectl apply -f https://github.com/knative/serving/releases/download/knative-v1.18.0/serving-core.yaml
# kubectl apply -f https://raw.githubusercontent.com/AaronYang0628/assets/refs/heads/main/knative/serving/release/download/knative-v1.18.0/serving-core.yaml
3.install network layer Istio
Details
kubectl apply -l knative.dev/crd-install=true -f https://github.com/knative/net-istio/releases/download/knative-v1.18.0/istio.yaml
kubectl apply -f https://github.com/knative/net-istio/releases/download/knative-v1.18.0/istio.yaml
kubectl apply -f https://github.com/knative/net-istio/releases/download/knative-v1.18.0/net-istio.yaml4.install cert manager
Details
kubectl apply -f https://github.com/cert-manager/cert-manager/releases/download/v1.17.2/cert-manager.yaml5.install kserve
Details
kubectl apply --server-side -f https://github.com/kserve/kserve/releases/download/v0.15.0/kserve.yaml
kubectl apply --server-side -f https://github.com/kserve/kserve/releases/download/v0.15.0/kserve-cluster-resources.yaml
Reference
for more information, you can check 🔗https://artifacthub.io/packages/helm/prometheus-community/prometheus
Preliminary
1. Kubernetes has installed, if not check 🔗link 2. ArgoCD has installed, if not check 🔗link 3. Helm binary has installed, if not check 🔗link1.install gateway API CRDs
Details
kubectl apply -f https://github.com/kubernetes-sigs/gateway-api/releases/download/v1.3.0/standard-install.yaml2.install cert manager
Reference
following 🔗link to install cert manager
3.install istio system
Reference
following 🔗link to install three istio components (istio-base, istiod, istio-ingressgateway)
4.install Knative Operator
Details
kubectl -n argocd apply -f - << EOF
apiVersion: argoproj.io/v1alpha1
kind: Application
metadata:
  name: knative-operator
spec:
  syncPolicy:
    syncOptions:
    - CreateNamespace=true
  project: default
  source:
    repoURL: https://knative.github.io/operator
    chart: knative-operator
    targetRevision: v1.18.1
    helm:
      releaseName: knative-operator
      values: |
        knative_operator:
          knative_operator:
            image: m.daocloud.io/gcr.io/knative-releases/knative.dev/operator/cmd/operator
            tag: v1.18.1
            resources:
              requests:
                cpu: 100m
                memory: 100Mi
              limits:
                cpu: 1000m
                memory: 1000Mi
          operator_webhook:
            image: m.daocloud.io/gcr.io/knative-releases/knative.dev/operator/cmd/webhook
            tag: v1.18.1
            resources:
              requests:
                cpu: 100m
                memory: 100Mi
              limits:
                cpu: 500m
                memory: 500Mi
  destination:
    server: https://kubernetes.default.svc
    namespace: knative-serving
EOF
5.sync by argocd
Details
argocd app sync argocd/knative-operator6.install kserve serving CRD
kubectl apply -f - <<EOF
apiVersion: operator.knative.dev/v1beta1
kind: KnativeServing
metadata:
  name: knative-serving
  namespace: knative-serving
spec:
  version: 1.18.0 # this is knative serving version
  config:
    domain:
      example.com: ""
EOF
Details
7.install kserve CRD
Details
kubectl -n argocd apply -f - << EOF
apiVersion: argoproj.io/v1alpha1
kind: Application
metadata:
  name: kserve-crd
  annotations:
    argocd.argoproj.io/sync-options: ServerSideApply=true
    argocd.argoproj.io/compare-options: IgnoreExtraneous
spec:
  syncPolicy:
    syncOptions:
    - CreateNamespace=true
    - ServerSideApply=true
  project: default
  source:
    repoURL: https://aaronyang0628.github.io/helm-chart-mirror/charts
    chart: kserve-crd
    targetRevision: v0.15.2
    helm:
      releaseName: kserve-crd
  destination:
    server: https://kubernetes.default.svc
    namespace: kserve
EOF8.sync by argocd
Details
argocd app sync argocd/kserve-crd9.install kserve Controller
Details
kubectl -n argocd apply -f - << EOF
apiVersion: argoproj.io/v1alpha1
kind: Application
metadata:
  name: kserve
  annotations:
    argocd.argoproj.io/sync-options: ServerSideApply=true
    argocd.argoproj.io/compare-options: IgnoreExtraneous
spec:
  syncPolicy:
    syncOptions:
    - CreateNamespace=true
    - ServerSideApply=true
  project: default
  source:
    repoURL: https://aaronyang0628.github.io/helm-chart-mirror/charts
    chart: kserve
    targetRevision: v0.15.2
    helm:
      releaseName: kserve
      values: |
        kserve:
          agent:
            image: m.daocloud.io/docker.io/kserve/agent
          router:
            image: m.daocloud.io/docker.io/kserve/router
          storage:
            image: m.daocloud.io/docker.io/kserve/storage-initializer
            s3:
              accessKeyIdName: AWS_ACCESS_KEY_ID
              secretAccessKeyName: AWS_SECRET_ACCESS_KEY
              endpoint: ""
              region: ""
              verifySSL: ""
              useVirtualBucket: ""
              useAnonymousCredential: ""
          controller:
            deploymentMode: "Serverless"
            rbacProxyImage: m.daocloud.io/quay.io/brancz/kube-rbac-proxy:v0.18.0
            rbacProxy:
              resources:
                limits:
                  cpu: 100m
                  memory: 300Mi
                requests:
                  cpu: 100m
                  memory: 300Mi
            gateway:
              domain: example.com
            image: m.daocloud.io/docker.io/kserve/kserve-controller
            resources:
              limits:
                cpu: 100m
                memory: 300Mi
              requests:
                cpu: 100m
                memory: 300Mi
          servingruntime:
            tensorflow:
              image: tensorflow/serving
              tag: 2.6.2
            mlserver:
              image: m.daocloud.io/docker.io/seldonio/mlserver
              tag: 1.5.0
            sklearnserver:
              image: m.daocloud.io/docker.io/kserve/sklearnserver
            xgbserver:
              image: m.daocloud.io/docker.io/kserve/xgbserver
            huggingfaceserver:
              image: m.daocloud.io/docker.io/kserve/huggingfaceserver
              devShm:
                enabled: false
                sizeLimit: ""
              hostIPC:
                enabled: false
            huggingfaceserver_multinode:
              shm:
                enabled: true
                sizeLimit: "3Gi"
            tritonserver:
              image: nvcr.io/nvidia/tritonserver
            pmmlserver:
              image: m.daocloud.io/docker.io/kserve/pmmlserver
            paddleserver:
              image: m.daocloud.io/docker.io/kserve/paddleserver
            lgbserver:
              image: m.daocloud.io/docker.io/kserve/lgbserver
            torchserve:
              image: pytorch/torchserve-kfs
              tag: 0.9.0
            art:
              image: m.daocloud.io/docker.io/kserve/art-explainer
          localmodel:
            enabled: false
            controller:
              image: m.daocloud.io/docker.io/kserve/kserve-localmodel-controller
            jobNamespace: kserve-localmodel-jobs
            agent:
              hostPath: /mnt/models
              image: m.daocloud.io/docker.io/kserve/kserve-localmodelnode-agent
          inferenceservice:
            resources:
              limits:
                cpu: "1"
                memory: "2Gi"
              requests:
                cpu: "1"
                memory: "2Gi"
  destination:
    server: https://kubernetes.default.svc
    namespace: kserve
EOF10.sync by argocd
Details
argocd app sync argocd/kserve11.install kserve eventing CRD
Details
kubectl apply -f https://github.com/knative/eventing/releases/download/knative-v1.18.1/eventing-crds.yaml12.install kserve eventing
Details
kubectl apply -f https://github.com/knative/eventing/releases/download/knative-v1.18.1/eventing-core.yamlFAQ
Serving
Subsections of Serving
Inference
Subsections of Inference
First Pytorch ISVC
Mnist Inference
More Information about
mnistservice can be found 🔗link
- create a namespace
kubectl create namespace kserve-test- deploy a sample
irisservice
kubectl apply -n kserve-test -f - <<EOF
apiVersion: "serving.kserve.io/v1beta1"
kind: "InferenceService"
metadata:
  name: "first-torchserve"
  namespace: kserve-test
spec:
  predictor:
    model:
      modelFormat:
        name: pytorch
      storageUri: gs://kfserving-examples/models/torchserve/image_classifier/v1
      resources:
        limits:
          memory: 4Gi
EOF- Check
InferenceServicestatus
kubectl -n kserve-test get inferenceservices first-torchserve After all pods are ready, you can access the service by using the following command
Access By
If the EXTERNAL-IP value is set, your environment has an external load balancer that you can use for the ingress gateway.
export INGRESS_HOST=$(kubectl -n istio-system get service istio-ingressgateway -o jsonpath='{.status.loadBalancer.ingress[0].ip}')
export INGRESS_PORT=$(kubectl -n istio-system get service istio-ingressgateway -o jsonpath='{.spec.ports[?(@.name=="http2")].nodePort}')
If the EXTERNAL-IP value is none (or perpetually pending), your environment does not provide an external load balancer for the ingress gateway. In this case, you can access the gateway using the service’s node port.
export INGRESS_HOST=$(minikube ip)
export INGRESS_PORT=$(kubectl -n istio-system get service istio-ingressgateway -o jsonpath='{.spec.ports[?(@.name=="http2")].nodePort}')
export INGRESS_HOST=$(minikube ip)
kubectl port-forward --namespace istio-system svc/istio-ingressgateway 30080:80
export INGRESS_PORT=30080- Perform a prediction First, prepare your inference input request inside a file:
wget -O ./mnist-input.json https://raw.githubusercontent.com/kserve/kserve/refs/heads/master/docs/samples/v1beta1/torchserve/v1/imgconv/input.json- Invoke the service
SERVICE_HOSTNAME=$(kubectl -n kserve-test get inferenceservice first-torchserve  -o jsonpath='{.status.url}' | cut -d "/" -f 3)
# http://first-torchserve.kserve-test.example.com
curl -v -H "Host: ${SERVICE_HOSTNAME}" -H "Content-Type: application/json" "http://${INGRESS_HOST}:${INGRESS_PORT}/v1/models/mnist:predict" -d @./mnist-input.jsonFirst Custom Model
AlexNet Inference
More Information about
AlexNetservice can be found 🔗link
- Implement Custom Model using KServe API
 1import argparse
 2import base64
 3import io
 4import time
 5
 6from fastapi.middleware.cors import CORSMiddleware
 7from torchvision import models, transforms
 8from typing import Dict
 9import torch
10from PIL import Image
11
12import kserve
13from kserve import Model, ModelServer, logging
14from kserve.model_server import app
15from kserve.utils.utils import generate_uuid
16
17
18class AlexNetModel(Model):
19    def __init__(self, name: str):
20        super().__init__(name, return_response_headers=True)
21        self.name = name
22        self.load()
23        self.ready = False
24
25    def load(self):
26        self.model = models.alexnet(pretrained=True)
27        self.model.eval()
28        # The ready flag is used by model ready endpoint for readiness probes,
29        # set to True when model is loaded successfully without exceptions.
30        self.ready = True
31
32    async def predict(
33        self,
34        payload: Dict,
35        headers: Dict[str, str] = None,
36        response_headers: Dict[str, str] = None,
37    ) -> Dict:
38        start = time.time()
39        # Input follows the Tensorflow V1 HTTP API for binary values
40        # https://www.tensorflow.org/tfx/serving/api_rest#encoding_binary_values
41        img_data = payload["instances"][0]["image"]["b64"]
42        raw_img_data = base64.b64decode(img_data)
43        input_image = Image.open(io.BytesIO(raw_img_data))
44        preprocess = transforms.Compose([
45            transforms.Resize(256),
46            transforms.CenterCrop(224),
47            transforms.ToTensor(),
48            transforms.Normalize(mean=[0.485, 0.456, 0.406],
49                                 std=[0.229, 0.224, 0.225]),
50        ])
51        input_tensor = preprocess(input_image).unsqueeze(0)
52        output = self.model(input_tensor)
53        torch.nn.functional.softmax(output, dim=1)
54        values, top_5 = torch.topk(output, 5)
55        result = values.flatten().tolist()
56        end = time.time()
57        response_id = generate_uuid()
58
59        # Custom response headers can be added to the inference response
60        if response_headers is not None:
61            response_headers.update(
62                {"prediction-time-latency": f"{round((end - start) * 1000, 9)}"}
63            )
64
65        return {"predictions": result}
66
67
68parser = argparse.ArgumentParser(parents=[kserve.model_server.parser])
69args, _ = parser.parse_known_args()
70
71if __name__ == "__main__":
72    # Configure kserve and uvicorn logger
73    if args.configure_logging:
74        logging.configure_logging(args.log_config_file)
75    model = AlexNetModel(args.model_name)
76    model.load()
77    # Custom middlewares can be added to the model
78    app.add_middleware(
79        CORSMiddleware,
80        allow_origins=["*"],
81        allow_credentials=True,
82        allow_methods=["*"],
83        allow_headers=["*"],
84    )
85 ModelServer().start([model])- create
requirements.txt
kserve
torchvision==0.18.0
pillow>=10.3.0,<11.0.0- create
Dockerfile
FROM m.daocloud.io/docker.io/library/python:3.11-slim

WORKDIR /app

COPY requirements.txt .
RUN pip install --no-cache-dir  -r requirements.txt

COPY model.py .

CMD ["python", "model.py", "--model_name=custom-model"]- build and push custom docker image
docker build -t ay-custom-model .
docker tag ddfd0186813e docker-registry.lab.zverse.space/ay/ay-custom-model:latest
docker push docker-registry.lab.zverse.space/ay/ay-custom-model:latest- create a namespace
kubectl create namespace kserve-test- deploy a sample
custom-modelservice
kubectl apply -n kserve-test -f - <<EOF
apiVersion: serving.kserve.io/v1beta1
kind: InferenceService
metadata:
  name: ay-custom-model
spec:
  predictor:
    containers:
      - name: kserve-container
        image: docker-registry.lab.zverse.space/ay/ay-custom-model:latest
EOF- Check
InferenceServicestatus
kubectl -n kserve-test get inferenceservices ay-custom-modelAfter all pods are ready, you can access the service by using the following command
Access By
If the EXTERNAL-IP value is set, your environment has an external load balancer that you can use for the ingress gateway.
export INGRESS_HOST=$(kubectl -n istio-system get service istio-ingressgateway -o jsonpath='{.status.loadBalancer.ingress[0].ip}')
export INGRESS_PORT=$(kubectl -n istio-system get service istio-ingressgateway -o jsonpath='{.spec.ports[?(@.name=="http2")].nodePort}')
If the EXTERNAL-IP value is none (or perpetually pending), your environment does not provide an external load balancer for the ingress gateway. In this case, you can access the gateway using the service’s node port.
export INGRESS_HOST=$(minikube ip)
export INGRESS_PORT=$(kubectl -n istio-system get service istio-ingressgateway -o jsonpath='{.spec.ports[?(@.name=="http2")].nodePort}')
export INGRESS_HOST=$(minikube ip)
kubectl port-forward --namespace istio-system svc/istio-ingressgateway 30080:80
export INGRESS_PORT=30080- Perform a prediction
First, prepare your inference input request inside a file:
wget -O ./alex-net-input.json https://kserve.github.io/website/0.15/modelserving/v1beta1/custom/custom_model/input.json- Invoke the service
export SERVICE_HOSTNAME=$(kubectl -n kserve-test get inferenceservice ay-custom-model  -o jsonpath='{.status.url}' | cut -d "/" -f 3)
# http://ay-custom-model.kserve-test.example.com
curl -v -H "Host: ${SERVICE_HOSTNAME}" -H "Content-Type: application/json" -X POST "http://${INGRESS_HOST}:${INGRESS_PORT}/v1/models/custom-model:predict" -d @.//alex-net-input.jsonFirst Model In Minio
Inference Model In Minio
More Information about
Deploy InferenceService with a saved model on S3can be found 🔗link
Create Service Account
=== “yaml”
apiVersion: v1
kind: ServiceAccount
metadata:
  name: sa
  annotations:
    eks.amazonaws.com/role-arn: arn:aws:iam::123456789012:role/s3access # replace with your IAM role ARN
    serving.kserve.io/s3-endpoint: s3.amazonaws.com # replace with your s3 endpoint e.g minio-service.kubeflow:9000
    serving.kserve.io/s3-usehttps: "1" # by default 1, if testing with minio you can set to 0
    serving.kserve.io/s3-region: "us-east-2"
    serving.kserve.io/s3-useanoncredential: "false" # omitting this is the same as false, if true will ignore provided credential and use anonymous credentials
=== “kubectl”
kubectl apply -f create-s3-sa.yamlCreate S3 Secret and attach to Service Account
Create a secret with your S3 user credential, KServe reads the secret annotations to inject the S3 environment variables on storage initializer or model agent to download the models from S3 storage.
Create S3 secret
=== “yaml”
apiVersion: v1
kind: Secret
metadata:
  name: s3creds
  annotations:
     serving.kserve.io/s3-endpoint: s3.amazonaws.com # replace with your s3 endpoint e.g minio-service.kubeflow:9000
     serving.kserve.io/s3-usehttps: "1" # by default 1, if testing with minio you can set to 0
     serving.kserve.io/s3-region: "us-east-2"
     serving.kserve.io/s3-useanoncredential: "false" # omitting this is the same as false, if true will ignore provided credential and use anonymous credentials
type: Opaque
stringData: # use `stringData` for raw credential string or `data` for base64 encoded string
  AWS_ACCESS_KEY_ID: XXXX
  AWS_SECRET_ACCESS_KEY: XXXXXXXX
Attach secret to a service account
=== “yaml”
apiVersion: v1
kind: ServiceAccount
metadata:
  name: sa
secrets:
- name: s3creds
=== “kubectl”
kubectl apply -f create-s3-secret.yaml!!! note
If you are running kserve with istio sidecars enabled, there can be a race condition between the istio proxy being ready and the agent pulling models. This will result in a tcp dial connection refused error when the agent tries to download from s3.
To resolve it, istio allows the blocking of other containers in a pod until the proxy container is ready.

You can enabled this by setting `proxy.holdApplicationUntilProxyStarts: true` in `istio-sidecar-injector` configmap, `proxy.holdApplicationUntilProxyStarts` flag was introduced in Istio 1.7 as an experimental feature and is turned off by default.
Deploy the model on S3 with InferenceService
Create the InferenceService with the s3 storageUri and the service account with s3 credential attached.
=== “New Schema”
```yaml
apiVersion: "serving.kserve.io/v1beta1"
kind: "InferenceService"
metadata:
  name: "mnist-s3"
spec:
  predictor:
    serviceAccountName: sa
    model:
      modelFormat:
        name: tensorflow
      storageUri: "s3://kserve-examples/mnist"
```
=== “Old Schema”
```yaml
apiVersion: "serving.kserve.io/v1beta1"
kind: "InferenceService"
metadata:
  name: "mnist-s3"
spec:
  predictor:
    serviceAccountName: sa
    tensorflow:
      storageUri: "s3://kserve-examples/mnist"
```
Apply the autoscale-gpu.yaml.
=== “kubectl”
kubectl apply -f mnist-s3.yamlRun a prediction
Now, the ingress can be accessed at ${INGRESS_HOST}:${INGRESS_PORT} or follow this instruction
to find out the ingress IP and port.
SERVICE_HOSTNAME=$(kubectl get inferenceservice mnist-s3 -o jsonpath='{.status.url}' | cut -d "/" -f 3)

MODEL_NAME=mnist-s3
INPUT_PATH=@./input.json
curl -v -H "Host: ${SERVICE_HOSTNAME}" -H "Content-Type: application/json" http://${INGRESS_HOST}:${INGRESS_PORT}/v1/models/$MODEL_NAME:predict -d $INPUT_PATH
!!! success “Expected Output”
```{ .bash .no-copy }
Note: Unnecessary use of -X or --request, POST is already inferred.
*   Trying 35.237.217.209...
* TCP_NODELAY set
* Connected to mnist-s3.default.35.237.217.209.xip.io (35.237.217.209) port 80 (#0)
> POST /v1/models/mnist-s3:predict HTTP/1.1
> Host: mnist-s3.default.35.237.217.209.xip.io
> User-Agent: curl/7.55.1
> Accept: */*
> Content-Length: 2052
> Content-Type: application/x-www-form-urlencoded
> Expect: 100-continue
>
< HTTP/1.1 100 Continue
* We are completely uploaded and fine
< HTTP/1.1 200 OK
< content-length: 251
< content-type: application/json
< date: Sun, 04 Apr 2021 20:06:27 GMT
< x-envoy-upstream-service-time: 5
< server: istio-envoy
<
* Connection #0 to host mnist-s3.default.35.237.217.209.xip.io left intact
{
    "predictions": [
        {
            "predictions": [0.327352405, 2.00153053e-07, 0.0113353515, 0.203903764, 3.62863029e-05, 0.416683704, 0.000281196437, 8.36911859e-05, 0.0403052084, 1.82206513e-05],
            "classes": 5
        }
    ]
}
```
Kafka Sink Transformer
AlexNet Inference
More Information about
Custom Transformerservice can be found 🔗link
- Implement Custom Transformer
./model.pyusing Kserve API
 1import os
 2import argparse
 3import json
 4
 5from typing import Dict, Union
 6from kafka import KafkaProducer
 7from cloudevents.http import CloudEvent
 8from cloudevents.conversion import to_structured
 9
10from kserve import (
11    Model,
12    ModelServer,
13    model_server,
14    logging,
15    InferRequest,
16    InferResponse,
17)
18
19from kserve.logging import logger
20from kserve.utils.utils import generate_uuid
21
22kafka_producer = KafkaProducer(
23    value_serializer=lambda v: json.dumps(v).encode('utf-8'),
24    bootstrap_servers=os.environ.get('KAFKA_BOOTSTRAP_SERVERS', 'localhost:9092')
25)
26
27class ImageTransformer(Model):
28    def __init__(self, name: str):
29        super().__init__(name, return_response_headers=True)
30        self.ready = True
31
32
33    def preprocess(
34        self, payload: Union[Dict, InferRequest], headers: Dict[str, str] = None
35    ) -> Union[Dict, InferRequest]:
36        logger.info("Received inputs %s", payload)
37        logger.info("Received headers %s", headers)
38        self.request_trace_key = os.environ.get('REQUEST_TRACE_KEY', 'algo.trace.requestId')
39        if self.request_trace_key not in payload:
40            logger.error("Request trace key '%s' not found in payload, you cannot trace the prediction result", self.request_trace_key)
41            if "instances" not in payload:
42                raise ValueError(
43                    f"Request trace key '{self.request_trace_key}' not found in payload and 'instances' key is missing."
44                )
45        else:
46            headers[self.request_trace_key] = payload.get(self.request_trace_key)
47
48        return {"instances": payload["instances"]}
49
50    def postprocess(
51        self,
52        infer_response: Union[Dict, InferResponse],
53        headers: Dict[str, str] = None,
54        response_headers: Dict[str, str] = None,
55    ) -> Union[Dict, InferResponse]:
56        logger.info("postprocess headers: %s", headers)
57        logger.info("postprocess response headers: %s", response_headers)
58        logger.info("postprocess response: %s", infer_response)
59
60        attributes = {
61            "source": "data-and-computing/kafka-sink-transformer",
62            "type": "org.zhejianglab.zverse.data-and-computing.kafka-sink-transformer",
63            "request-host": headers.get('host', 'unknown'),
64            "kserve-isvc-name": headers.get('kserve-isvc-name', 'unknown'),
65            "kserve-isvc-namespace": headers.get('kserve-isvc-namespace', 'unknown'),
66            self.request_trace_key: headers.get(self.request_trace_key, 'unknown'),
67        }
68
69        _, cloudevent = to_structured(CloudEvent(attributes, infer_response))
70        try:
71            kafka_producer.send(os.environ.get('KAFKA_TOPIC', 'test-topic'), value=cloudevent.decode('utf-8').replace("'", '"'))
72            kafka_producer.flush()
73        except Exception as e:
74            logger.error("Failed to send message to Kafka: %s", e)
75        return infer_response
76
77parser = argparse.ArgumentParser(parents=[model_server.parser])
78args, _ = parser.parse_known_args()
79
80if __name__ == "__main__":
81    if args.configure_logging:
82        logging.configure_logging(args.log_config_file)
83    logging.logger.info("available model name: %s", args.model_name)
84    logging.logger.info("all args: %s", args.model_name)
85    model = ImageTransformer(args.model_name)
86 ModelServer().start([model])- modify
./pyproject.toml
[tool.poetry]
name = "custom_transformer"
version = "0.15.2"
description = "Custom Transformer Examples. Not intended for use outside KServe Frameworks Images."
authors = ["Dan Sun <dsun20@bloomberg.net>"]
license = "Apache-2.0"
packages = [
    { include = "*.py" }
]

[tool.poetry.dependencies]
python = ">=3.9,<3.13"
kserve = {path = "../kserve", develop = true}
pillow = "^10.3.0"
kafka-python = "^2.2.15"
cloudevents = "^1.11.1"

[[tool.poetry.source]]
name = "pytorch"
url = "https://download.pytorch.org/whl/cpu"
priority = "explicit"

[tool.poetry.group.test]
optional = true

[tool.poetry.group.test.dependencies]
pytest = "^7.4.4"
mypy = "^0.991"

[tool.poetry.group.dev]
optional = true

[tool.poetry.group.dev.dependencies]
black = { version = "~24.3.0", extras = ["colorama"] }

[tool.poetry-version-plugin]
source = "file"
file_path = "../VERSION"

[build-system]
requires = ["poetry-core>=1.0.0"]
build-backend = "poetry.core.masonry.api"- prepare
../custom_transformer.Dockerfile
ARG PYTHON_VERSION=3.11
ARG BASE_IMAGE=python:${PYTHON_VERSION}-slim-bookworm
ARG VENV_PATH=/prod_venv

FROM ${BASE_IMAGE} AS builder

# Install Poetry
ARG POETRY_HOME=/opt/poetry
ARG POETRY_VERSION=1.8.3

RUN python3 -m venv ${POETRY_HOME} && ${POETRY_HOME}/bin/pip install poetry==${POETRY_VERSION}
ENV PATH="$PATH:${POETRY_HOME}/bin"

# Activate virtual env
ARG VENV_PATH
ENV VIRTUAL_ENV=${VENV_PATH}
RUN python3 -m venv $VIRTUAL_ENV
ENV PATH="$VIRTUAL_ENV/bin:$PATH"

COPY kserve/pyproject.toml kserve/poetry.lock kserve/
RUN cd kserve && poetry install --no-root --no-interaction --no-cache
COPY kserve kserve
RUN cd kserve && poetry install --no-interaction --no-cache

COPY custom_transformer/pyproject.toml custom_transformer/poetry.lock custom_transformer/
RUN cd custom_transformer && poetry install --no-root --no-interaction --no-cache
COPY custom_transformer custom_transformer
RUN cd custom_transformer && poetry install --no-interaction --no-cache


FROM ${BASE_IMAGE} AS prod

COPY third_party third_party

# Activate virtual env
ARG VENV_PATH
ENV VIRTUAL_ENV=${VENV_PATH}
ENV PATH="$VIRTUAL_ENV/bin:$PATH"

RUN useradd kserve -m -u 1000 -d /home/kserve

COPY --from=builder --chown=kserve:kserve $VIRTUAL_ENV $VIRTUAL_ENV
COPY --from=builder kserve kserve
COPY --from=builder custom_transformer custom_transformer

USER 1000
ENTRYPOINT ["python", "-m", "custom_transformer.model"]- regenerate poetry.lock
poetry lock --no-update- build and push custom docker image
cd python
podman build -t docker-registry.lab.zverse.space/data-and-computing/ay-dev/msg-transformer:dev9 -f custom_transformer.Dockerfile .

podman push docker-registry.lab.zverse.space/data-and-computing/ay-dev/msg-transformer:dev9Generative
Subsections of Generative
First Generative Service
B(KServe 推理服务)B --> C[[Knative Serving]] --> D[自动扩缩容/灰度发布]
B --> E[[Istio]] --> F[流量管理/安全]
B --> G[[存储系统]] --> H[S3/GCS/PVC]
### 单YAML部署推理服务
```yaml
apiVersion: "serving.kserve.io/v1beta1"
kind: "InferenceService"
metadata:
  name: "sklearn-iris"
  namespace: kserve-test
spec:
  predictor:
    model:
      modelFormat:
        name: sklearn
      resources: {}
      storageUri: "gs://kfserving-examples/models/sklearn/1.0/model"
check CRD
kubectl -n kserve-test get inferenceservices sklearn-iris kubectl -n istio-system get svc istio-ingressgateway export INGRESS_HOST=$(minikube ip)
export INGRESS_PORT=$(kubectl -n istio-system get service istio-ingressgateway -o jsonpath='{.spec.ports[?(@.name=="http2")].nodePort}')SERVICE_HOSTNAME=$(kubectl -n kserve-test get inferenceservice sklearn-iris -o jsonpath='{.status.url}' | cut -d "/" -f 3)
# http://sklearn-iris.kserve-test.example.com
curl -v -H "Host: ${SERVICE_HOSTNAME}" -H "Content-Type: application/json" "http://${INGRESS_HOST}:${INGRESS_PORT}/v1/models/sklearn-iris:predict" -d @./iris-input.jsonHow to deploy your own ML model
apiVersion: serving.kserve.io/v1beta1
kind: InferenceService
metadata:
  name: huggingface-llama3
  namespace: kserve-test
  annotations:
    serving.kserve.io/deploymentMode: RawDeployment
    serving.kserve.io/autoscalerClass: none
spec:
  predictor:
    model:
      modelFormat:
        name: huggingface
      storageUri: pvc://llama-3-8b-pvc/hf/8b_instruction_tuned
    workerSpec:
      pipelineParallelSize: 2
      tensorParallelSize: 1
      containers:
      - name: worker-container
          resources:
          requests:
nvidia.com/gpu: "8"Canary Policy
KServe supports canary rollouts for inference services. Canary rollouts allow for a new version of an InferenceService to receive a percentage of traffic. Kserve supports a configurable canary rollout strategy with multiple steps. The rollout strategy can also be implemented to rollback to the previous revision if a rollout step fails.
KServe automatically tracks the last good revision that was rolled out with 100% traffic. The canaryTrafficPercent field in the component’s spec needs to be set with the percentage of traffic that should be routed to the new revision. KServe will then automatically split the traffic between the last good revision and the revision that is currently being rolled out according to the canaryTrafficPercent value.
When the first revision of an InferenceService is deployed, it will receive 100% of the traffic. When multiple revisions are deployed, as in step 2, and the canary rollout strategy is configured to route 10% of the traffic to the new revision, 90% of the traffic will go to the LastestRolledoutRevision. If there is an unhealthy or bad revision applied, traffic will not be routed to that bad revision. In step 3, the rollout strategy promotes the LatestReadyRevision from step 2 to the LatestRolledoutRevision. Since it is now promoted, the LatestRolledoutRevision gets 100% of the traffic and is fully rolled out. If a rollback needs to happen, 100% of the traffic will be pinned to the previous healthy/good revision- the PreviousRolledoutRevision.
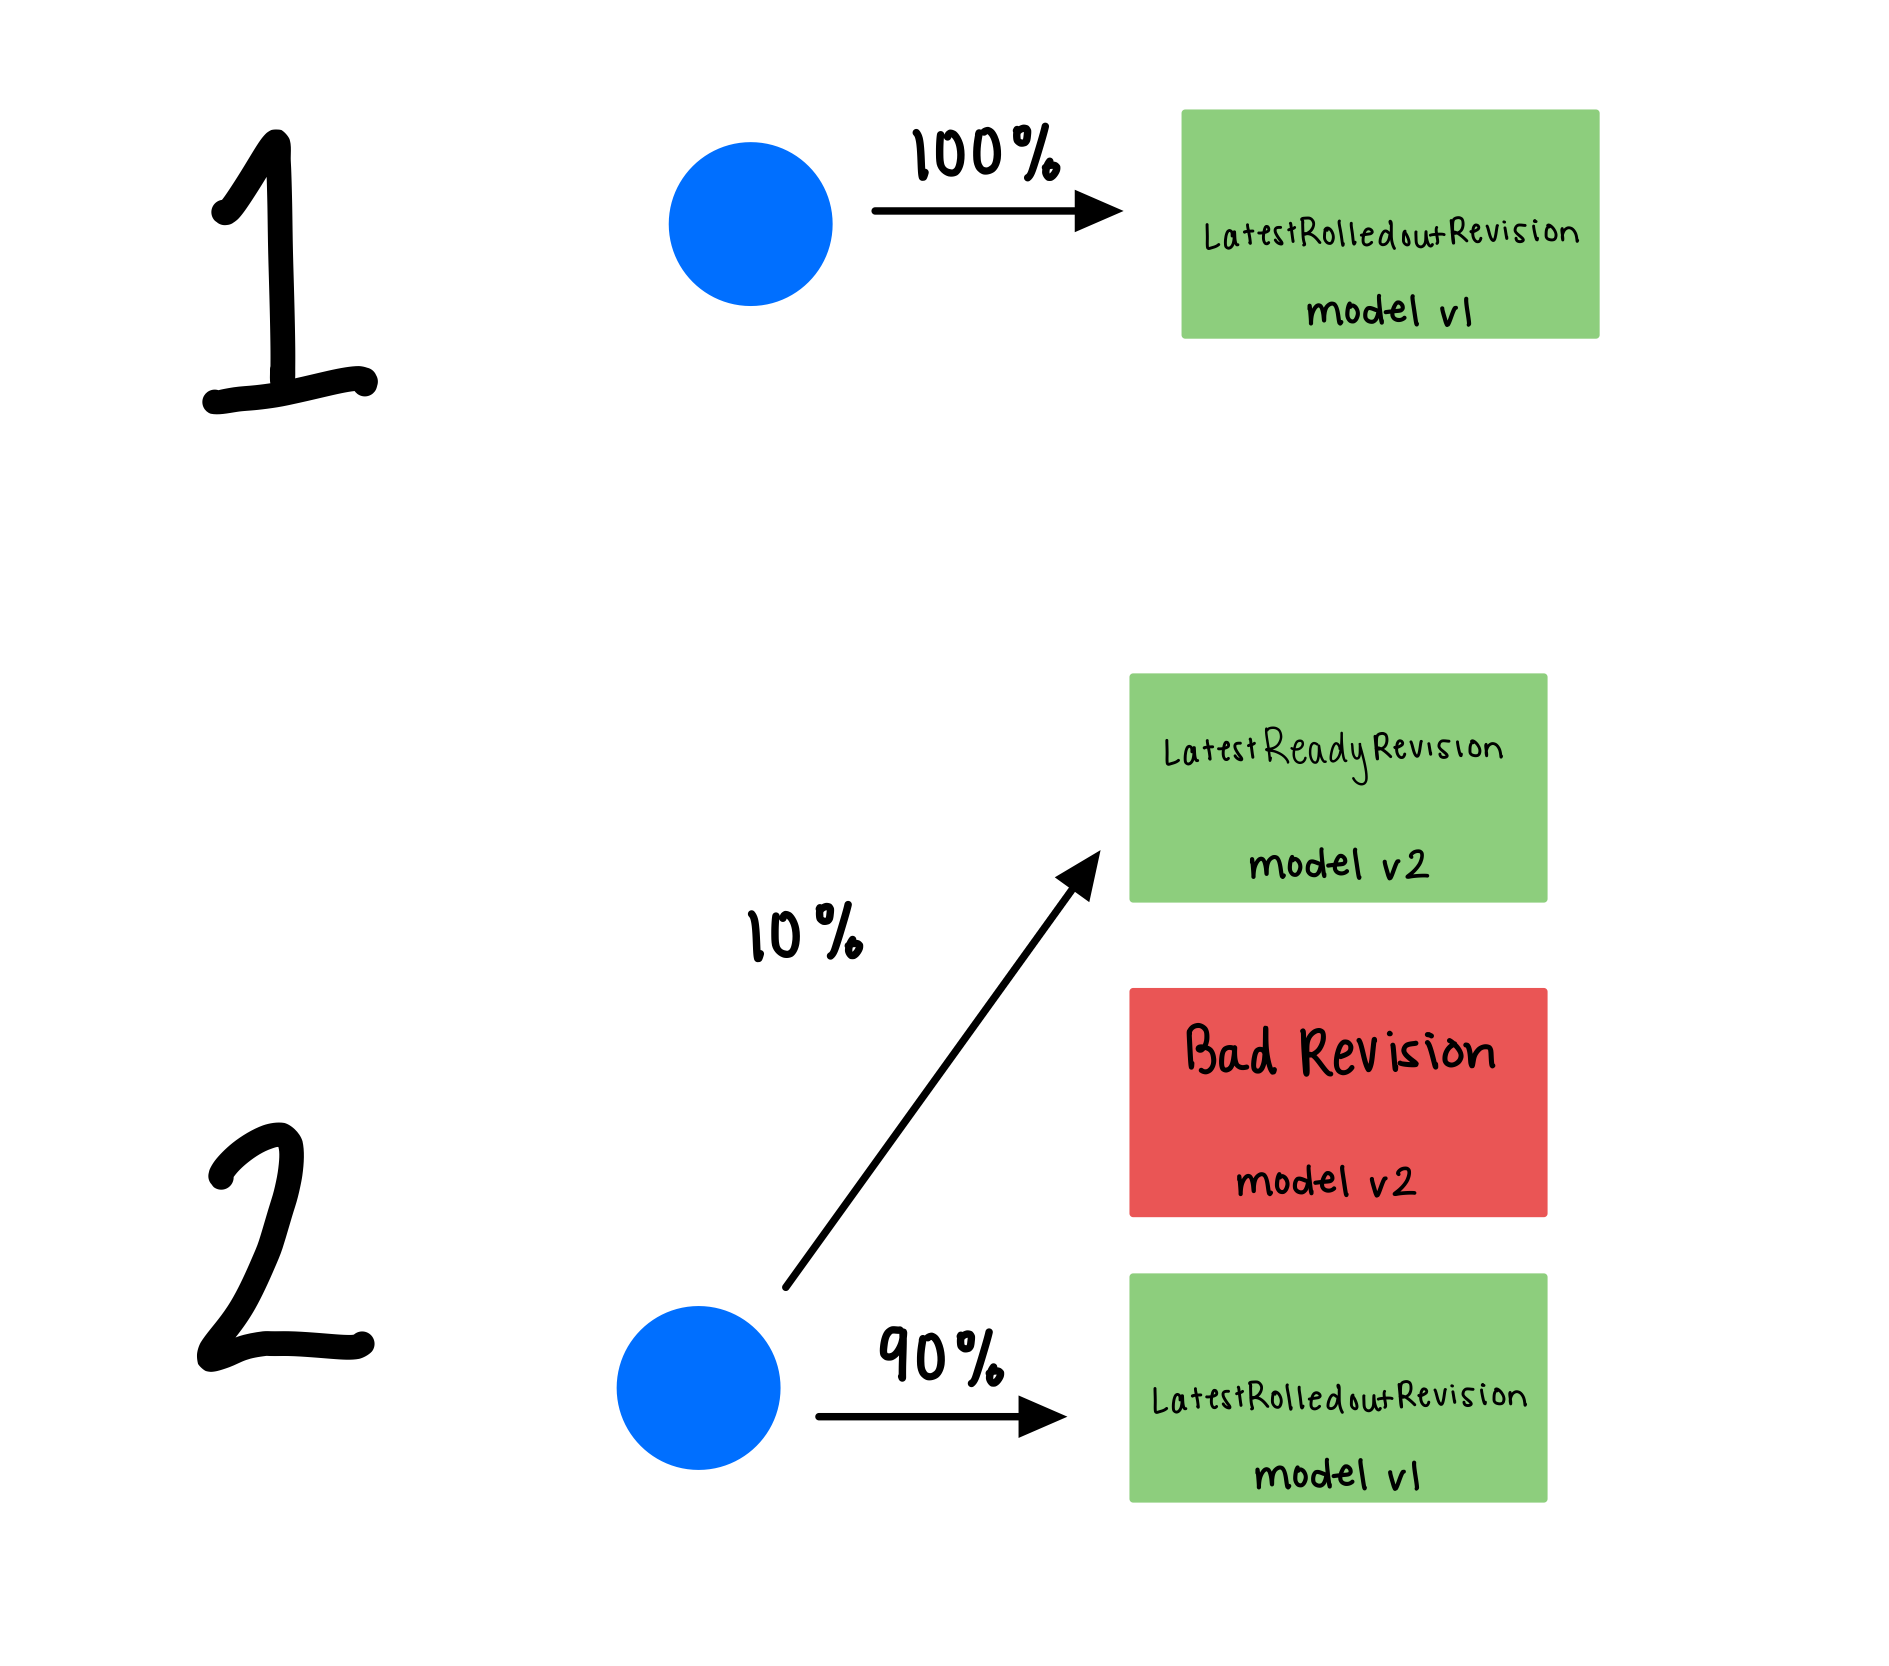
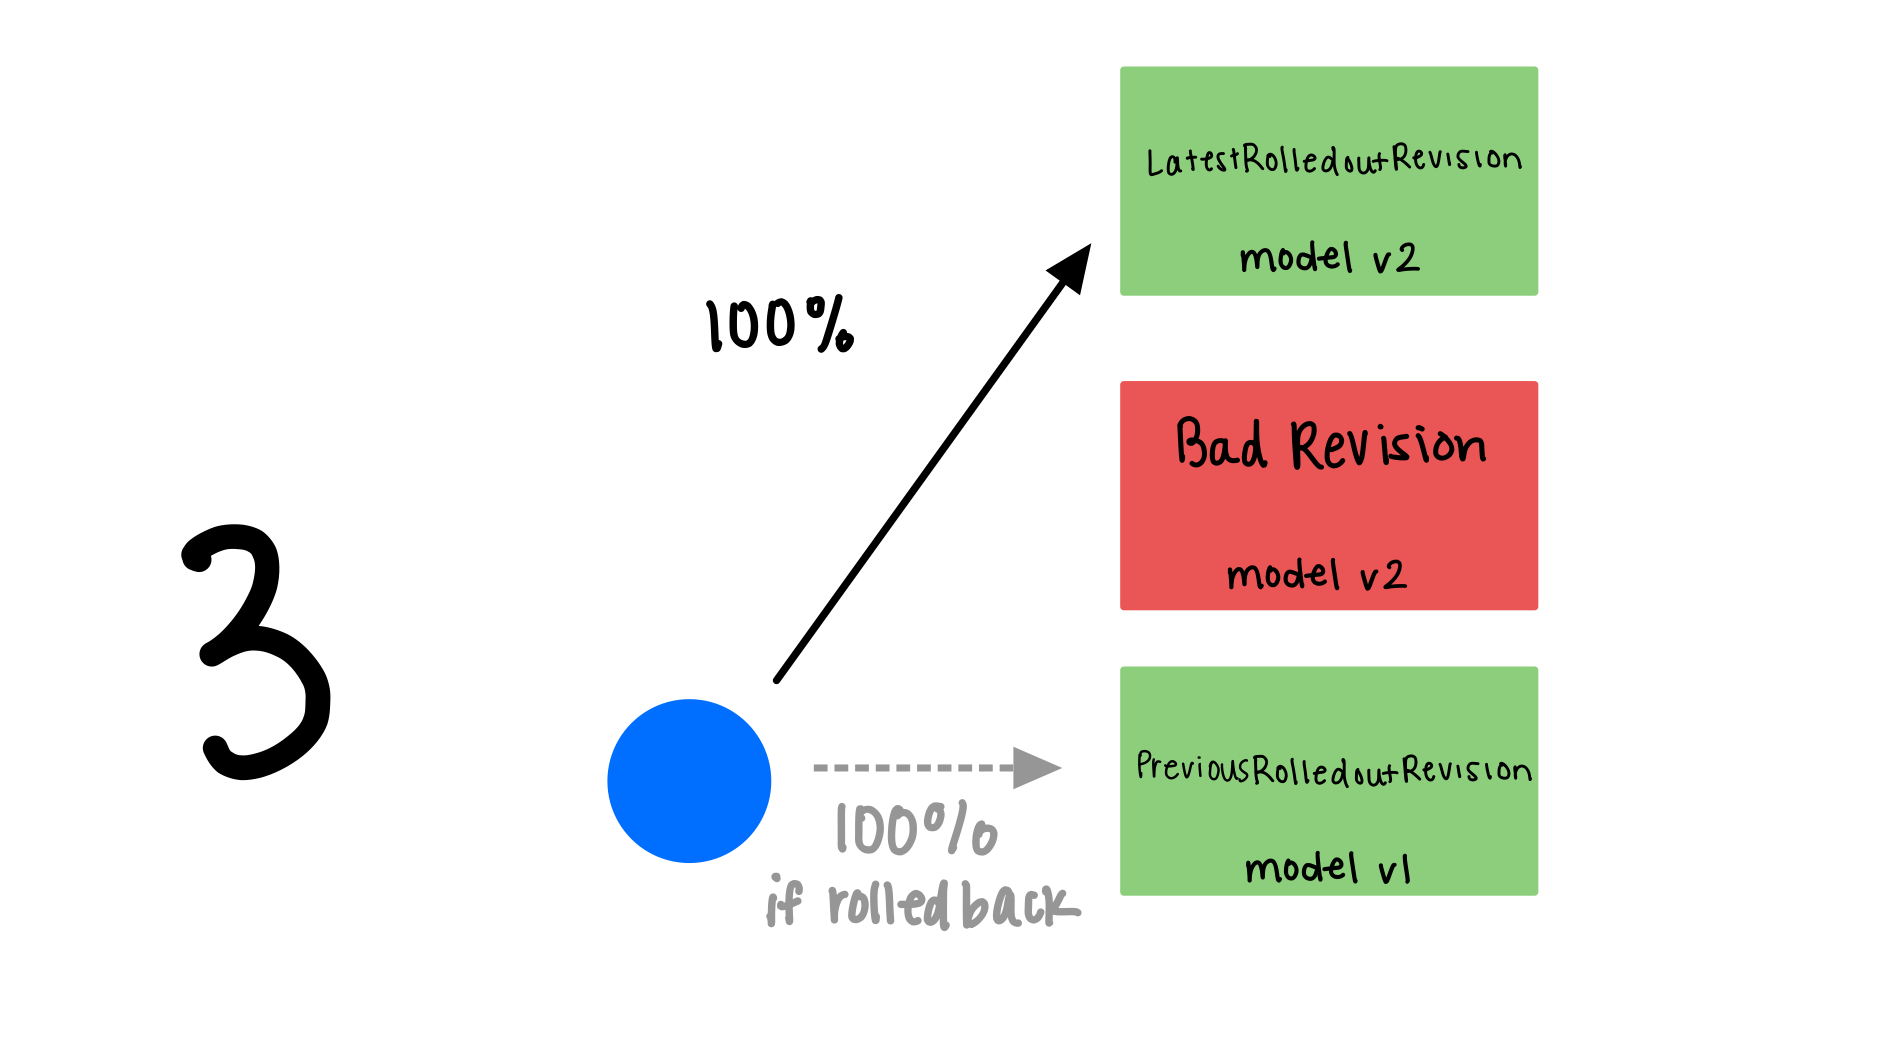
Reference
For more information, see Canary Rollout.
Subsections of Canary Policy
Rollout Example
Create the InferenceService
Follow the First Inference Service
tutorial. Set up a namespace kserve-test and create an InferenceService.
After rolling out the first model, 100% traffic goes to the initial model with service revision 1.
kubectl -n kserve-test get isvc sklearn-irisApply Canary Rollout Strategy
- Add the
canaryTrafficPercentfield to the predictor component - Update the
storageUrito use a new/updated model.
kubectl apply -n kserve-test -f - <<EOF
apiVersion: "serving.kserve.io/v1beta1"
kind: "InferenceService"
metadata:
  name: "sklearn-iris"
  namespace: kserve-test
spec:
  predictor:
    canaryTrafficPercent: 10
    model:
      args: ["--enable_docs_url=True"]
      modelFormat:
        name: sklearn
      resources: {}
      runtime: kserve-sklearnserver
      storageUri: "gs://kfserving-examples/models/sklearn/1.0/model-2"
EOF
After rolling out the canary model, traffic is split between the latest ready revision 2 and the previously rolled out revision 1.
kubectl -n kserve-test get isvc sklearn-irisCheck the running pods, you should now see port two pods running for the old and new model and 10% traffic is routed to
the new model. Notice revision 1 contains 0002 in its name, while revision 2 contains 0003.
kubectl get pods

NAME                                                        READY   STATUS    RESTARTS   AGE
sklearn-iris-predictor-00002-deployment-c7bb6c685-ktk7r     2/2     Running   0          71m
sklearn-iris-predictor-00003-deployment-8498d947-fpzcg      2/2     Running   0          20m
Run a prediction
Follow the next two steps (Determine the ingress IP and ports and Perform inference) in the First Inference Service tutorial.
Send more requests to the InferenceService to observe the 10% of traffic that routes to the new revision.
Promote the canary model
If the canary model is healthy/passes your tests,
you can promote it by removing the canaryTrafficPercent field and re-applying the InferenceService custom resource with the same name sklearn-iris
kubectl apply -n kserve-test -f - <<EOF
apiVersion: "serving.kserve.io/v1beta1"
kind: "InferenceService"
metadata:
  name: "sklearn-iris"
  namespace: kserve-test
spec:
  predictor:
    model:
      args: ["--enable_docs_url=True"]
      modelFormat:
        name: sklearn
      resources: {}
      runtime: kserve-sklearnserver
      storageUri: "gs://kfserving-examples/models/sklearn/1.0/model-2"
EOF
Now all traffic goes to the revision 2 for the new model.
kubectl get isvc sklearn-iris
NAME       URL                                   READY   PREV   LATEST   PREVROLLEDOUTREVISION   LATESTREADYREVISION                AGE
sklearn-iris   http://sklearn-iris.kserve-test.example.com   True           100                              sklearn-iris-predictor-00002   17m
The pods for revision generation 1 automatically scales down to 0 as it is no longer getting the traffic.
kubectl get pods -l serving.kserve.io/inferenceservice=sklearn-iris
NAME                                                           READY   STATUS        RESTARTS   AGE
sklearn-iris-predictor-00001-deployment-66c5f5b8d5-gmfvj   1/2     Terminating   0          17m
sklearn-iris-predictor-00002-deployment-5bd9ff46f8-shtzd   2/2     Running       0          15m
Rollback and pin the previous model
You can pin the previous model (model v1, for example) by setting the canaryTrafficPercent to 0 for the current
model (model v2, for example). This rolls back from model v2 to model v1 and decreases model v2’s traffic to zero.
Apply the custom resource to set model v2’s traffic to 0%.
kubectl apply -n kserve-test -f - <<EOF
apiVersion: "serving.kserve.io/v1beta1"
kind: "InferenceService"
metadata:
  name: "sklearn-iris"
spec:
  predictor:
    canaryTrafficPercent: 0
    model:
      modelFormat:
        name: sklearn
      storageUri: "gs://kfserving-examples/models/sklearn/1.0/model-2"
EOF
Check the traffic split, now 100% traffic goes to the previous good model (model v1) for revision generation 1.
kubectl get isvc sklearn-iris
NAME       URL                                   READY   PREV   LATEST   PREVROLLEDOUTREVISION              LATESTREADYREVISION                AGE
sklearn-iris   http://sklearn-iris.kserve-test.example.com   True    100    0        sklearn-iris-predictor-00002   sklearn-iris-predictor-00003   18m
The pods for previous revision (model v1) now routes 100% of the traffic to its pods while the new model (model v2) routes 0% traffic to its pods.
kubectl get pods -l serving.kserve.io/inferenceservice=sklearn-iris

NAME                                                       READY   STATUS        RESTARTS   AGE
sklearn-iris-predictor-00002-deployment-66c5f5b8d5-gmfvj   1/2     Running       0          35s
sklearn-iris-predictor-00003-deployment-5bd9ff46f8-shtzd   2/2     Running       0          16m
Route traffic using a tag
You can enable tag based routing by adding the annotation serving.kserve.io/enable-tag-routing, so traffic can be
explicitly routed to the canary model (model v2) or the old model (model v1) via a tag in the request URL.
Apply model v2 with canaryTrafficPercent: 10 and serving.kserve.io/enable-tag-routing: "true".
kubectl apply -n kserve-test -f - <<EOF
apiVersion: "serving.kserve.io/v1beta1"
kind: "InferenceService"
metadata:
  name: "sklearn-iris"
  annotations:
    serving.kserve.io/enable-tag-routing: "true"
spec:
  predictor:
    canaryTrafficPercent: 10
    model:
      modelFormat:
        name: sklearn
      storageUri: "gs://kfserving-examples/models/sklearn/1.0/model-2"
EOF
Check the InferenceService status to get the canary and previous model URL.
kubectl get isvc sklearn-iris -ojsonpath="{.status.components.predictor}" | jqThe output should look like
Since we updated the annotation on the InferenceService, model v2 now corresponds to sklearn-iris-predictor--00003.
You can now send the request explicitly to the new model or the previous model by using the tag in the request URL. Use
the curl command
from Perform inference and
add latest- or prev- to the model name to send a tag based request.
For example, set the model name and use the following commands to send traffic to each service based on the latest or prev tag.
curl the latest revision
MODEL_NAME=sklearn-iris
curl -v -H "Host: latest-${MODEL_NAME}-predictor-.kserve-test.example.com" -H "Content-Type: application/json" http://${INGRESS_HOST}:${INGRESS_PORT}/v1/models/$MODEL_NAME:predict -d @./iris-input.json
or curl the previous revision
curl -v -H "Host: prev-${MODEL_NAME}-predictor-.kserve-test.example.com" -H "Content-Type: application/json" http://${INGRESS_HOST}:${INGRESS_PORT}/v1/models/$MODEL_NAME:predict -d @./iris-input.jsonAuto Scaling
Soft Limit
You can configure InferenceService with annotation autoscaling.knative.dev/target for a soft limit. The soft limit is a targeted limit rather than a strictly enforced bound, particularly if there is a sudden burst of requests, this value can be exceeded.
apiVersion: "serving.kserve.io/v1beta1"
kind: "InferenceService"
metadata:
  name: "sklearn-iris"
  namespace: kserve-test
  annotations:
    autoscaling.knative.dev/target: "5"
spec:
  predictor:
    model:
      args: ["--enable_docs_url=True"]
      modelFormat:
        name: sklearn
      resources: {}
      runtime: kserve-sklearnserver
      storageUri: "gs://kfserving-examples/models/sklearn/1.0/model"
Hard Limit
You can also configure InferenceService with field containerConcurrency with a hard limit. The hard limit is an enforced upper bound. If concurrency reaches the hard limit, surplus requests will be buffered and must wait until enough capacity is free to execute the requests.
apiVersion: "serving.kserve.io/v1beta1"
kind: "InferenceService"
metadata:
  name: "sklearn-iris"
  namespace: kserve-test
spec:
  predictor:
    containerConcurrency: 5
    model:
      args: ["--enable_docs_url=True"]
      modelFormat:
        name: sklearn
      resources: {}
      runtime: kserve-sklearnserver
      storageUri: "gs://kfserving-examples/models/sklearn/1.0/model"
Scale with QPS
apiVersion: "serving.kserve.io/v1beta1"
kind: "InferenceService"
metadata:
  name: "sklearn-iris"
  namespace: kserve-test
spec:
  predictor:
    scaleTarget: 1
    scaleMetric: qps
    model:
      args: ["--enable_docs_url=True"]
      modelFormat:
        name: sklearn
      resources: {}
      runtime: kserve-sklearnserver
      storageUri: "gs://kfserving-examples/models/sklearn/1.0/model"
Scale with GPU
apiVersion: "serving.kserve.io/v1beta1"
kind: "InferenceService"
metadata:
  name: "flowers-sample-gpu"
  namespace: kserve-test
spec:
  predictor:
    scaleTarget: 1
    scaleMetric: concurrency
    model:
      modelFormat:
        name: tensorflow
      storageUri: "gs://kfserving-examples/models/tensorflow/flowers"
      runtimeVersion: "2.6.2-gpu"
      resources:
        limits:
          nvidia.com/gpu: 1
Enable Scale To Zero
apiVersion: "serving.kserve.io/v1beta1"
kind: "InferenceService"
metadata:
  name: "sklearn-iris"
  namespace: kserve-test
spec:
  predictor:
    minReplicas: 0
    model:
      args: ["--enable_docs_url=True"]
      modelFormat:
        name: sklearn
      resources: {}
      runtime: kserve-sklearnserver
      storageUri: "gs://kfserving-examples/models/sklearn/1.0/model"
Prepare Concurrent Requests Container
# export INGRESS_PORT=$(kubectl -n istio-system get service istio-ingressgateway -o jsonpath='{.spec.ports[?(@.name=="http2")].nodePort}')
podman run --rm \
      -v /root/kserve/iris-input.json:/tmp/iris-input.json \
      --privileged \
      -e INGRESS_HOST=$(minikube ip) \
      -e INGRESS_PORT=32132 \
      -e MODEL_NAME=sklearn-iris \
      -e INPUT_PATH=/tmp/iris-input.json \
      -e SERVICE_HOSTNAME=sklearn-iris.kserve-test.example.com \
      -it m.daocloud.io/docker.io/library/golang:1.22  bash -c "go install github.com/rakyll/hey@latest; bash"
Fire
Send traffic in 30 seconds spurts maintaining 5 in-flight requests.
hey -z 30s -c 100 -m POST -host ${SERVICE_HOSTNAME} -D $INPUT_PATH http://${INGRESS_HOST}:${INGRESS_PORT}/v1/models/$MODEL_NAME:predictReference
For more information, please refer to the KPA documentation.
Knative
Subsections of Knative
Eventing
Subsections of Eventing
Broker
Knative Broker 是 Knative Eventing 系统的核心组件,它的主要作用是充当事件路由和分发的中枢,在事件生产者(事件源)和事件消费者(服务)之间提供解耦、可靠的事件传输。
以下是 Knative Broker 的关键作用详解:
事件接收中心:
Broker 是事件流汇聚的入口点。各种事件源(如 Kafka 主题、HTTP 源、Cloud Pub/Sub、GitHub Webhooks、定时器、自定义源等)将事件发送到 Broker。
事件生产者只需知道 Broker 的地址,无需关心最终有哪些消费者或消费者在哪里。
事件存储与缓冲:
Broker 通常基于持久化的消息系统实现(如 Apache Kafka, Google Cloud Pub/Sub, RabbitMQ, NATS Streaming 或内存实现 InMemoryChannel)。这提供了:
持久化: 确保事件在消费者处理前不会丢失(取决于底层通道实现)。
缓冲: 当消费者暂时不可用或处理速度跟不上事件产生速度时,Broker 可以缓冲事件,避免事件丢失或压垮生产者/消费者。
重试: 如果消费者处理事件失败,Broker 可以重新投递事件(通常需要结合 Trigger 和 Subscription 的重试策略)。
解耦事件源和事件消费者:
这是 Broker 最重要的作用之一。事件源只负责将事件发送到 Broker,完全不知道有哪些服务会消费这些事件。
事件消费者通过创建 Trigger 向 Broker 声明它对哪些事件感兴趣。消费者只需知道 Broker 的存在,无需知道事件是从哪个具体源产生的。
这种解耦极大提高了系统的灵活性和可维护性:
独立演进: 可以独立添加、移除或修改事件源或消费者,只要它们遵循 Broker 的契约。
动态路由: 基于事件属性(如 type, source)动态路由事件到不同的消费者,无需修改生产者或消费者代码。
多播: 同一个事件可以被多个不同的消费者同时消费(一个事件 -> Broker -> 多个匹配的 Trigger -> 多个服务)。
事件过滤与路由(通过 Trigger):
Broker 本身不直接处理复杂的过滤逻辑。过滤和路由是由 Trigger 资源实现的。
Trigger 资源绑定到特定的 Broker。
Trigger 定义了:
订阅者: 目标服务(Knative Service、Kubernetes Service、Channel 等)的地址。
过滤器: 基于事件属性(主要是 type 和 source,以及其他可扩展属性)的条件表达式。只有满足条件的事件才会被 Broker 通过该 Trigger 路由到对应的订阅者。
Broker 接收事件后,会检查所有绑定到它的 Trigger 的过滤器。对于每一个匹配的 Trigger,Broker 都会将事件发送到该 Trigger 指定的订阅者。
提供标准事件接口:
Broker 遵循 CloudEvents 规范,它接收和传递的事件都是 CloudEvents 格式的。这为不同来源的事件和不同消费者的处理提供了统一的格式标准,简化了集成。
多租户和命名空间隔离:
Broker 通常部署在 Kubernetes 的特定命名空间中。一个命名空间内可以创建多个 Broker。
这允许在同一个集群内为不同的团队、应用或环境(如 dev, staging)隔离事件流。每个团队/应用可以管理自己命名空间内的 Broker 和 Trigger。
总结比喻:
可以把 Knative Broker 想象成一个高度智能的邮局分拣中心:
接收信件(事件): 来自世界各地(不同事件源)的信件(事件)都寄到这个分拣中心(Broker)。
存储信件: 分拣中心有仓库(持久化/缓冲)临时存放信件,确保信件安全不丢失。
分拣规则(Trigger): 分拣中心里有很多分拣员(Trigger)。每个分拣员负责特定类型或来自特定地区的信件(基于事件属性过滤)。
投递信件: 分拣员(Trigger)找到符合自己负责规则的信件(事件),就把它们投递到正确的收件人(订阅者服务)家门口。
解耦: 寄信人(事件源)只需要知道分拣中心(Broker)的地址,完全不需要知道收信人(消费者)是谁、在哪里。收信人(消费者)只需要告诉分拣中心里负责自己这类信件的分拣员(创建 Trigger)自己的地址,不需要关心信是谁寄来的。分拣中心(Broker)和分拣员(Trigger)负责中间的复杂路由工作。
Broker 带来的核心价值:
松耦合: 彻底解耦事件生产者和消费者。
灵活性: 动态添加/移除消费者,动态改变路由规则(通过修改/创建/删除 Trigger)。
可靠性: 提供事件持久化和重试机制(依赖底层实现)。
可伸缩性: Broker 和消费者都可以独立伸缩。
标准化: 基于 CloudEvents。
简化开发: 开发者专注于业务逻辑(生产事件或消费事件),无需自己搭建复杂的事件总线基础设施。
Subsections of Broker
Install Kafka Broker
About
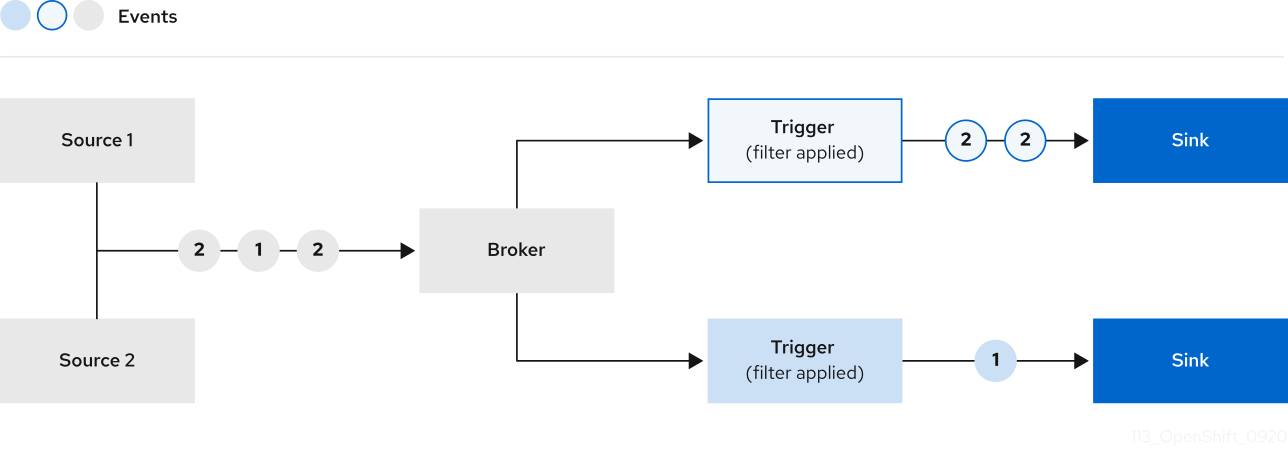
- Source, curl, kafkaSource,
- Broker
- Trigger
- Sink: ksvc, isvc
Install a Channel (messaging) layer
kubectl apply -f https://github.com/knative-extensions/eventing-kafka-broker/releases/download/knative-v1.18.0/eventing-kafka-controller.yamlkubectl apply -f https://github.com/knative-extensions/eventing-kafka-broker/releases/download/knative-v1.18.0/eventing-kafka-channel.yamlInstall a Broker layer
kubectl apply -f https://github.com/knative-extensions/eventing-kafka-broker/releases/download/knative-v1.18.0/eventing-kafka-broker.yamlReference
for more information, you can check 🔗https://knative.dev/docs/eventing/brokers/broker-types/kafka-broker/
[Optional] Install Eventing extensions
- kafka sink
kubectl apply -f https://github.com/knative-extensions/eventing-kafka-broker/releases/download/knative-v1.18.0/eventing-kafka-sink.yamlReference
for more information, you can check 🔗https://knative.dev/docs/eventing/sinks/kafka-sink/
- kafka source
kubectl apply -f https://github.com/knative-extensions/eventing-kafka-broker/releases/download/knative-v1.18.0/eventing-kafka-source.yamlReference
for more information, you can check 🔗https://knative.dev/docs/eventing/sources/kafka-source/
Display Broker Message
Flow
flowchart LR
    A[Curl] -->|HTTP| B{Broker}
    B -->|Subscribe| D[Trigger1]
    B -->|Subscribe| E[Trigger2]
    B -->|Subscribe| F[Trigger3]
    E --> G[Display Service]
Setps
1. Create Broker Setting
kubectl apply -f - <<EOF
apiVersion: v1
kind: ConfigMap
metadata:
  name: kafka-broker-config
  namespace: knative-eventing
data:
  default.topic.partitions: "10"
  default.topic.replication.factor: "1"
  bootstrap.servers: "kafka.database.svc.cluster.local:9092" #kafka service address
  default.topic.config.retention.ms: "3600"
EOF
2. Create Broker
kubectl apply -f - <<EOF
apiVersion: eventing.knative.dev/v1
kind: Broker
metadata:
  annotations:
    eventing.knative.dev/broker.class: Kafka
  name: first-broker
  namespace: kserve-test
spec:
  config:
    apiVersion: v1
    kind: ConfigMap
    name: kafka-broker-config
    namespace: knative-eventing
EOF
deadletterSink:
3. Create Trigger
kubectl apply -f - <<EOF
apiVersion: eventing.knative.dev/v1
kind: Trigger
metadata:
  name: display-service-trigger
  namespace: kserve-test
spec:
  broker: first-broker
  subscriber:
    ref:
      apiVersion: serving.knative.dev/v1
      kind: Service
      name: event-display
EOF
4. Create Sink Service (Display Message)
kubectl apply -f - <<EOF
apiVersion: serving.knative.dev/v1
kind: Service
metadata:
  name: event-display
  namespace: kserve-test
spec:
  template:
    spec:
      containers:
        - image: gcr.io/knative-releases/knative.dev/eventing/cmd/event_display
EOF
5. Test
kubectl run curl-test --image=curlimages/curl -it --rm --restart=Never -- \
  -v "http://kafka-broker-ingress.knative-eventing.svc.cluster.local/kserve-test/first-broker" \
  -X POST \
  -H "Ce-Id: $(date +%s)" \
  -H "Ce-Specversion: 1.0" \
  -H "Ce-Type: test.type" \
  -H "Ce-Source: curl-test" \
  -H "Content-Type: application/json" \
  -d '{"test": "Broker is working"}'
6. Check message
kubectl -n kserve-test logs -f deploy/event-display-00001-deployment Kafka Broker Invoke ISVC
1. Prepare RBAC
- create cluster role to access CRD isvc
kubectl apply -f - <<EOF
apiVersion: rbac.authorization.k8s.io/v1
kind: ClusterRole
metadata:
  name: kserve-access-for-knative
rules:
- apiGroups: ["serving.kserve.io"]
  resources: ["inferenceservices", "inferenceservices/status"]
  verbs: ["get", "list", "watch"]
EOF- create rolebinding and grant privileges
kubectl apply -f - <<EOF
apiVersion: rbac.authorization.k8s.io/v1
kind: ClusterRoleBinding
metadata:
  name: kafka-controller-kserve-access
roleRef:
  apiGroup: rbac.authorization.k8s.io
  kind: ClusterRole
  name: kserve-access-for-knative
subjects:
- kind: ServiceAccount
  name: kafka-controller
  namespace: knative-eventing
EOF
2. Create Broker Setting
kubectl apply -f - <<EOF
apiVersion: v1
kind: ConfigMap
metadata:
  name: kafka-broker-config
  namespace: knative-eventing
data:
  default.topic.partitions: "10"
  default.topic.replication.factor: "1"
  bootstrap.servers: "kafka.database.svc.cluster.local:9092" #kafka service address
  default.topic.config.retention.ms: "3600"
EOF
3. Create Broker
kubectl apply -f - <<EOF
apiVersion: eventing.knative.dev/v1
kind: Broker
metadata:
  annotations:
    eventing.knative.dev/broker.class: Kafka
  name: isvc-broker
  namespace: kserve-test
spec:
  config:
    apiVersion: v1
    kind: ConfigMap
    name: kafka-broker-config
    namespace: knative-eventing
  delivery:
    deadLetterSink:
      ref:
        apiVersion: serving.knative.dev/v1
        kind: Service
        name: event-display
EOF
4. Create InferenceService
Reference
you can create isvc first-tourchserve service, by following 🔗link
5. Create Trigger
kubectl apply -f - << EOF
apiVersion: eventing.knative.dev/v1
kind: Trigger
metadata:
  name: kserve-trigger
  namespace: kserve-test
spec:
  broker: isvc-broker
  filter:
    attributes:
      type: prediction-request
  subscriber:
    uri: http://first-torchserve.kserve-test.svc.cluster.local/v1/models/mnist:predict
EOF
6. Test
Normally, we can invoke
first-tourchserveby executing
export MASTER_IP=192.168.100.112
export ISTIO_INGRESS_PORT=$(kubectl -n istio-system get service istio-ingressgateway -o jsonpath='{.spec.ports[?(@.name=="http2")].nodePort}')
export SERVICE_HOSTNAME=$(kubectl -n kserve-test get inferenceservice first-torchserve  -o jsonpath='{.status.url}' | cut -d "/" -f 3)
# http://first-torchserve.kserve-test.example.com
curl -v -H "Host: ${SERVICE_HOSTNAME}" -H "Content-Type: application/json" "http://${MASTER_IP}:${ISTIO_INGRESS_PORT}/v1/models/mnist:predict" -d @./mnist-input.json
Now, you can access model by executing
export KAFKA_BROKER_INGRESS_PORT=$(kubectl -n knative-eventing get service kafka-broker-ingress -o jsonpath='{.spec.ports[?(@.name=="http-container")].nodePort}')
curl -v "http://${MASTER_IP}:${KAFKA_BROKER_INGRESS_PORT}/kserve-test/isvc-broker" \
  -X POST \
  -H "Ce-Id: $(date +%s)" \
  -H "Ce-Specversion: 1.0" \
  -H "Ce-Type: prediction-request" \
  -H "Ce-Source: event-producer" \
  -H "Content-Type: application/json" \
-d @./mnist-input.json Plugin
Subsections of Plugin
Eventing Kafka Broker
Subsections of Eventing Kafka Broker
Prepare Dev Environment
-
update go -> 1.24
-
install
ko-> 1.8.0
go install github.com/google/ko@latest
# wget https://github.com/ko-build/ko/releases/download/v0.18.0/ko_0.18.0_Linux_x86_64.tar.gz
# tar -xzf ko_0.18.0_Linux_x86_64.tar.gz  -C /usr/local/bin/ko
# cp /usr/local/bin/ko/ko /root/bin- protoc
PB_REL="https://github.com/protocolbuffers/protobuf/releases"
curl -LO $PB_REL/download/v30.2/protoc-30.2-linux-x86_64.zip
# mkdir -p ${HOME}/bin/
mkdir -p /usr/local/bin/protoc
unzip protoc-30.2-linux-x86_64.zip -d /usr/local/bin/protoc
cp /usr/local/bin/protoc/bin/protoc /root/bin
# export PATH="$PATH:/root/bin"
rm -rf protoc-30.2-linux-x86_64.zip- protoc-gen-go -> 1.5.4
go install google.golang.org/protobuf/cmd/protoc-gen-go@latestexport GOPATH=/usr/local/go/bin- copy some code
mkdir -p ${GOPATH}/src/knative.dev
cd ${GOPATH}/src/knative.dev
git clone git@github.com:knative/eventing.git # clone eventing repo
git clone git@github.com:AaronYang0628/eventing-kafka-broker.git
cd eventing-kafka-broker
git remote add upstream https://github.com/knative-extensions/eventing-kafka-broker.git
git remote set-url --push upstream no_push
export KO_DOCKER_REPO=docker-registry.lab.zverse.space/data-and-computing/ay-devBuild Async Preidction Flow
Flow
flowchart LR
    A[User Curl] -->|HTTP| B{ISVC-Broker:Kafka}
    B -->|Subscribe| D[Trigger1]
    B -->|Subscribe| E[Kserve-Triiger]
    B -->|Subscribe| F[Trigger3]
    E --> G[Mnist Service]
    G --> |Kafka-Sink| B
Setps
1. Create Broker Setting
kubectl apply -f - <<EOF
apiVersion: v1
kind: ConfigMap
metadata:
  name: kafka-broker-config
  namespace: knative-eventing
data:
  default.topic.partitions: "10"
  default.topic.replication.factor: "1"
  bootstrap.servers: "kafka.database.svc.cluster.local:9092" #kafka service address
  default.topic.config.retention.ms: "3600"
EOF
2. Create Broker
kubectl apply -f - <<EOF
apiVersion: eventing.knative.dev/v1
kind: Broker
metadata:
  annotations:
    eventing.knative.dev/broker.class: Kafka
  name: isvc-broker
  namespace: kserve-test
spec:
  config:
    apiVersion: v1
    kind: ConfigMap
    name: kafka-broker-config
    namespace: knative-eventing
EOF
3. Create Trigger
kubectl apply -f - << EOF
apiVersion: eventing.knative.dev/v1
kind: Trigger
metadata:
  name: kserve-trigger
  namespace: kserve-test
spec:
  broker: isvc-broker
  filter:
    attributes:
      type: prediction-request-udf-attr # you can change this
  subscriber:
    uri: http://prediction-and-sink.kserve-test.svc.cluster.local/v1/models/mnist:predict
EOF
4. Create InferenceService
 1kubectl apply -f - <<EOF
 2apiVersion: serving.kserve.io/v1beta1
 3kind: InferenceService
 4metadata:
 5  name: prediction-and-sink
 6  namespace: kserve-test
 7spec:
 8  predictor:
 9    model:
10      modelFormat:
11        name: pytorch
12      storageUri: gs://kfserving-examples/models/torchserve/image_classifier/v1
13  transformer:
14    containers:
15      - image: docker-registry.lab.zverse.space/data-and-computing/ay-dev/msg-transformer:dev9
16        name: kserve-container
17        env:
18        - name: KAFKA_BOOTSTRAP_SERVERS
19          value: kafka.database.svc.cluster.local
20        - name: KAFKA_TOPIC
21          value: test-topic # result will be saved in this topic
22        - name: REQUEST_TRACE_KEY
23          value: test-trace-id # using this key to retrieve preidtion result
24        command:
25          - "python"
26          - "-m"
27          - "model"
28        args:
29          - --model_name
30          - mnist
31EOF[Optional] 5. Invoke InferenceService Directly
- preparation
wget -O ./mnist-input.json https://raw.githubusercontent.com/kserve/kserve/refs/heads/master/docs/samples/v1beta1/torchserve/v1/imgconv/input.json
SERVICE_NAME=prediction-and-sink
MODEL_NAME=mnist
INPUT_PATH=@./mnist-input.json
PLAIN_SERVICE_HOSTNAME=$(kubectl -n kserve-test get inferenceservice $SERVICE_NAME -o jsonpath='{.status.url}' | cut -d "/" -f 3)- fire!!
export INGRESS_HOST=192.168.100.112
export INGRESS_PORT=$(kubectl -n istio-system get service istio-ingressgateway -o jsonpath='{.spec.ports[?(@.name=="http2")].nodePort}')
curl -v -H "Host: ${PLAIN_SERVICE_HOSTNAME}" -H "Content-Type: application/json" -d $INPUT_PATH http://${INGRESS_HOST}:${INGRESS_PORT}/v1/models/$MODEL_NAME:predict6. Invoke Broker
- preparation
cat > image-with-trace-id.json << EOF
{
    "test-trace-id": "16ec3446-48d6-422e-9926-8224853e84a7",
    "instances": [
        {
            "data": "iVBORw0KGgoAAAANSUhEUgAAABwAAAAcCAAAAABXZoBIAAAAw0lEQVR4nGNgGFggVVj4/y8Q2GOR83n+58/fP0DwcSqmpNN7oOTJw6f+/H2pjUU2JCSEk0EWqN0cl828e/FIxvz9/9cCh1zS5z9/G9mwyzl/+PNnKQ45nyNAr9ThMHQ/UG4tDofuB4bQIhz6fIBenMWJQ+7Vn7+zeLCbKXv6z59NOPQVgsIcW4QA9YFi6wNQLrKwsBebW/68DJ388Nun5XFocrqvIFH59+XhBAxThTfeB0r+vP/QHbuDCgr2JmOXoSsAAKK7bU3vISS4AAAAAElFTkSuQmCC"
        }
    ]
}
EOF- fire!!
export MASTER_IP=192.168.100.112
export KAFKA_BROKER_INGRESS_PORT=$(kubectl -n knative-eventing get service kafka-broker-ingress -o jsonpath='{.spec.ports[?(@.name=="http-container")].nodePort}')

curl -v "http://${MASTER_IP}:${KAFKA_BROKER_INGRESS_PORT}/kserve-test/isvc-broker" \
  -X POST \
  -H "Ce-Id: $(date +%s)" \
  -H "Ce-Specversion: 1.0" \
  -H "Ce-Type: prediction-request-udf-attr" \
  -H "Ce-Source: event-producer" \
  -H "Content-Type: application/json" \
-d @./image-with-trace-id.json - check input data in kafka topic
knative-broker-kserve-test-isvc-broker
kubectl -n database exec -it deployment/kafka-client-tools -- bash -c \
'kafka-console-consumer.sh --bootstrap-server $BOOTSTRAP_SERVER --consumer.config $CLIENT_CONFIG_FILE --topic knative-broker-kserve-test-isvc-broker --from-beginning'- check response result in kafka topic
test-topic
kubectl -n database exec -it deployment/kafka-client-tools -- bash -c \
'kafka-console-consumer.sh --bootstrap-server $BOOTSTRAP_SERVER --consumer.config $CLIENT_CONFIG_FILE --topic test-topic --from-beginning' 1{
2 "specversion": "1.0",
3 "id": "822e3115-0185-4752-9967-f408dda72004",
4 "source": "data-and-computing/kafka-sink-transformer",
5 "type": "org.zhejianglab.zverse.data-and-computing.kafka-sink-transformer",
6 "time": "2025-07-02T08:57:04.133497+00:00",
7 "data":
8 {
9 "predictions": [2]
10 },
11 "request-host": "prediction-and-sink-transformer.kserve-test.svc.cluster.local",
12 "kserve-isvc-name": "prediction-and-sink",
13 "kserve-isvc-namespace": "kserve-test",
14 "test-trace-id": "16ec3446-48d6-422e-9926-8224853e84a7"
15}test-trace-id to grab the result.